Formulas are the lifeblood of Excel; they are essential to achieve even basic tasks. On the other hand, Power Query has been designed so that most transformations are accessed through the intuitive user interface. But Power Query formulas exist; it has a formula language with over 700 functions.
Each time we make a transformation with the user interface, Power Query formulas are used in the background. We can see them in the Formula Bar and Advanced Editor.
Table of Contents
- Do we need to use Power Query formulas?
- Where can we write Power Query formulas?
- Writing a Power Query formula in a Custom Column
- Simple formula operations
- Formula Example #1
- Formula Example #2
- Row Context
- Data types
- Formula Example #3
- Finding Functions
- Power Query function library
- #Shared to show Power Query functions
- IntelliSense
- Looking at existing transformation steps
- Essential formula tips
- Practice, practice, practice
Do we need to use Power Query formulas?
When I started using Power Query, I used lots of formulas because that is what I did in Excel. However, once I understood the interface, it became clear that many transformations can be achieved without manually writing any formulas. Therefore, I recommend you look for transformations available from the standard menus before delving into specific functions.
Formulas are essential to tackle some of the more complicated situations we might encounter. So, you can’t avoid them entirely.
One confusion is that the functions are not the same as Excel’s; they are written using M code. At the start, it’s frustrating that we can’t transfer our existing Excel knowledge into Power Query. But once we understand how the formulas are constructed, it is easy to find what you need.
Where can we write Power Query formulas?
Every transformation we undertake in Power Query is a formula. When we promote headers, it creates a formula:
= Table.PromoteHeaders(#"Changed Type", [PromoteAllScalars=true])Or if we split a column by a comma, Power Query writes a formula
= Table.SplitColumn(#"Changed Type", "Text", Splitter.SplitTextByDelimiter(",", QuoteStyle.Csv), {"Text.1", "Text.2"})We can write these formulas directly into the Formula Bar or the Advanced Editor. Though, if you are getting started, these can be overwhelming. The most accessible place to start is the Custom Column dialog box.
When we use a Custom Column, it is writing a formula inside the Table.AddColumn function. Even if we just enter 1+1 as a formula. Power Query wraps this in the Table.AddColumn transformation.
= Table.AddColumn(Source, "New Column Name", each 1+1)As this post is part of an introductory series into Power Query, we will focus on writing formulas inside a custom column. But be aware that much more is possible if you want to go further.
Writing a Power Query formula in a Custom Column
The easiest place to write a Power Query formula is in a custom column.
Create a custom column by clicking Add Column > Custom Column.

The Custom Column dialog box opens.
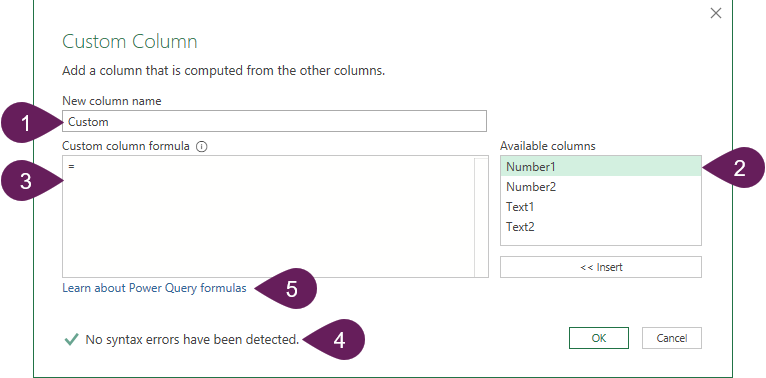
The critical areas of this dialog box are:
- New column name
The text entered here is used as the column name in the table. - Available columns
This contains a list of columns in the query which exist in the previous step. Selecting a column and clicking the Insert button (or double-clicking the name) inserts the column name into the formula. This is useful as it reduces typos that stop our code from working as intended. - Custom column formula
This is where we enter the text which forms the formula. - Error check
The error check helps to let us know if the syntax is correct. For example, it will check if matching opening and closing brackets exist. However, it will not tell us if the formula gives the right result, only that the syntax is correct. Actually, it’s challenging to interpret what the errors mean. To learn more about the types of errors we might encounter, check out this post: Power Query – Common Errors & How to Fix Them. - Learn about Power Query formulas
This link takes us to Microsoft’s Power Query formulas web pages. If you get stuck, this is the place to go.
Simple formula operations
Simple formula operations are similar to Excel.
We do not need to enter the equals symbol ( = ) at the start; it will automatically be in the formula box.
Numeric operators
=[Column 1] + [Column 2] //Addition
=[Column 1] - [Column 2] //Subtraction
=[Column 1] * [Column 2] //Multiplication
=[Column 1] / [Column 2] //Division
=[Column 1] & [Column 2] //Concatenate
Brackets / Parentheses
Parentheses or Brackets (depending on what you call them) work the same as in Excel.
=([Column 1] + [Column 2]) / [Column 3]Logical operators
=[Column 1] = [Column 2] //Equal
=[Column 1] > [Column 2] //Greater Than
=[Column 1] >= [Column 2] //Greater Than or Equal To
=[Column 1] < [Column 2] //Less Than
=[Column 1] <= [Column 2] //Less Than or Equal To
=[Column 1] <> [Column 2] //Does Not Equal
The formulas above will give a True or False result.
Power
The Power operator ( ^ ) we use in Excel does not work in Power Query formulas. Instead, we have to use the Number.Power formula.
Formula Example #1
The screenshot below shows some basic formula operations in action.
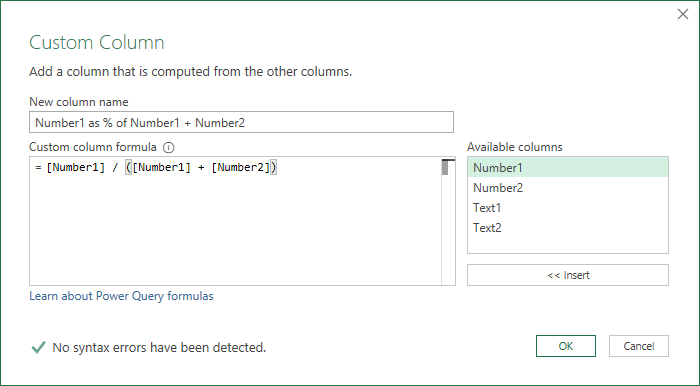
You can see the column names being used; Number1 is divided by the total of Number1 + Number2.
Formula Example #2
The screenshot below shows that formulas can be constructed from static values.
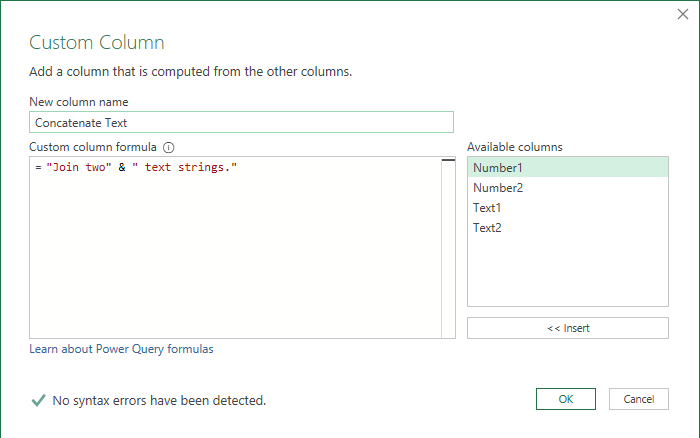
A formula can include a mix of columns and static values.
Row Context
Unless you do some advanced formula magic, the formulas in Power Query have what is known as Row Context. This means the formula is applied to each row one by one.
Data types
Power Query formulas are picky about data types.
If the column used within the function is not the correct data type, the formula will calculate an error. So, if the data type does not match the formula requirements, we need to find a way to convert it. We can either add a step before creating the custom column or use a converting formula.
Some of the most common converting formulas are:
- Text.From – To convert anything to text
- Date.ToText – To convert a date to text
- Date.From – To convert a number into a date
- Date.FromText – To convert text into a date
- Number.ToText – To convert a number to text
- Number.From – To convert any inputs to a number
- Number.FromText – To convert text into a number
- Logical.From – To convert numbers into their True or False values
- Logical.FromText – To convert text strings of “True” or “False” into boolean values of True or False
- Logical.ToText – To convert Boolean True or False values into “True” or “False” text strings
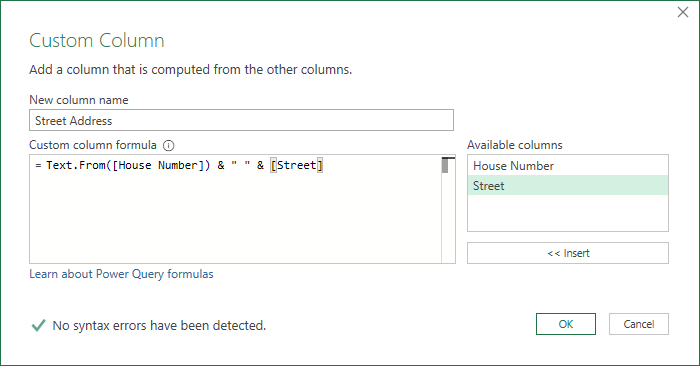
Formula Example #3
The following table contains numbers and text. As the House Number is numeric, we need to convert it to text before combining it with Street Name into a single address string.

The formula text would be:
=Text.From([House Number]) & " " & [Street]The bold text highlights the use of the Text.From function to convert the House Number into a Text data type before combining with the Street Name column.
Finding Functions
As noted earlier, we cannot use Excel formulas inside Power Query.
Power Query function library
The easiest way to find the available formulas is to click the Learn about Power Query formulas link.
The functions are grouped by what they do. We will look at the Number group if we want a formula that uses or returns numbers. Most of the formulas in this section start with the word Number. Here are some examples:
- Number.Abs – Returns the absolute value of a number
- Number.FromText – Returns a number from a text string
- Number.IsOdd – Returns true if the value is odd, or false if it is even.
Specific number formulas might start with other words too, such as:
- Decimal.From – Returns a decimal from a given value
- Percentage.From – Returns a percentage from a given value
Generally, formulas that output a date start with Date in the formula name (such as Date.Year), and formulas that output text start with Text in the formula name (such as Text.Start).
Think about Excel functions; how did you learn them? You probably had someone show you, or you had to do some guesswork with a lot of trial and error. Because of how Power Query functions are named, it is much easier to find the function we want.
#Shared to show Power Query functions
Another option to discover the Power Query function is entering #shared in the formula bar.
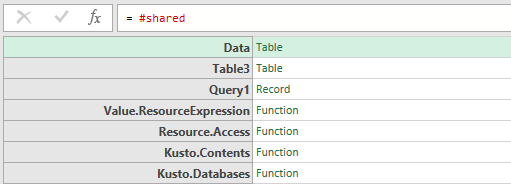
This provides us with a complete list of functions. We can click on any function name to find out about it.
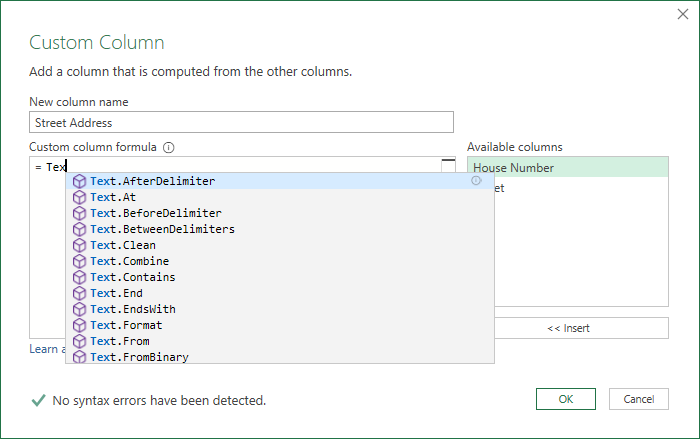
IntelliSense
Power Query has IntelliSense built in. This means we can start typing the name of a function, and a list of options appears. For example, the screenshot below shows the list of functions just by typing “Tex” into the formula box.
Note: At the time of writing, an annoying bug makes IntelliSense repeat words when formulas are entered. Check out this video for further details on how to avoid it: https://www.youtube.com/watch?v=p3hhUZwQGVE
IntelliSense helps us to discover functions and makes them easier to use. After you’ve got the name of the function, type the opening bracket, and Power Query shows the arguments and data types required. It took a while for Power Query to get this functionality, but now that it’s here, I couldn’t live without it.
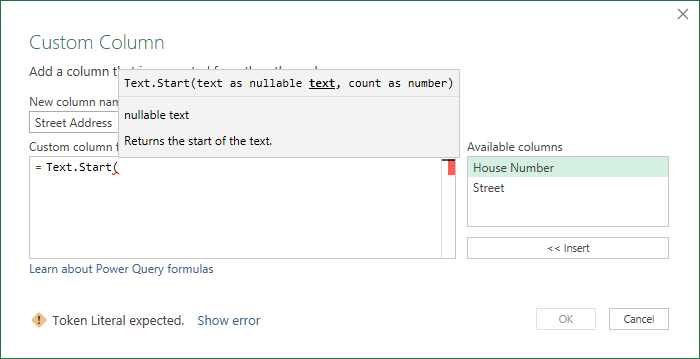
In the screenshot above, we can see that Text.Start has text as the first argument, which must be a text data type.
Looking at existing transformation steps
The transformations we use through the standard interface use functions. Therefore, we can use these as a guide to help us write our own formulas.
Let’s say we wanted to extract the first 4 letters from a text string. We could use Add Column > Extract > First Characters from the Ribbon, then insert 4 into the Insert First Character dialog box. Then, we could take a look at the M code in the Formula Bar for that applied step; it would show the following:
= Table.AddColumn(#"Changed Type", "First Characters", each Text.Start([Text Column], 4), type text)The bold section is the function Text.Start. This function extracts the first characters from a text string (it is similar to Excel’s LEFT function).
This illustrates that any time you’re stuck, looking at the M code for similar transformations may guide you to the type of function you need.
Essential formula tips
The differences between M code and Excel Functions can trip us up. Some of the key differences are:
M code is case sensitive
In Excel, we can write functions in upper or lower case; Excel understands what we want and converts functions to upper case for us. But Power Query is case sensitive; Text.Start is the name of a function, but text.start is not. Power Query may make some automatic text conversions for us to avoid some errors, but do not rely on it.
M starts counting at 0
Text.PositionOf is a function that finds the position of a string within another string. If we use the following M code as an example:
=Text.PositionOf("Excel Off The Grid","Excel")This is similar to Excel’s FIND function with the arguments in the opposite order.
=FIND("Excel","Excel Off The Grid")The Excel function returns a value of 1, while the Power Query function returns a value of 0. This is because Power Query starts counting from 0. It may seem odd to most Excel users, but it is common in programming languages.
Practice, practice, practice
In this post, we’ve covered the basics of Power Query formulas. I guarantee that you will forget everything you’ve read unless you practice this over the next few weeks or months. You will likely need to refer to the M function library to find what you need at various times. There is no shame in that… actually, that’s the whole point of it being there.
That’s enough talk from me; it’s time you went and tried some of these out for yourself.
Read more posts in this series
- Introduction to Power Query
- Get data into Power Query – 5 common data sources
- DataRefresh Power Query in Excel: 4 ways & advanced options
- Use the Power Query editor to update queries
- Get to know Power Query Close & Load options
- Power Query Parameters: 3 methods
- Common Power Query transformations (50+ powerful transformations explained)
- Power Query Append: Quickly combine many queries into 1
- Get data from folder in Power Query: combine files quickly
- List files in a folder & subfolders with Power Query
- How to get data from the Current Workbook with Power Query
- How to unpivot in Excel using Power Query (3 ways)
- Power Query: Lookup value in another table with merge
- How to change source data location in Power Query (7 ways)
- Power Query formulas (how to use them and pitfalls to avoid)
- Power Query If statement: nested ifs & multiple conditions
- How to use Power Query Group By to summarize data
- How to use Power Query Custom Functions
- Power Query – Common Errors & How to Fix Them
- Power Query – Tips and Tricks
Discover how you can automate your work with our Excel courses and tools.
The Excel Academy

Make working late a thing of the past.
The Excel Academy is Excel training for professionals who want to save time.