In this post, we explore the topic of Power Query custom functions; What are they? When should we use them? And how to create them? At the time of writing, over 700 standard M functions are already available in Power Query. So why do we need custom functions at all?
Custom functions use the existing M function library and combine them to achieve a specific result. They do not create any new transformations but are a combination of existing functions. We use them where we need to apply the same transformations in many queries or multiple rows.
I thought for quite a long time about whether to include custom functions in this Power Query intro series as they can be pretty tricky. But I decided that they were too valuable to exclude.
This post involves a bit of coding and changing the automatically generated M code, so follow along carefully.
Table of Contents
Download the example file: Join the free Insiders Program and gain access to the example file used for this post.
File name: 0117 Power Query Custom Functions.xlsx
What are custom functions?
Functions are processes or procedures which consistently perform a task. For example, Excel’s SUM function will consistently add up values, or VLOOKUP will consistently return an equivalent matching value from a list.
However, just because functions in Excel normally calculate numeric and text results, this doesn’t mean this has to be the case. Actually, this is quite a limiting belief. From a Power Query perspective, it is better to think of functions as any routine task that can be applied over and over again.
We’re going to tackle this area by working through two examples:
- An easy custom function to demonstrate the syntax and format
- A transformation-based custom function to demonstrate a real-life use case
Easy Power Query custom function example
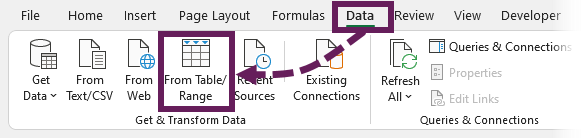
The example file contains just one Table. To load the data into Power Query, select any cell in that Table and click Data > From Table/Range from the Ribbon.
Give the query a helpful name – I’ve called it Data, and this is how we will refer to this query later in the post.
In this first example, we create a simple custom function. Its purpose is to illustrate the process so that it won’t be an overwhelming learning curve when we get into the following example.
Create a blank query
Create a blank query by clicking Home > New Source > Other Sources > Blank Query
Give the query a useful name; for illustration purposes, I’ve called it fxMyFunction (don’t use that name in the real world, select something more descriptive, but it will work for our example).
Write the M code
Open the Advanced Editor for the blank query by clicking View > Advanced Editor (or Home > Advanced Editor).
The Advanced Editor window looks like this:
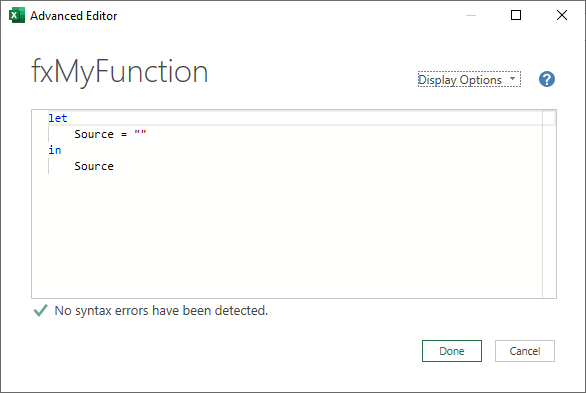
Even though it is a Blank Query, we are still provided with some initial code.
The let and in statements are key elements in M code; it tells Power Query where the transformations start and end.
Our first example aims to create a custom function that multiplies a value by 10. For this, we need a single input, which we will call initialValue.
Enter the following text into the Advanced Editor. REMEMBER: M code is case-sensitive, so type carefully 😁
(initialValue) =>
let
    nameOfStep = initialValue * 10
in
    nameOfStep
We will deconstruct this code shortly, but for now, click Done to close the Advanced Editor dialog box.
Invoke the function
In the Power Query window, we should see the following:

This is where we can test the function. Enter a number into the initialValue box (I’ve gone with 10) and click Invoke.
If we have done everything correctly, it should calculate the value and display it back to us.
By invoking the function in this way, Power Query creates a query called Invoke Function. We don’t need this; it can be deleted.
Use the custom function as a new column
In the queries pane, we have the query we created at the start (which we called Data) and the function we created (called fxMyFunction).
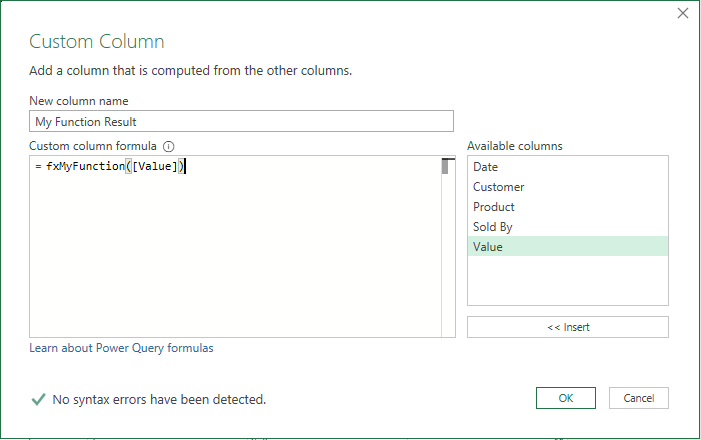
Let’s use the custom function within our Data query. Open up the Data query and create a Custom Column by clicking Add Column > Custom Column from the Ribbon.
The code to use in the Custom Column window is:
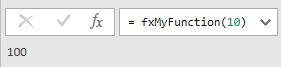
=fxMyFunction([Value])Note: The word [Value] in the function is the name of the column to be used as the argument.
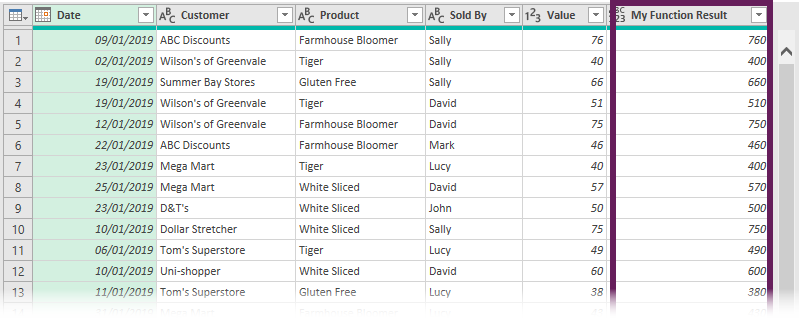
Using a custom function is just like using a standard Power Query function.
Click OK to commit the function. A new column is added to the query with the result of the custom function; each result is the Value column multiplied by 10.
Understanding the syntax
Let’s deconstruct the code we created earlier to understand what it does.
The first line declares the arguments (or inputs) to be used in the function. In our example, it only has one input called initialValue.
(initialValue) =>The second line identifies the start of the transformation steps; there is no need to change anything on this line.
letNext, we created a step called nameOfStep. There are rules about naming steps, especially regarding using spaces. However, rather than getting into that now, it’s easier to always exclude spaces when creating steps manually.
nameOfStep takes the initialValue (the argument declared in the first line) and multiplies it by 10.
nameOfStep = initialValue * 10Finally, we return the result of the function. in denotes the end of the transformations. After the in statement, we provide the step name to be returned by the function. In our case, we only have one step so we will return nameOfStep.
in
    nameOfStep
Multiple arguments and types
When using standard Power Query functions, you will notice they can have multiple arguments and require specific data types. We can do the same in our own custom functions. This is handled in the argument declaration at the start of the query.
Declaring the input type
To declare a text data type, we change the code as follows:
(myText as text) =>In the code above, myText accepts only text input. To only permit a table as the argument, we would use the following:
(myTable as table) =>TIP: As you know, there are lots of data types. If you’re unsure of the code for a data type, use another query, change the data type through the standard user interface, then review the code created to identify the code of the data type.
Declaring the output type
Power Query also has a data type for the output of the function; this is stated outside the brackets.
(myText as text) as table =>The example above shows the function takes a text value as an argument, and the result returned is a table data type.
Declaring multiple arguments
To declare multiple arguments for the function, we list them inside the brackets.
(myText as text, myTable as table) as number =>The declaration above has:
- Two arguments called:
- myText – with a text data type
- myTable – with a table data type
- Output has been declared as a number data type
Power Query custom functions containing transformations
Believe it or not, we now have everything we need. All it takes is a small amount of syntax and the right transformation steps.
Remember, the goal of a custom function is to repeat the same steps in multiple scenarios. The easiest way to build custom functions is to:
- Apply the transformation steps to calculate a single result
- Edit the transformations to insert parameters where the code will differ each time it runs
When you become more advanced with Power Query, you can write custom functions from scratch without recording transformations.
Example
For this example, we will calculate the total purchases for a customer.
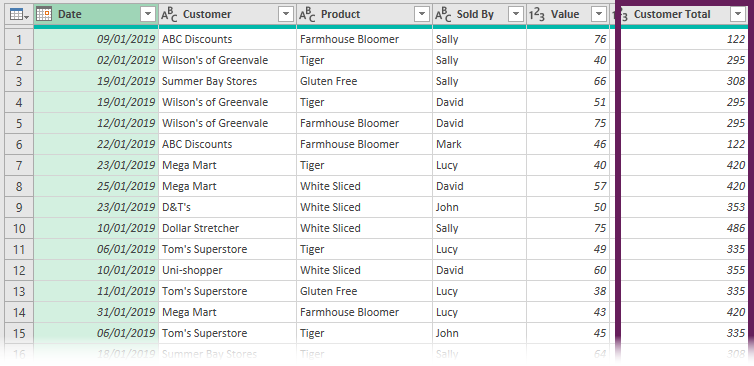
The screenshot below contains the final result. ABC has two transactions, the first being $46 and the second being $76, but in both display $122 in the Customer Total column.
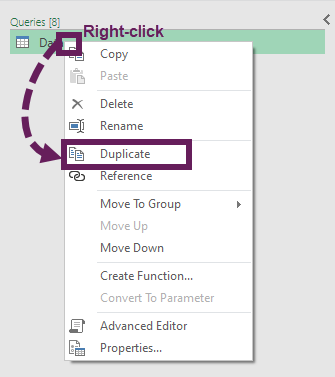
Duplicate the query
Duplicate the Data query we imported at the start. Right-click on the query in the queries list and click Duplicate in the menu.
Rename the query
As we saw above, the name we give to the function query is the function’s name. I’ve given the query the name fxFilterTotal. Placing fx at the start is common practice for custom functions; it helps visually identify it as a function (another common prefix is fn).
Transformations
Let’s start making the transformations to calculate the result for one customer.
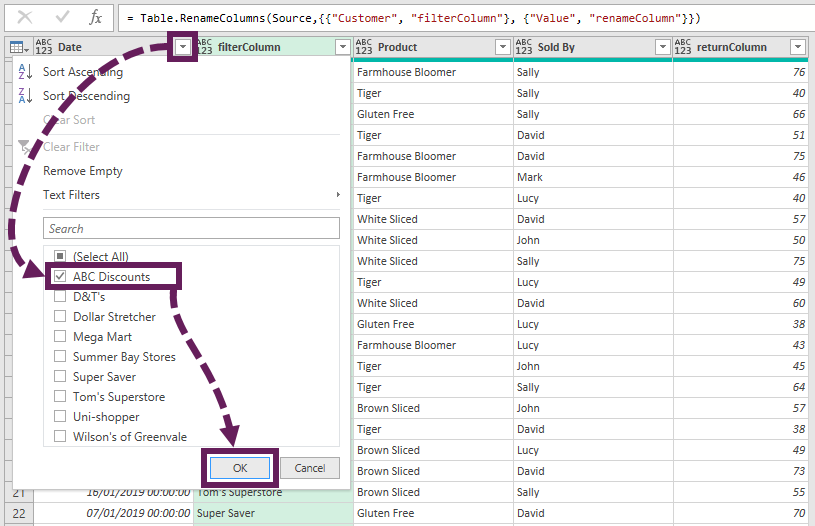
Start by renaming the columns we will be working with.
Rename the columns as follows:
- Customer change to filterColumn
- Value change to returnColumn
This is a useful step as it gives us control of column names no matter the scenario.
Next, filter on the filterColumn to select a single customer,
For the final transformation, select the returnColumn and click Transform > Statistics > Sum from the Ribbon.
This will calculate the total value for the selected customer.

There are other ways to achieve this calculation, but let’s keep it simple.
Change the query into a function
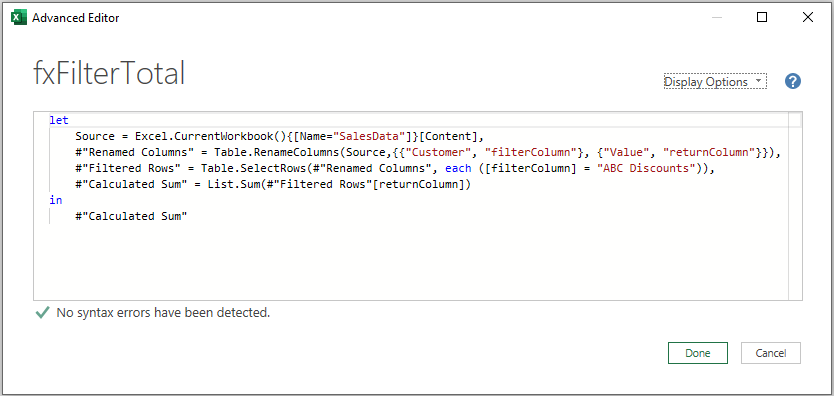
Open the advanced editor; the code will be as follows:
Here comes the tricky part… making the correct changes to the M code. Eeek!!!
First, we must declare the arguments in the first line of the code. We need four arguments:
- The table to use
- The name of the column to filter
- The value to filter by
- The name of the column to return the result from.
Therefore, the declaration statement at the top of the query is:
(tableName as table, filterColumn as text, filterText as text, returnColumn as text) =>Now let’s insert the arguments into our recorded code:
Change this:
Source = Excel.CurrentWorkbook(){[Name="SalesData"]}[Content],To this:
Source = tableName,In the following line, we change the name of the Customer and Value columns to the names of the parameters.
This:
#"Renamed Columns" = Table.RenameColumns(Source,{{"Customer", "filterColumn"}, {"Value", "returnColumn"}}),Becomes:
#"Renamed Columns" = Table.RenameColumns(Source,{{filterColumn, "filterColumn"}, {returnColumn, "returnColumn"}}),The final parameter to apply is the value to filter by.
This:
#"Filtered Rows" = Table.SelectRows(#"Renamed Columns", each ([filterColumn] = "ABC Discounts")),Becomes
#"Filtered Rows" = Table.SelectRows(#"Renamed Columns", each ([filterColumn] = filterText)),That’s all the changes. See, it wasn’t too bad, was it?
You will notice the function no longer contains any columns from the Data query we were working with. This means the function could be used in any query.
TIP: We can easily copy and paste queries between workbooks if we want to reuse them.
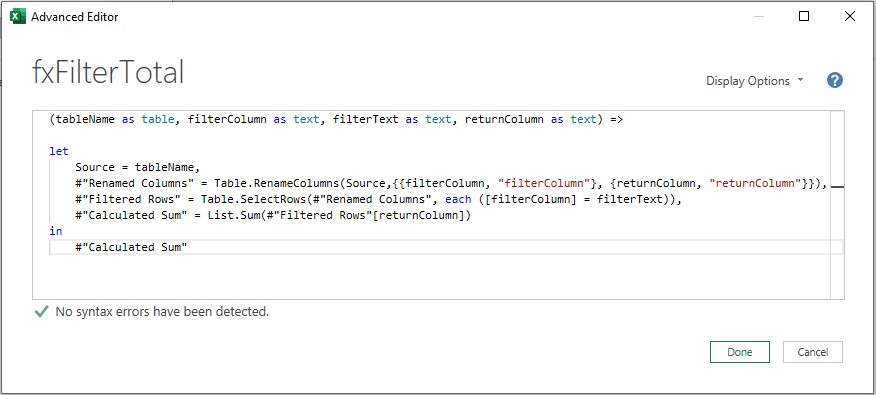
The completed M code should be like this:
Click Done to close the Advanced Editor window.
If you have any typos, here is the final text you can copy/paste.
(tableName as table, filterColumn as text, filterText as text, returnColumn as text) =>

let
    Source = tableName,
    #"Renamed Columns" = Table.RenameColumns(Source,{{filterColumn, "filterColumn"}, {returnColumn, "returnColumn"}}),
    #"Filtered Rows" = Table.SelectRows(#"Renamed Columns", each ([filterColumn] = filterText)),
    #"Calculated Sum" = List.Sum(#"Filtered Rows"[returnColumn])
in
    #"Calculated Sum"
Testing the function
Let’s invoke the function to see if it works.
- tableName: Data
- filterColumn: Customers
- filterText: ABC Discounts
- returnColumn: Value
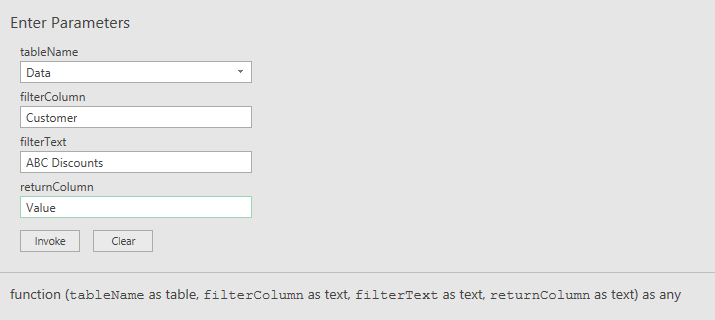
Click Invoke
It should return the correct value.

Amazing stuff!!!
Use the custom function
All that’s left now is for us to use the custom function. Open the Data query and add a Custom Column. Enter the following as the formula:
=fxFilterTotal(Source,"Customer",[Customer],"Value")- Source – is the name of the previous step
- “Customer” – the name of the column to filter
- [Customer] – the value to filter by (i.e., the in from the Customer column)
- “Value” – the column to calculate on
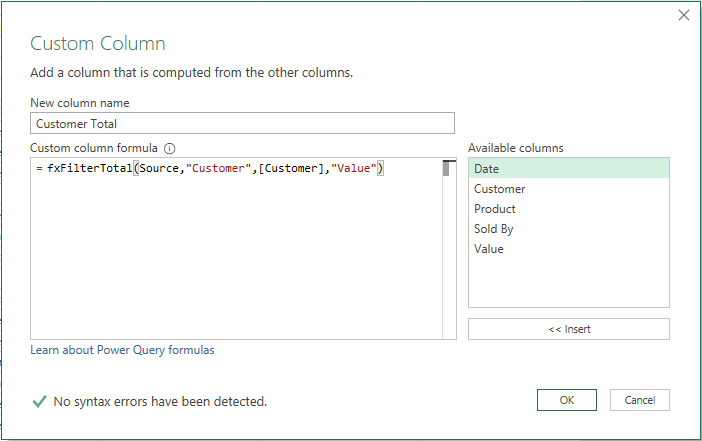
Click OK to accept the function.
The Preview window now looks like this, showing the total sales value for each customer. For example, look at ABC discounts in rows 1 and 6; they both show 122 in the Customer Total column.
Conclusion
In this post, we’ve seen how to create basic and transformation-based Power Query custom functions.
Manipulating the M code is complex and prone to errors, especially when we haven’t yet built up the experience. Therefore, like so many other features of Power Query, the best advice is to practice, practice, practice 🙂
Read more posts in this series
- Introduction to Power Query
- Get data into Power Query – 5 common data sources
- DataRefresh Power Query in Excel: 4 ways & advanced options
- Use the Power Query editor to update queries
- Get to know Power Query Close & Load options
- Power Query Parameters: 3 methods
- Common Power Query transformations (50+ powerful transformations explained)
- Power Query Append: Quickly combine many queries into 1
- Get data from folder in Power Query: combine files quickly
- List files in a folder & subfolders with Power Query
- How to get data from the Current Workbook with Power Query
- How to unpivot in Excel using Power Query (3 ways)
- Power Query: Lookup value in another table with merge
- How to change source data location in Power Query (7 ways)
- Power Query formulas (how to use them and pitfalls to avoid)
- Power Query If statement: nested ifs & multiple conditions
- How to use Power Query Group By to summarize data
- How to use Power Query Custom Functions
- Power Query – Common Errors & How to Fix Them
- Power Query – Tips and Tricks
Discover how you can automate your work with our Excel courses and tools.
The Excel Academy

Make working late a thing of the past.
The Excel Academy is Excel training for professionals who want to save time.
Hallo Mark,
I’m a german PQ-Fan. My ‘fxFilterTotal’-Function don’t rename columns. I used Record.Field and Table.Columns – there can I transfer string-parameter; here is my example:
let
Source = tableName,
// #”Renamed Columns” = Table.RenameColumns(Source,{{filterColumn, “filterColumn”}, {returnColumn, “returnColumn”}}),
#”Filtered Rows” = Table.SelectRows(tableName, each (Record.Field(_, filterColumn) = filterText)),
#”Calculated Sum” = List.Sum(Table.Column(#”Filtered Rows”, returnColumn))
in
#”Calculated Sum”
kind regards Luschi
That’s a nice approach; I like it. 👍