In this post, we are looking at the Power Query Close & Load options. This is part of a series designed to get you up and running with Power Query quickly. So far in the series, we have only loaded data into Excel via a Table. But there are lots of other options to explore.
While we won’t be using all the Close & Load settings in this series, it is important to be aware of them. Then, if and when the situation arises, you can review the options and pick the best choice for your scenario.
Table of Contents
Close & Load settings
Having imported data into Power Query and made our transformations, we must decide what to do with that query. We cannot leave the data in Power Query until later; it needs a load destination.
If the default options are applied, clicking Home > Close & Load will push the data straight into Excel as a Table on a new worksheet.
The advantage of selecting Close & Load To… is we get to see all the options, rather than just loading to the default location. Select Home > Close & Load (drop down) > Close & Load To… (1), or an alternative is File > Close & Load To… (2).

What is the advantage of selecting the “load to” option?
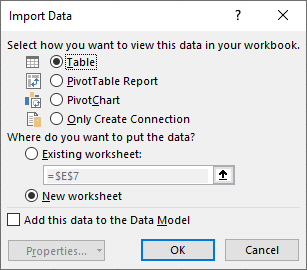
The Import Data window opens.
This window provides three key choices:
- How to view the data
- Where to put the data
- Whether to load the data into the Data Model.
Let’s look at each of these sections in turn.
How to view the query output
The top section in the Import Data dialog box determines what type of object the data is loaded into:
- Table – Load the data into Excel as a Table, which appears on the face of the worksheet.
- PivotTable Report – The columns of the transformed data are available to use as dimensions within a PivotTable.
- PivotChart – The columns of the transformed data are available to use within a PivotChart.
- Only Create Connection – The data is not visible on any worksheet as a Table, PivotTable, or PivotChart.
It may appear that only creating a connection is a bit pointless. After all, why import data if you can’t see it anywhere. However, even though the data is not available on the face of a worksheet, it can still be available to the Data Model and other queries.
Where to put the query output
The second group of options determine where the query output will be placed. This is only relevant if we selected Table, PivotTable, or PivotChart in the first group.
The options are either:
- New worksheet – the output will start at Cell A1)
- Existing Worksheet – where we can define the exact cell to place the Table, PivotTable or PivotChart).
If we are only creating a connection, these options are disabled.
Add to the Data Model
The Data Model is a modern way for Excel to handle data. A Data Model is essential if using Power Pivot or creating relationships.
But the Data Model isn’t just for using Power Pivot. The Pivot Cache is Excel’s usual way of storing data used with a PivotTable. We cannot see the cache; it is stored invisibly within the Excel file format. But, we can certainly see the impact; file sizes for workbooks containing Pivot Caches can become huge.
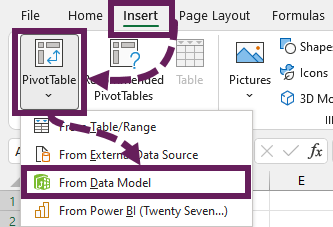
The file sizes are significantly smaller by loading the data into a Data Model rather than a Pivot Cache. Therefore, when creating a PivotTable, we simply need to select the Data Model as the source.
As an illustration, I loaded 1 million rows of data (containing only two columns) into the Data Model. I then used the data model to create a basic PivotTable; the file size was 794KB. By contrast, loading the same data directly into a PivotTable using the Pivot Cache and the file size was 3,488KB. Over 4 times the size! When working with more columns or more rows, the variance is even more pronounced.
Even if not wanting to use Power Pivot, or create relationships, the Data Model is still a better option.
Properties button
Clicking the Properties at the bottom of the Import Window opens the Query Properties window, which we have covered in another post: Power Query – data refresh.
Change Close & Load settings of an existing query
So, we’ve created a query and loaded it into its destination. What happens when we want to change the destination? You would think we head back into Power Query and select a new destination in the Import Data dialog box. However, if we go back into an existing query, the Close and Load To… option is greyed out (see screenshot below).
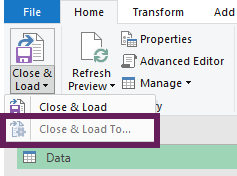
Don’t worry; there is another way.
Why is Close and Load Greyed Out?
Instead of changing the Close & Load options within Power Query, we can view them in the Queries and Connection pane. In Excel, click Data > Queries & Connections. From the list of queries, right-click on the query and select Load To…
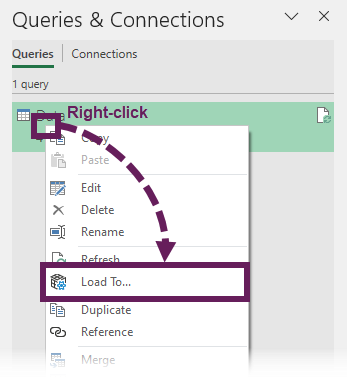
This opens the Data Import dialog box again. From there, we can change the load settings.
Take care when making changes here; anything based on the existing data may be affected.
Close and load applies to all new queries
Now it’s time for a small warning.
As our abilities with Power Query increase, we may create multiple queries in a single session. Once we are happy with them, we then close and load them into Excel.
The Import Data dialog box selections are applied to all new queries. If we want different queries to be loaded differently, it is better to load them all as connection only, then go back and change them as we wish. Otherwise, we can spend a lot of time deleting Tables, PivotTables, and worksheets we never wanted.
Changing the default Close & Load settings
It is a good idea to adjust the default Close & Load settings so that it works how we work.
The default settings can be changed in the Query Options section. To reach this from Excel click Data > Get Data (drop-down) > Query Options. Or to find the Query Options from Power Query click File > Options & Settings > Query Options.
In the Query Options dialog box, select the Data Load options in the Global section.
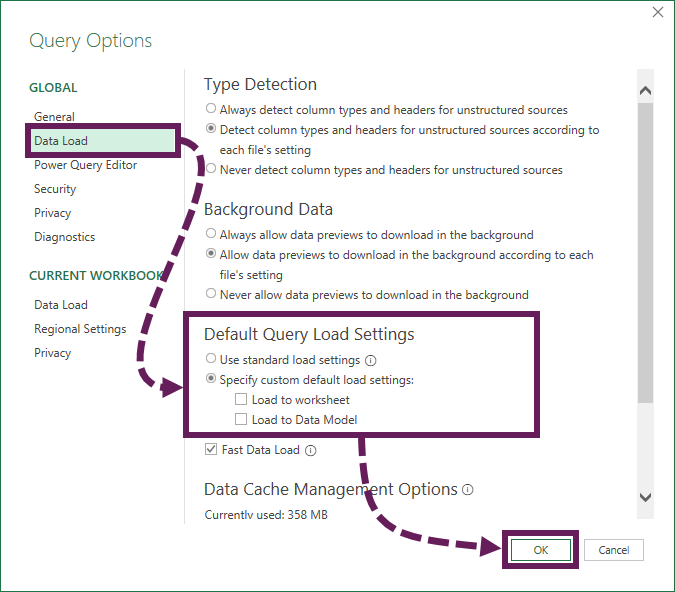
Here we can find the Default Query Load Settings. I recommend disabling both of the following options:
- Load to worksheet: Uncheck
- Load to Data Model: Uncheck
With both unchecked, this makes connection only the default. As noted above, since all new queries are treated the same way, connection only is the best choice for us.
Click OK to close the Query Options dialog box.
Discard & Close
Finally, the last Close & Load option is to discard any changes entirely. To do this, in Power Query, click File > Discard & Close.
Wrap-up
This post has looked at the options for loading data from Power Query into Excel. While you may not use them all straight away, it’s good to be aware of these settings for future reference.
The best time saver you can use is to set the defaults so that Power Query loads as a connection only as default.
Read more posts in this series
- Introduction to Power Query
- Get data into Power Query – 5 common data sources
- DataRefresh Power Query in Excel: 4 ways & advanced options
- Use the Power Query editor to update queries
- Get to know Power Query Close & Load options
- Power Query Parameters: 3 methods
- Common Power Query transformations (50+ powerful transformations explained)
- Power Query Append: Quickly combine many queries into 1
- Get data from folder in Power Query: combine files quickly
- List files in a folder & subfolders with Power Query
- How to get data from the Current Workbook with Power Query
- How to unpivot in Excel using Power Query (3 ways)
- Power Query: Lookup value in another table with merge
- How to change source data location in Power Query (7 ways)
- Power Query formulas (how to use them and pitfalls to avoid)
- Power Query If statement: nested ifs & multiple conditions
- How to use Power Query Group By to summarize data
- How to use Power Query Custom Functions
- Power Query – Common Errors & How to Fix Them
- Power Query – Tips and Tricks
Discover how you can automate your work with our Excel courses and tools.
The Excel Academy

Make working late a thing of the past.
The Excel Academy is Excel training for professionals who want to save time.
Thank you for this article. Great explanation of Only Create Connection and loading to the Data Model. Looking forward to the VBA info as I’ve never used them in Excel before…time to learn!
Yes, there is always something new to learn. 😀