Using named ranges in Excel is a core skill. Normally, we refer to a specific range. However, named ranges have a secret feature… the ability to use a relative named range.
They don’t sound too exciting, but they open up a new world of opportunity, which you may have never considered before.
Let’s start with a bit of terminology:
- Absolute named range: Refers to a specific range which does not change
- Dynamic named range: Refers to a range which expands/contracts to a specific size
- Relative named range: Refers to a range which is determined based on where it is used
If that is unclear, don’t worry, it will become clear as we work through the post.
So, let’s fire up Excel and take a look.
Creating named ranges
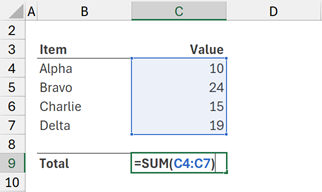
Let’s start by reminding ourselves how to create a standard named range.
From the Ribbon, click Formulas > Define Name.

The New Name dialog box appears.
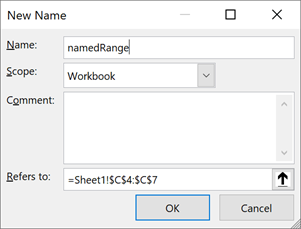
The important options are:
- Name: The name you wish to give to the named range
- Scope: This has two options, Workbook or Worksheet.
- A Workbook level name can be used in a formula by using only its name.
- A Worksheet level name must use the name of the sheet and name if it is used outside the sheet in which the name is held.
- Refers to: The range of cells (or calculation) we want to name.
Set these options, then click OK.
Using the screenshot above as an example, any time =namedRange is used, it is equivalent to entering =Sheet1!$C$4:$C$7.
So, that’s caught us up on standard named ranges. Now, let’s move on to relative named ranges.
Creating relative named ranges
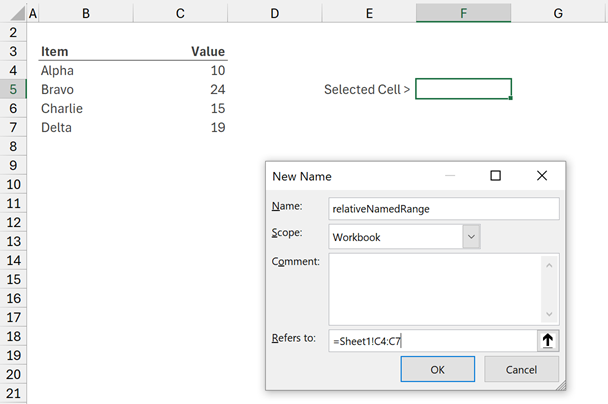
When entering a range into the Refers to box, Excel enters the $ signs (to freeze the cell references) automatically.
But (here is the trick) there is no requirement to use $ symbols.
For example, we can create a named range that refers to =Sheet1!C4:C7. Without the $ signs. It is now a relative named range. The range is set relative to the cell selected at the time of creation.
To prove how this works, select cell F5, then create a named range called relativeNamedRange with =Sheet1!C4:C7 – don’t include any $ signs.
Click OK to create the name.
Next, move down one cell to F6. Enter a formula that uses the relativeNamedRange.
As you enter the formula, notice how the range has also moved down one cell.
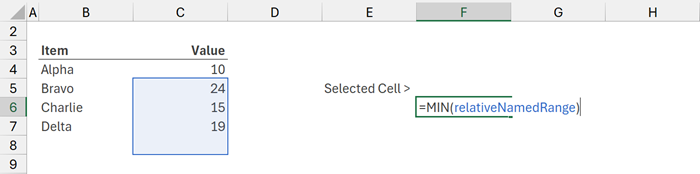
In the screenshot above, =MIN(relativeNamedRange) calculates the minimum value.
The minimum value within the range at the time of creating the name was 10 (the value in cell C4). But, the named range no longer contains 10; the cells have shifted down by one cell. Therefore, the result will be 15.
In case you’re wondering… Yes, we can use mixed references with the $ on the row or column references.
Examples of relative named ranges
Here are a few ideas where you can implement this technique.
Always refer to the cell above
If we have a formula that should always refer to the cells above, what happens when a new row is added?
Before row added:

After row added:
You will notice that the range of the formula does not change.
Creating a named range for the cell above solves this problem.
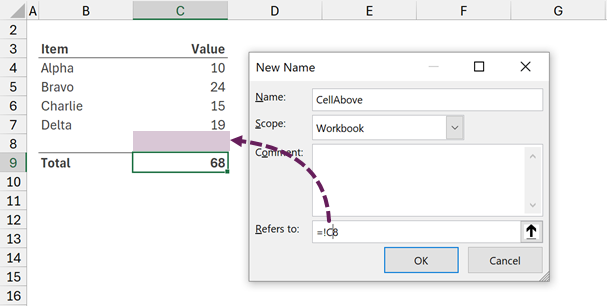
If we use the CellAbove named range in the formula, it always refers to the cell directly above.
The formula in cell C9 is:
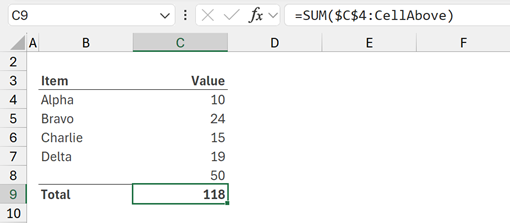
=SUM($C$4:CellAbove)No matter how many rows we add, the range always expands from C4 to the cell above the formula.
Running total
Another use case for relative named ranges is creating a running total.
The calculation method for the running total is: cell above + cell to the left.
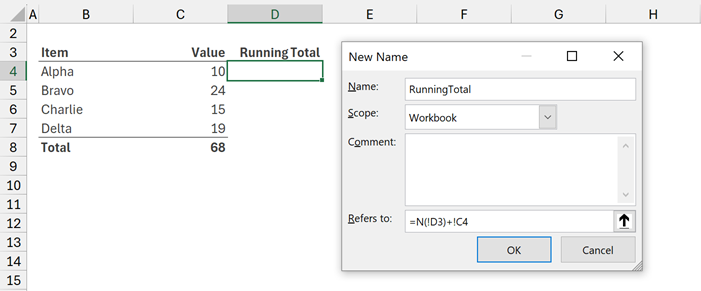
In the screenshot above, the formula is:
=N(!D3)+!C4The N() function is a conversion function:
- Non-number values are converted to numbers
- Dates are converted to serial numbers
- True is converted to 1
- Anything else is converted to zero
In a running total calculation, the cell above the first cell is often a heading. By using the N function, it converts a heading to 0. Therefore, it does not impact the result of the running total calculation.
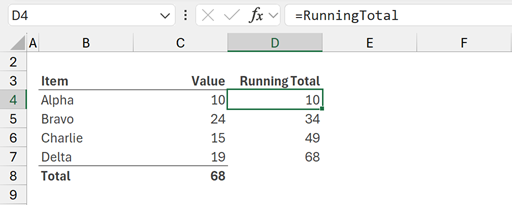
In the screenshot above, the formulas in cells D4:D7 are =runningTotal. Excel has calculated a running total by returning a different result for each named range.
Global vs local relative named ranges
In the two examples above, we did not use a sheet name within the named range. Therefore, these were “global” relative named ranges. They can be used on any sheet in the workbook.
If we include the name of a sheet, it creates a “local” relative named range. The sheet remains fixed.
For example, if cell C9 of Sheet1 were selected, and we created a relative named range with the following formula, it would create a cell above reference, but only for that sheet.
='Sheet1'!C8So, if the named range were used in cell D2 of Sheet2, using, it would return cell D1 of Sheet1 (i.e. all always refers to Sheet1 no matter where in the workbook).
Therefore, we need to be careful when creating relative named ranges so they have the correct global or local range.
Related Posts:
- Hide named ranges in Excel: 4 simple ways
- Cell ranges: 99% of users don’t know this
- Named Ranges – VBA properties & actions
Discover how you can automate your work with our Excel courses and tools.
The Excel Academy

Make working late a thing of the past.
The Excel Academy is Excel training for professionals who want to save time.
I have created the following Workbook relative named range and assuming I am in Cell C4:
_1Up RefersTo =Index(!C3:C4,1,1) This picks up C3
_1Dw RefersTo =Index(C4:C5,2,1) This picks up C5
_1Lf RefersTo =Index(B4:C4,1,1) This picks up B4
_1Rg RefersTo =Index(C4:D4,1,2) This picks up D4
This would allow me to use on any sheet.
Question would this create havoc or crash Excel.
Many thanks and also for your excellent blogs.
Kie
I say give it a go and see what happens.
Do you need to use INDEX? If in C4, why not just use =!C4 for _1Up?
Excellent article, thanks. I liked the running total trick
Hi,
How to create a Named Range with all the Even Rows extracted from an existing Dynamic Named Range ?
Thanks for your help