
One thing that continually causes problems for all data professionals is dates. Over time, Microsoft has given us a plethora of tools and Excel functions for handling dates, yet they still catch us out. Power Query is a tool for manipulating and cleaning data, and it has a lot of features for managing dates. The Power Query date format is flexible and can be converted into many other text and numeric formats.
For this post, we begin by looking at the basics of Power Query date formats. Then once we’ve grasped that, we move on to look at some tricky date format scenarios.
Table of Contents
Download the example file: Join the free Insiders Program and gain access to the example file used for this post.
File name: 0043 Power Query Date Formats.zip
Simple Power Query date format transformations
In this section, we look at the basic process and simple transformations for working with dates.
Date data type
When we get our data into Power Query, we first need to ensure dates have the correct data type. Sometimes Power Query’s automatic detection of data types gets it wrong, so we need to check that all columns are correct.
To change a specific column into a date format, we have lots of options:
- Click the data type icon in the column header and select Date
- Select the column, then click Transform > Data Type > Date from the Ribbon
- Right-click on the column header, then click Change Type > Date
- Change the applied data type in the M code to type date
Changing the data type is the most important step. Until the columns are recognized as dates, Power Query cannot use them as dates.
One confusing aspect is that Power Query data types exist in two ways:
Value level: Each value in Power Query has a data type. If the column data type shows abc123 (which is the any data type), each value in that column still has it’s own data type (text, number, date etc). The value type determines the type of transformations that can be performed on the value.
Column level: The column data type determines how the contents of a column is understood. The column data type declares that the values within that column should conform to that data type; therefore the actions available are based on that type.
If we write the M code ourselves, it is possible to have a date column that does not contain all date values.
Extracting additional information from a date
From a date column, we can extract other information. The Power Query date formats available from the ribbon are shown below.
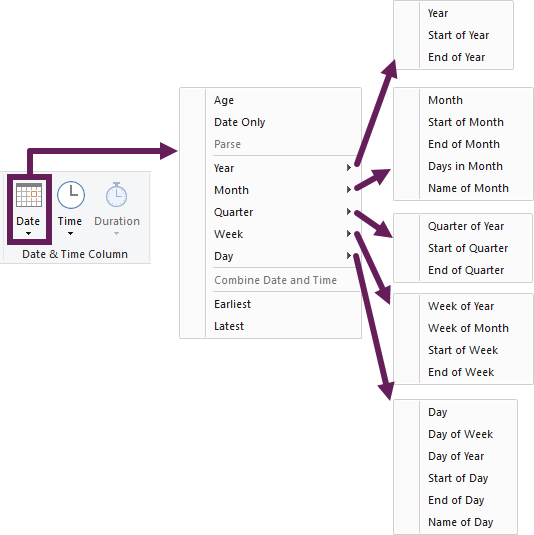
These are available in Power Query’s Transform and Add Column ribbons. The Transform ribbon converts the selected column while Add Column creates a new column based on the selection.
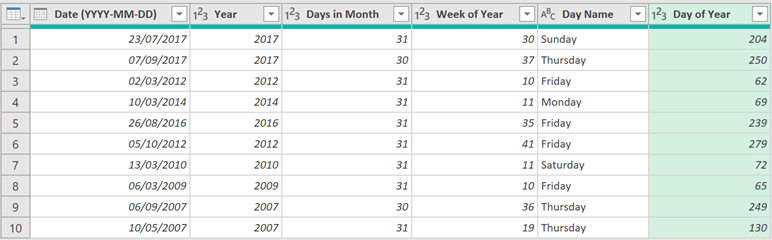
The following are examples of the types of information we can extract from the date column (Year, Days in Month, Week of Year, Day Name, Day of Year)
M code for date transformations
Each of the transformations above, apply a Power Query function to extract the information from the date. For example, the M code to add the Year and Day of Year columns are:
Year
= Table.AddColumn(#"Changed Type", "Year", each Date.Year([#"Date (YYYY-MM-DD)"]), Int64.Type)The Date.Year function extracts the Year from a date.
Day of Year
= Table.AddColumn(#"Inserted Day Name", "Day of Year", each Date.DayOfYear([#"Date (YYYY-MM-DD)"]), Int64.Type)The Date.DayOfYear function calculates the year day number from a date.
Additional information:
- Find out more about Power Query functions here: Power Query formulas (how to use them and pitfalls to avoid).
- Details of all the date functions are here: https://learn.microsoft.com/en-us/powerquery-m/date-functions
Tricky transformations
The biggest issue we typically face is getting values into a date type initially. Often this occurs when working with different country date formats.
The date format used in the US is month – day – year. Yet, it is day – month – year in the UK. Then there is the ISO 8601 format, which is year – month – day.
Personally, I prefer the year – month – day format as it can be sorted correctly when it is text or numeric. But I can’t imagine the UK government is about to change anything on my account.
If using data containing dates in a format different from our local settings, Power Query can get confused. For example, if the cell value is 01/02/03, it could be:
- 2nd January 2003 – the US format
- 1st February 2003 – the UK format
- 3rd February 2001 – the ISO 8601 format
In this section, we look at how we force Power Query to understand dates, even if different country date formats are used.
Examples
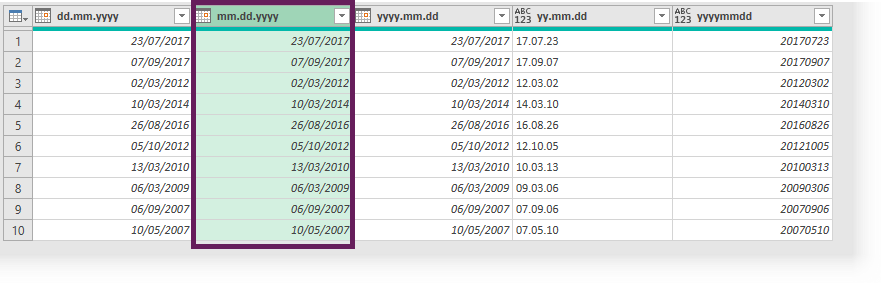
Look at the screenshot below. It shows dates in five different formats (without any data types applied). I have included the format in the header so you can see what the date format is meant to be.
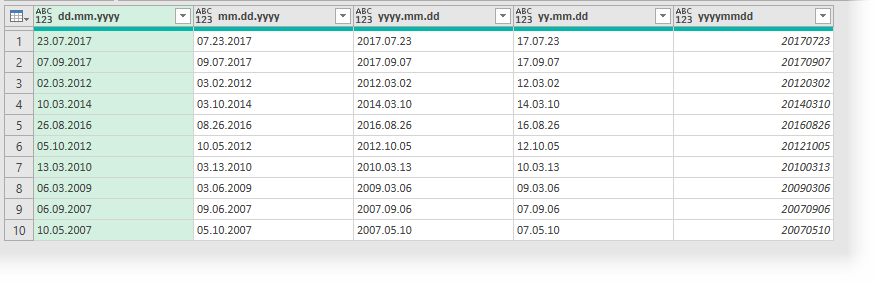
NOTE: I am based in the UK. My regional settings are set to English (United Kingdom), so the dd.mm.yyyy is the expected format for dates. Depending on your location settings, you may get different results to those shown below.
If I use this data and select Date as the column data type, this is the result:

- dd.mm.yyyy – as expected, Power Query is happy to translate a date in my local region format.
- mm.dd.yyyy – the first row is an error because the value 07.23.2017 as a UK date would be the 7th day of the 23rd month. This is not a valid date in my region. In the second row, the value is 09/07/2017. As a UK format, this would be the 9th day of the 7th month, which is a valid date. However, even though the format is valid, the result is incorrect. The original date is in a mm.dd.yyyy format, so the correct value should be 7th day of the 9th month.
- yyyy.mm.dd – due to the year having a 4 character format, Power Query has correctly guessed that the remaining digits are month followed by day.
- yy.mm.dd – the data for this example includes the year with just two digits. Power Query can’t work out which digits relate to the year, month or day. It has applied my local format. However, this has mixed up the day and year, meaning every value is incorrect. This is the most dangerous result, as if we don’t notice and keep going, it could cause havoc later on.
- yyyymmdd – there are no separators in this example. Power Query has not recognized this as any date, so each value displays as an error.
Power Query gives us lots of tools to solve each of these date formats.
Locale settings
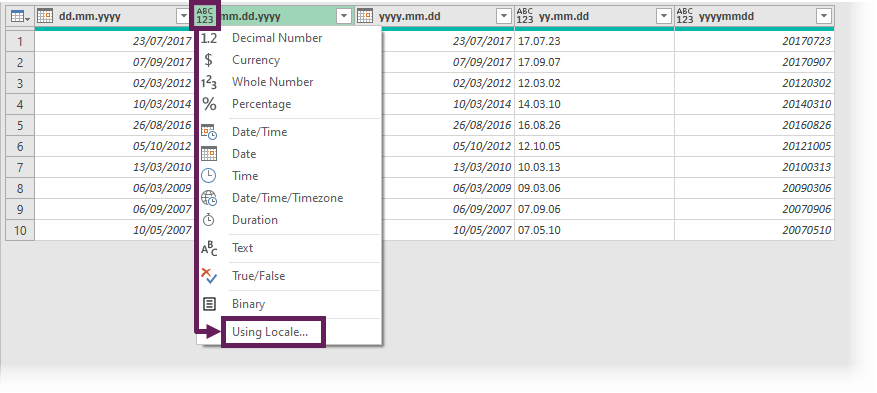
If the date is a valid country format, we can explicitly tell Power Query which country to use.
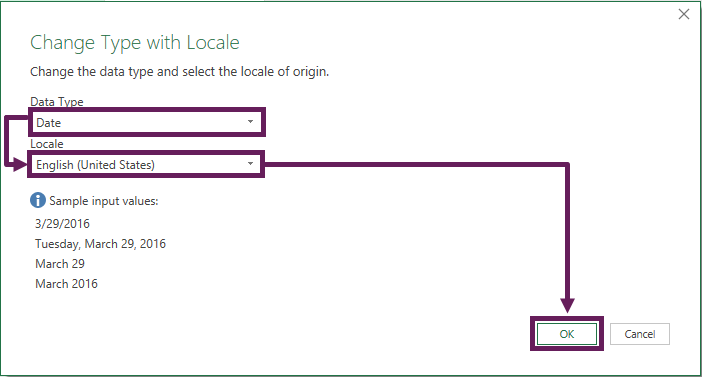
Click the data type icon and select Using Locale… from the menu.
From the Change Type with Locale dialog box, select the following options:
- Data Type: Date
- Locale: The region for the date format (for mm.dd.yyyy, I’ve selected English (United States))
Then click OK to close the window.
Power Query now shows the correct date.
In the previous section, Power Query already got the correct result for the yyyy.mm.dd format, so we can move on to the next column.
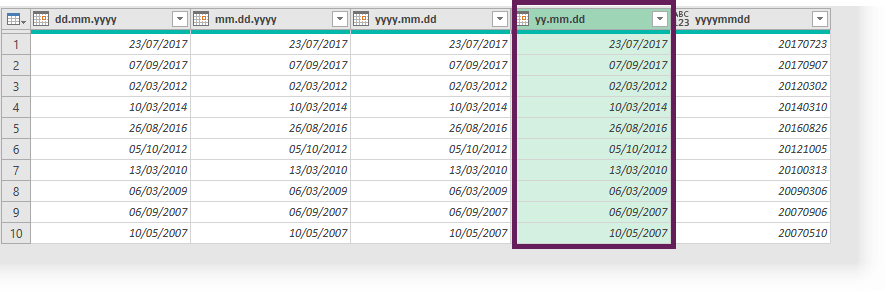
To change the yy.mm.dd format, we can select English (Canada) as the locale date format. At the bottom of the window, it displays a sample of formats that are correctly recognized.

The yyyy-mm-dd format is the first item in the list of sample inputs (shown in the purple box above). This order matches our example data. Selecting this option generates the correct values for this column. Power Query is intelligent enough to recognize the separators and create the correct date.
It may take a bit of exploration to find out which locale (if any) match the format we’ve got.
While the yyyymmdd format is in the same order as English (Canada), due to the lack of separators, Power Query doesn’t recognize this as a date. We will come back to this example in a moment.
Changing the workbook Locale setting
If a workbook is going to have a lot of dates in a specific region format, we can change the Locale settings for the whole workbook.
Click File > Options and settings > Query Options
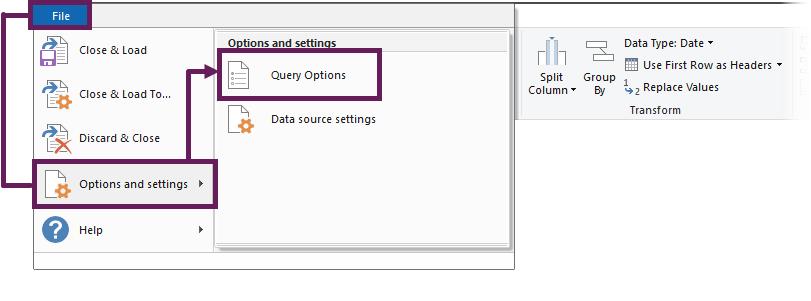
In the Query Options dialog box, select Regional Settings > [Required Locale] > OK
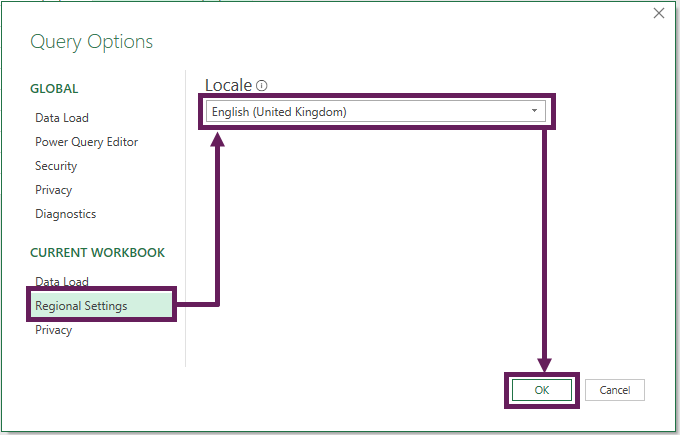
This setting applies to the current workbook only.
Once the locale is set, we only need to use the standard date data type and Power Query will apply that locale setting to each field.
Dealing with unknown date formats
We were left with the tricky yyyymmdd format. There are a few options we can try here. The two we are going to look at are:
- Power Query Formulas
- Column From Examples
Using Power Query formulas
Our date is in a standard format, so we can apply basic M code formulas to calculate the result.
Click Add Column > Custom Column

In the Custom Column dialog box, I have entered the following formula.
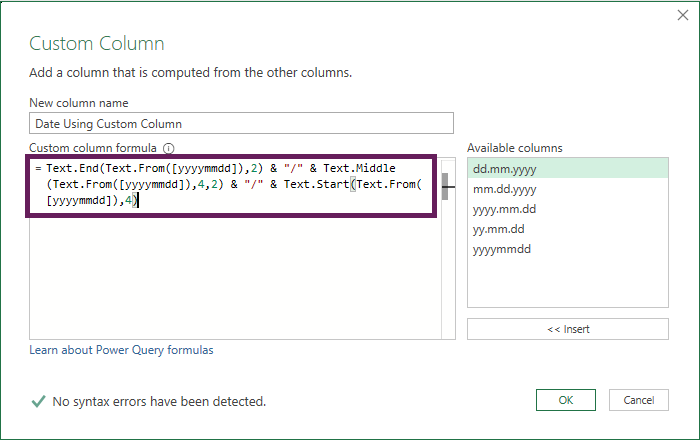
=Text.End(Text.From([yyyymmdd]),2) & "/"
    & Text.Middle(Text.From([yyyymmdd]),4,2)
    & "/" & Text.Start(Text.From([yyyymmdd]),4)
This is constructed using 4 functions:
- Text.From() – converts the value in the field to text
- Text.Start() – similar to Excel’s LEFT function to return the first characters from a text string
- Text.End() – similar to Excel’s RIGHT function to return the last characters from a text string
- Text.Middle() – similar to Excel’s MID function to extract characters from the middle of a text string
With this formula, we’ve constructed the date in a UK format using text.
If changing the data type for this new column, Power Query can now easily recognize this as a date.
This formula is specific for this scenario. You will need to change the formula to match your requirements.
Other useful functions for creating date values are:
- #date: Creates a date based on year, month and day numbers.
Example:=#date(2023,02,28)is 28 February 2023. - Date.From: Creates a date based on a value and a culture code.
Example:=Date.From(“03/15/2023″,”en-US”) is understood to be a US date for the 15 March 2023. The value can be text, or numbers. - Date.FromText: Creates a date based on a value and options.
Example:=Date.FromText("März 2023, 15", [Format="MMMM yyyy, dd", Culture="de-DE"]))is recognized as a date of 15 March 2023, presented is presented in the MMMM yyyy, dd format and using German spellings.
Using Column From Examples
Column From Examples is a feature that helps to standardize formats with complex structures.
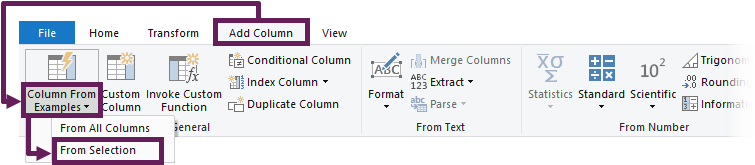
Select the column, then click Add Column > Column From Examples (drop-down) > From Selection
In the column on the far right, we can start typing the date we want to see, then press Enter.
For example, for the value 20170723, I have entered 23/07/2017 as shown by the screenshot below.
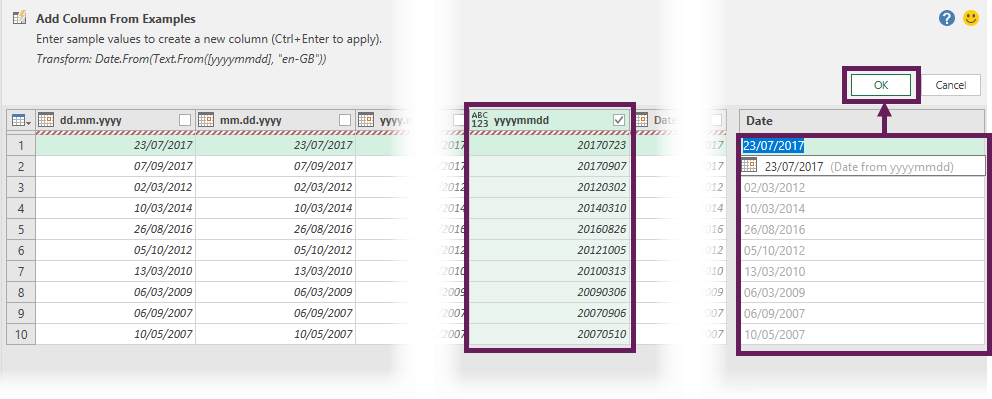
Power Query does its magic and creates values for all our rows. Check that these are right. If not, correct any that are wrong; each time we provide more detail, Power Query adjusts its suggested transformation.
This is an advanced tool. If there isn’t enough standardization in the value, Power Query can easily calculate the incorrect results. But for our scenario, it is reasonably straightforward.
Once happy with the format, click OK.

Conclusion
We have seen how to use the Power Query date format to extract additional information from a date. These are quick and easy transformations. However, before we are able to make those transformations, we need the column to be a date data type.
Using different date formats, we were able to get standardized dates from all of them. Therefore, no matter where the data comes from, we can convert it and use it in our local region.
Related Posts:
- How to add fiscal Month, Quarter or Year Column in Power Query
- Calculate quarter from dates in Excel (inc non-standard calendars)
- EOMONTH Function in Excel
Discover how you can automate your work with our Excel courses and tools.
The Excel Academy

Make working late a thing of the past.
The Excel Academy is Excel training for professionals who want to save time.
This was helpful, especially the customizing – just one issue with one of your examples (not your fault, it’s an error on Microsoft’s side); If you select English – Canada, it outputs the date in UK format instead of the Canadian format. This makes using Canada as an example for Excel… confusing. I always end up having to set custom formats.
Hi Adam – I didn’t know that about the Canada format. That’s good to know.
I have learnt about date formatting. Lot of thanks.
Mark,
Great examples as usual. Have you considered making use of the Date.ToText function? You can easily input both a format string and a culture code to get your desired output.
I put together this extensive list with possible format options: https://powerquery.how/date-totext/
If you feel it’s useful, feel free to include it in the guide.
-Rick