In Power Query, promoting headers for nested tables before expanding columns leads to fewer and easier transformations. However, these options are not available in the user interface. Therefore, we must make a few changes to the M code ourselves.
This post shows two ways to promote headers in nested tables before expanding columns.
Table of Contents
Download the example file: Click the button below to join the Insiders program and gain access to the example file used for this post.
File name: 0188 Promote headers before expand.zip
Watch the video
Example
The example in this post involves 3 tables we want to combine together.

Often, we can just click the expand icon (double-headed arrow) at the top of the Data column and then deal with the clean-up issues.
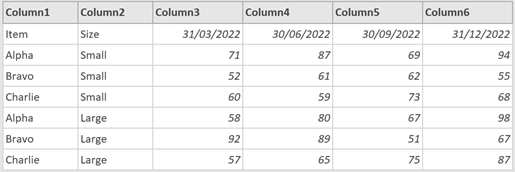
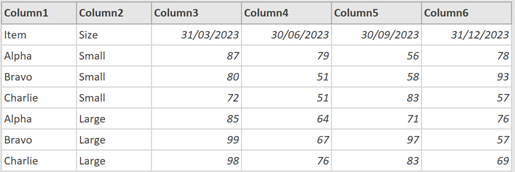
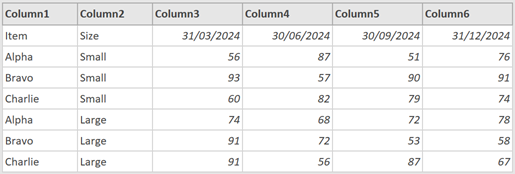
However, in this example, this will give us significant problems. The 3 tables have different time periods for each column (see the screenshots below).
2022
2023
2024
If we expand the columns, they combine based on Column1, Column2, Column3, etc. This format is really difficult to use.
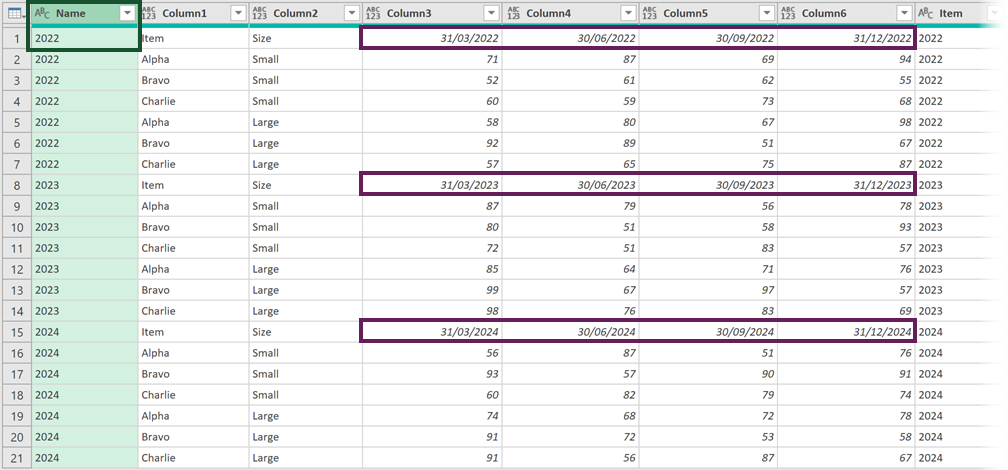
The significant issues are:
- The expanded columns do not have the same information; they are different time periods. By combining them based on column number, we created a very difficult layout.
- The original columns, Name, Item, Kind, and Hidden, are already promoted, but the headers from the expanded columns are not. So, if we promote headers after combining the tables, we lose the headers from the original columns.
The solution is to promote headers before combining the data.
Promote headers – Excel files
If the source data is an Excel workbook, there is a simple change we can make to the m code.
Select the Source step in the query. The formula bar shows something similar to the following:
= Excel.Workbook(File.Contents("C:\File Path\0188 Data.xlsx"), null, true)The Excel. Workbook function the syntax is:
Excel.Workbook(workbook, optional useHeaders , optional delayTypes) as table- Excel.Workbook: Function to connect to an Excel workbook.
- workbook: The Excel workbook binary.
- useHeaders: Indicates whether the first row of each table should be treated as a header (true = Yes, null/false = no).
- delayTypes: Indicates whether each column should be left untyped.
To promote the headers, we only need to change the second argument to true.
= Excel.Workbook(File.Contents("C:\File Path\0188 Data.xlsx"), true, true)This promotes the header of each nested table. Then, we can expand columns normally.
Promote headers – Other file types
However, you may not be dealing with an Excel file. Other file types, such as PDF, also generate nested tables.
Unfortunately, there is no equivalent useHeaders argument for all sources. But don’t worry; we can promote the headers another way.
Click the fx Icon next to the formula bar.
Enter the following formula:
= Table.TransformColumns(Source, {{"Data", each Table.PromoteHeaders(_, [PromoteAllScalars=true]), type table}})Let’s understand the formula:
- Table.TransformColumns: The function to perform transformations on columns.
- Source: The name of the table or step to perform the transformation on.
- “Data”: Name of the column to transform.
- each Table.PromoteHeaders(_, [PromoteAllScalars=true]): Apply the Table.PromoteHeaders transformation to each table in the column.
- type table: Output of Table.TransformColumns should be a table data type.
This formula ensures the headers are promoted in each nested table before we expand the data.
What if the header is not the first row?
If the header is not the first row, we must remove any unnecessary rows at the top.
We can do this by clicking the fx Icon next to the formula bar and then entering the following formula:
= Table.TransformColumns(Source, {{"Data", each Table.Skip(_,3), type table}})- Table.TransformColumns: Function to perform a transformation on a column.
- Source: The name of the table or step to perform the transformation on.
- “Data”: Name of the column containing the tables.
- each Table.Skip(_,3): Remove the top 3 rows from the top of each table.
- type table: Output of Table.TransformColumns should be a table data type.
Once the header row is the first row in the data, we can promote using the other file types method noted above.
NOTE
For more complex scenarios, check out this post: How to transform nested tables in Power Query (without coding)
Next steps
Once we promote the header row for each table, we can then click the expand icon at the top of the Data column.
The data should look like the following:
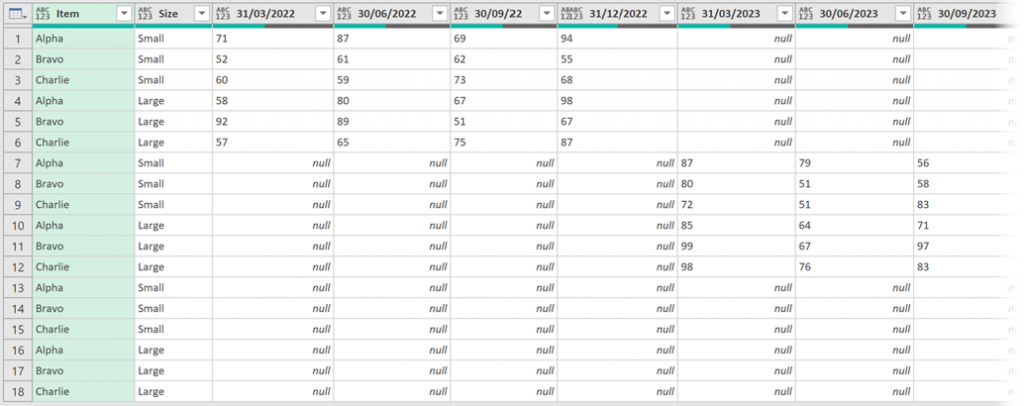
To get the data into a good state, we could select the Item and Size columns, then click Transform > Unpivot Columns (drop down) > Unpivot Other Columns
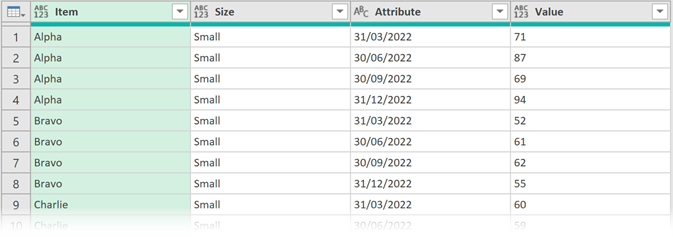
This is now a data set we can start to use.
NOTE:
If the column names are likely to change at a future point, then use the dynamic expand method from this post: How to expand columns dynamically in Power Query
Conclusion
The order in which we undertake transformations matters.
Expanding columns and then cleaning up the data may seem easier as the options are available in the user interface. However, this can lead to some difficult transformations later in the process.
With the small amount of knowledge from this post, you will be able to promote headers in nested tables before expanding columns. This will lead to fewer and easier transformations later.
Related Posts:
- How to expand columns dynamically in Power Query
- How to transform nested tables in Power Query (without coding)
- Power Query: How to Combine files based on a list
- How to get data into Power Query – 5 common data sources
Discover how you can automate your work with our Excel courses and tools.

Excel Academy
The complete program for saving time by automating Excel.

Excel Automation Secrets
Discover the 7-step framework for automating Excel.

Office Scripts: Automate Excel Everywhere
Start using Office Scripts and Power Automate to automate Excel in new ways.

Mark, this is very nice. Very useful. Great coverage of the topic. Easy to follow.