
Expanding table columns is a common Power Query action. It even has its own icon. But there is a problem lurking here. Clicking the expand data button hardcodes the column names into the M code. So, if new columns are added to the source at a later date, they don’t show up. So, in this post, we are looking at how to expand columns dynamically in Power Query to get all the data we want.
Table of Contents
Download the example file: Join the free Insiders Program and gain access to the example file used for this post.
File name: 0141 Expand columns dynamically.zip
Watch the video

The problem
Let’s take a look at a simple example to see the problem.
The data
Our Excel workbook includes 4 worksheets: Q1, Q2, Q3, and Q4.
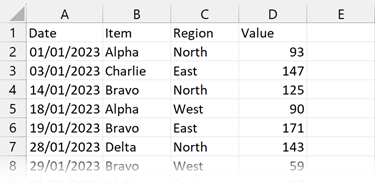
Each worksheet contains 4 columns: Date, Item, Region, and Value.
Here is the example data from the Q1 worksheet:
Connecting to the data
When we connect to the workbook, in the Navigation dialog box, we select the folder to import all the worksheets.
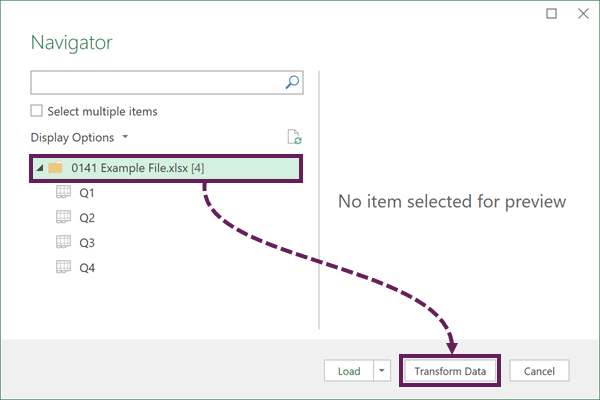
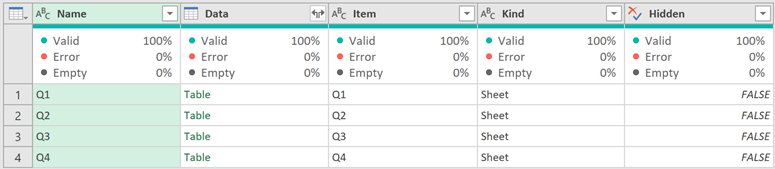
The Preview window displays all the worksheets in a single table.
At the moment, we just want the Data column. So, select the Data column, then click Home > Remove Columns (drop-down) > Remove Other Columns.
Expanding the column
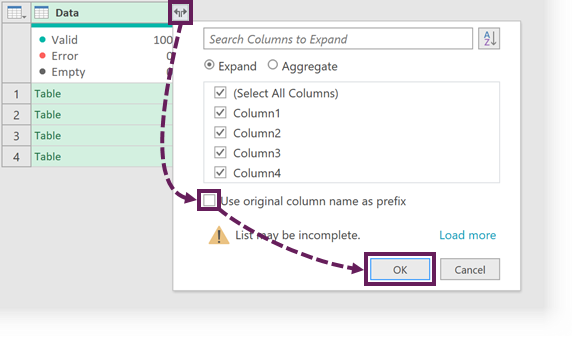
To expand the data, click the two arrow icon at the top of the Data column. We want all the columns, and we don’t want to include the original column name as a prefix.
Fantastic, we now have all the data expanded.
Problem Example
Now, let’s go back and add a new column to the source file.
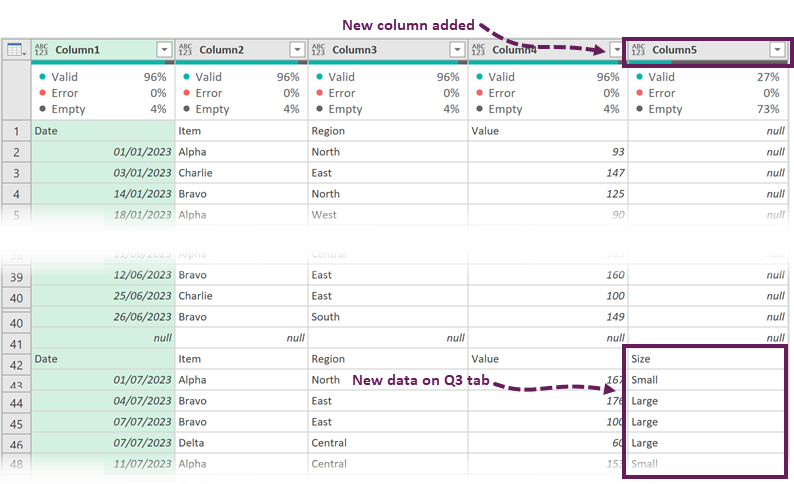
In the Q3 tab, I’ve added a Size column.

When we refresh the data, the new column does not appear.
Looking at the M code for the Expanded Data step reveals the problem. The code generated by automatically Power Query is:
= Table.ExpandTableColumn(Source, "Data", {"Column1","Column2","Column3","Column4"}, {"Column1", "Column2", "Column3", "Column4"})The column names have been hard-coded into the step. Therefore, this never works when new data is added.
If we manually change the M code to include “Column5” that will work. But it’s not a great solution. We don’t want to manually edit queries each time there are changes.
Let’s create a dynamic solution.
Using Table.Combine to expand columns dynamically
Table.Combine is an M code function that (yes, you guessed it) combines tables. The great news is the function doesn’t require us to hardcode any column names; it picks up all of them.
Delete the Expanded Data step. Click on the fx icon in the formula bar, then enter the following:
= Table.Combine(#"Removed Other Columns"[Data])- #”Removed Other Column” is the name of the previous step
- [Data] refers to the Data column which we want to expand.
BOOM! That’s all it took.
Now the preview window shows all the columns from all the Tables; including the new column.
Find out more about Table.Combine here: https://learn.microsoft.com/en-us/powerquery-m/table-combine
Using Table.Combine while retaining columns
Before you start leaping about in celebration, Table.Combine also has an issue. It doesn’t retain any of the existing columns.
Go back to the step where we removed the other columns; change it so that the Name and Data columns are kept.
As soon as we go back to the Table.Combine step, the Name column disappears. This is because previous columns are not retained.
This means it’s time to join our knowledge and create the perfect solution.
Change the Table.Combine step to the following:
= Table.ColumnNames(Table.Combine(#"Removed Other Columns"[Data]))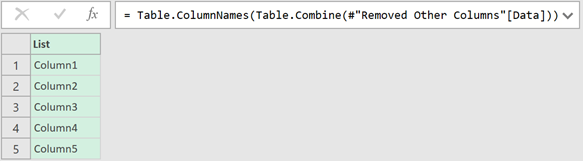
Table.Combine gets us all the columns. Table.ColumnNames gets us the list of the names from those columns.
Copy the code in the formula bar (excluding the equals sign). Then delete the step.
Now, let’s click the expand icon as normal.
In the M code, we can replace the first instances of this:
{"Column1", "Column2", "Column3", "Column4"}With this the code we copied from above:
Table.ColumnNames(Table.Combine(#"Removed Other Columns"[Data]))Looking at the documentation for Table.ExpandTableColumn reveals that the second section of column names is optional. Therefore, we can remove the second instance of:
{"Column1", "Column2", "Column3", "Column4"}The final M code function for this step will be:
= Table.ExpandTableColumn(#"Removed Other Columns", "Data",Table.ColumnNames(Table.Combine(#"Removed Other Columns"[Data])))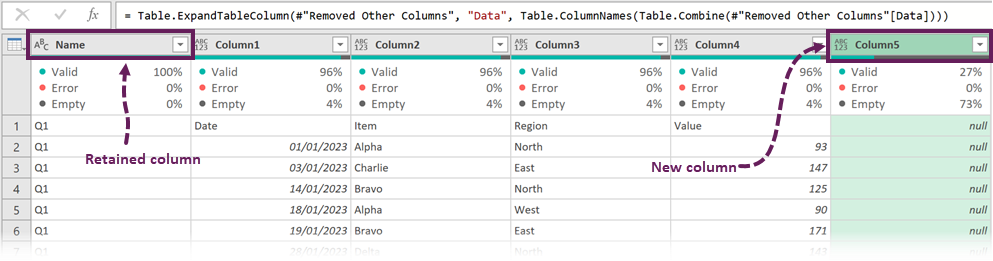
The preview window displays the retained columns and the new column. AMAZING!
Find out more about:
- Table.ColumnNames: https://learn.microsoft.com/en-us/powerquery-m/table-columnnames
- Table.ExpandTableColumn: https://learn.microsoft.com/en-us/powerquery-m/table-expandtablecolumn
How to get the correct column names
Our data has come from separate Excel worksheets. Because it is an unstructured source, the columns are given the names of Column1, Column2, Column3, etc. Wouldn’t having the correct column names from the original data set be better?
To do that, we must promote the headers inside each Table.
Select the step before expanding the data. In our example, it is called Removed Other Column.
Click on the fx icon next to the formula bar to create a new step and enter the following:
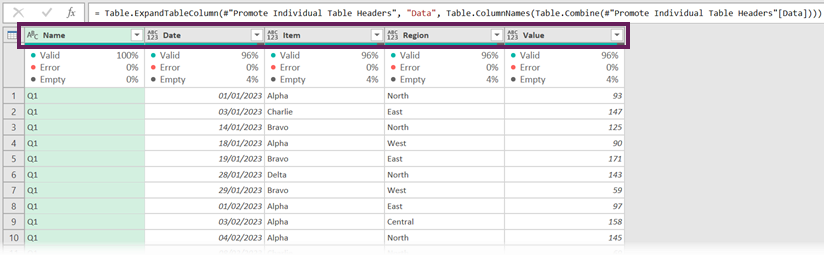
= Table.TransformColumns(#"Removed Other Columns",{{"Data", each Table.PromoteHeaders(_), type text}})This function promotes headers within each table in the Data column before they are expanded.
Now, when we expand the table, we have the correct column names.
Conclusion
By default, expanding columns in Power Query uses the Table.ExpandTableColumn function. This function hard-codes column names. Therefore, if column names change or new columns are added, our data may be incomplete or cause errors.
If we use the Table.Combine function; it includes all new columns, but does not retain any existing columns.
But we were able to use both functions together, along with Table.ColumnNames to build a completely dynamic solution.
Related posts:
- Power Query: Get data when sheet/Table names change (2 ways)
- Power Query Append: Quickly combine many queries into 1
- Power Query: Lookup value in another table with merge
Discover how you can automate your work with our Excel courses and tools.
The Excel Academy

Make working late a thing of the past.
The Excel Academy is Excel training for professionals who want to save time.