In Power Query, it is common to have nested Tables. These are Tables contained within a column, where each row contains a separate sub-Table. Sometimes we just want to expand the data; that is easy. But sometimes, we need to transform the data in the nested Table before expanding; that is NOT so easy. So, how can we achieve this?
That’s what we are looking at in this post; how to transform nested Tables in Power Query without writing the M code.
We will use a few techniques you may not have used before. But don’t worry; it will work if you follow the steps.
Table of Contents
Download the example file: Join the free Insiders Program and gain access to the example file used for this post.
File name: 0152 Transform nested table.zip
Watch the video

What are Nested Tables?
Nested Tables appear in many circumstances in Power Query:
- Connecting to a source with multiple data objects (e.g., From Folder or From Excel Workbook)
- Using Group By with the All Rows option
- Merging Tables
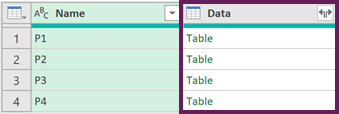
They look like this:
Example Data to transform nested tables
The example data in this post is a workbook with 4 tabs (P1, P2, P3, and P4). P1 looks as follows:
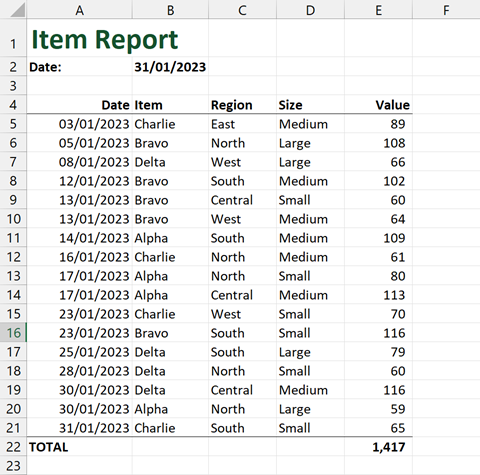
The other tabs have different rows but look the same.
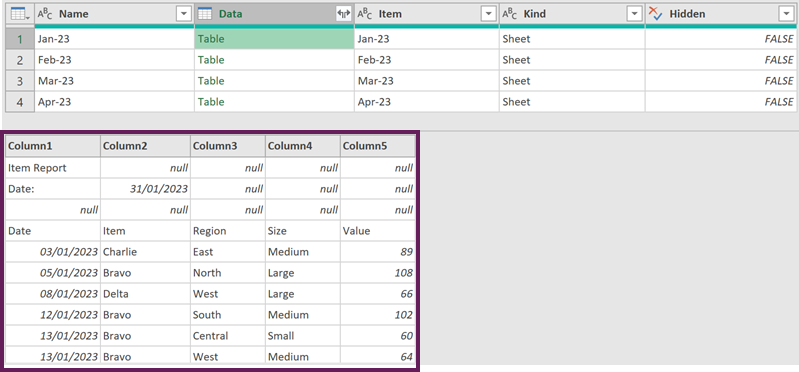
Once we connect to the workbook, the Power Query preview window looks as follows:

NOTE: To work along with the example file, you will need to re-point the source to the workbook on your PC.
Click on the white space next to any Table to reveal the data inside that Table.

We are going to apply our solution in 3 steps:
- Apply transformation to one Table
- Get the code for the transformation
- Apply the transformation to each nested Table in a column
Apply transformation to one Table
In the example, for each nested Table, we want to:
- Remove the null values at the top
- Remove the Total row at the bottom
- Promote headers
- Add an Index column.
To do this, we start by making the transformations to a single Table.
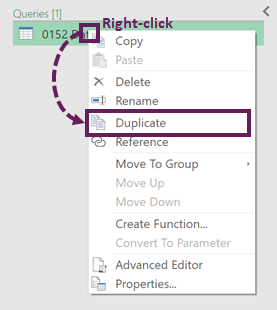
As we don’t want to mess with the original query, in the Queries pane, right-click on the query and select Duplicate.
To make it clearer which Table we are working with, let’s rename the duplicate query to Duplicate.
In the Duplicate query, click on the word Table in the first row of the preview window to drill into it.
Now we can proceed with the transformations for this worksheet. In the example file, we will:
- Delete the Promoted Headers and Changed Type steps
- Remove the Top 3 rows by clicking Home > Remove Rows > Remove Top Rows > Number of Rows: 3 > OK
- In the Date column, Right-click on the word TOTAL and select Filters > Does Not Equal
- Promote the headers by clicking Transform > Use First Row as Headers
- If the Changed Type step has not been applied automatically, you will need to add the data type for each column
- Click Add Column > Index Column
Get the code for the transformation
So far, everything probably makes reasonable sense. But, for the following steps, you will just have to trust me…
With the Duplicate query selected, click View > Advanced Editor.
This contains all the query steps. Identify the point at which you started making changes to the individual Table.
Our first action on the individual table was to #”Removed Top Rows”. In the screenshot below, all the steps before this have been highlighted.
Make a note of the last step before making the individual Table transformations. In our example, it is #”Jan-23_Sheet”.
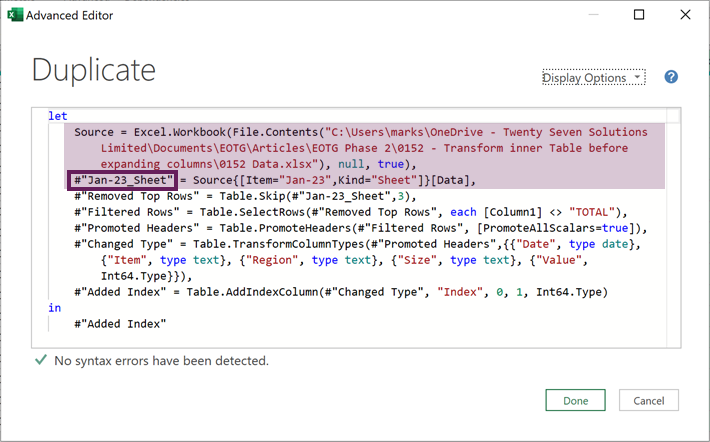
Delete these steps, but keep the word let at the start.
The code now looks like this:
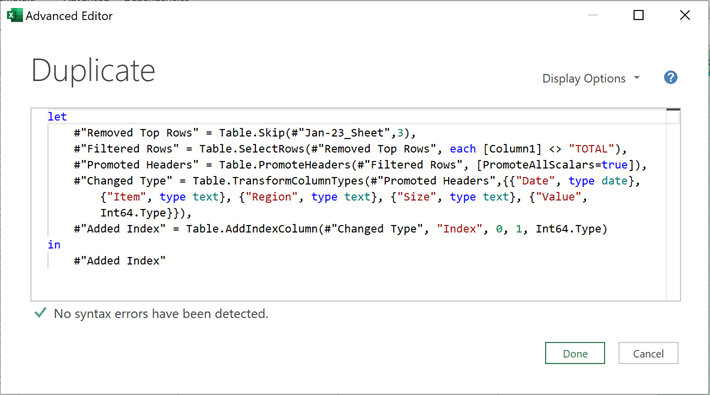
Select all the code, copy it, and then close the Advanced Editor. Don’t worry about any errors; we won’t use this query again.
Apply the transformation to each nested Table in the column
In the User Interface, there are no transformations for the Data column which give us the code we need. We could write the M code ourselves using the Table.TransformColumns function, but I assume you’re not an M code wizard. So, instead, we are going to transform another column and then steal the code.
In the original query, select the Name column and click Transform > Extract > First Characters > Count: 1 > OK
It doesn’t matter what this transformation is. We just need to generate the syntax for the Table.TransformColumns function.
The formula bar shows the following code:
= Table.TransformColumns(Source, {{"Name", each Text.Start(_, 1), type text}})We are going to reuse this code. The parts we will change are:
- “Name”: Refers to the name of the column to transform
- type text: Refers to the column’s data type following the transformation
- Text.Start(_,1): Refers to the transformation to undertake
Now let’s make the following changes to make the code work for our scenario:
- Rename Name to Data
- Change the code type text, to type table.
- Highlight the Text.Start(_,1) section, then paste the code we copied earlier.
This will lead to an error. In the example, the error is due to #”Jan-23_Sheet”. This was the name that we made note of earlier.
Find each instance of #”Jan-23_Sheet”, and replace it for an _ (underscore)
The formula bar for this step now looks like this (edited sections in bold)
= Table.TransformColumns(Source, {{"Data", each let
    #"Removed Top Rows" = Table.Skip(_,3),
    #"Filtered Rows" = Table.SelectRows(#"Removed Top Rows", each [Column1] <> "TOTAL"),
    #"Promoted Headers" = Table.PromoteHeaders(#"Filtered Rows", [PromoteAllScalars=true]),
    #"Changed Type" = Table.TransformColumnTypes(#"Promoted Headers",{{"Date", type date}, {"Item", type text}, {"Region", type text}, {"Size", type text}, {"Value", Int64.Type}}),
    #"Added Index" = Table.AddIndexColumn(#"Changed Type", "Index", 0, 1, Int64.Type)
in
    #"Added Index", type table}})
What to understand Table.TransformColumns and write the M code yourself? https://powerquery.how/table-transformcolumns/
Were the nested Tables transformed?
So, did this work? Were the nested Tables transformed?
Previously, the Table looked like this:
Now the Table looks like this:
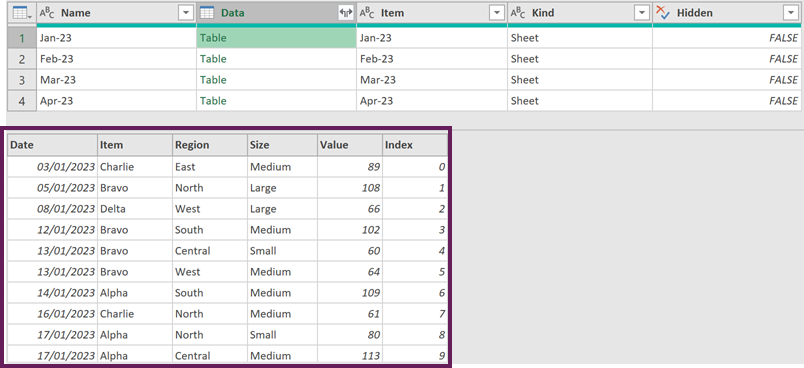
BOOM! Yes!! It worked.
Now you can expand the columns as you wish.
Finally, delete the Duplicate query as it currently serves no purpose.
Conclusion
The Power Query UI does not give us an easy way to transform a nested Table. However, with a bit of knowledge and code stealing, we can transform a nested table in Power Query without writing any of the M code ourselves. 😁
Related Posts:
- How to use Power Query Custom Functions
- Get data from folder in Power Query: combine files quickly
- How to expand columns dynamically in Power Query
Discover how you can automate your work with our Excel courses and tools.
The Excel Academy

Make working late a thing of the past.
The Excel Academy is Excel training for professionals who want to save time.