
Power Query has a really powerful feature that lets us combine all the files in a folder. However, sometimes the files are not contained in a single folder. Sometimes they are spread out in multiple places. How can we deal with that? That’s what we are looking at in this post: how to combine files based on a list.
Table of Contents
Download the example file: Join the free Insiders Program and gain access to the example file used for this post.
File name: 0150 Power Query connect file list.xlsx
Watch the video

Source Data Table
First, let’s start by making a Table of all the files to combine, including the sheets or tables in those workbooks we want to use.
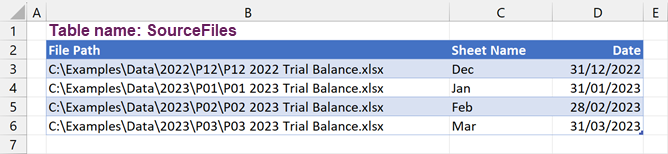
In this example, I will use worksheets, but you could use Tables or named ranges.
You will notice the worksheets in each workbook have different names; this is often a tricky Power Query situation, but this is no problem for this method.
Load the Table, which for the example is called SourceFiles, into Power Query.

Connect to and transform a single workbook
We now need to get the code to connect to each workbook. I’m assuming you’re not an M-code expert, so we will work through this without writing any code.
In Power Query, right-click on the Queries pane and click New Queries > From File > From Workbook.
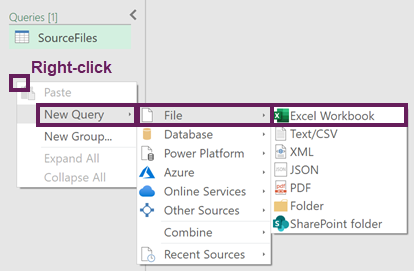
If your file is a different file type, use the relevant connector for that file.
Navigate to one of the files in the list and click Import.
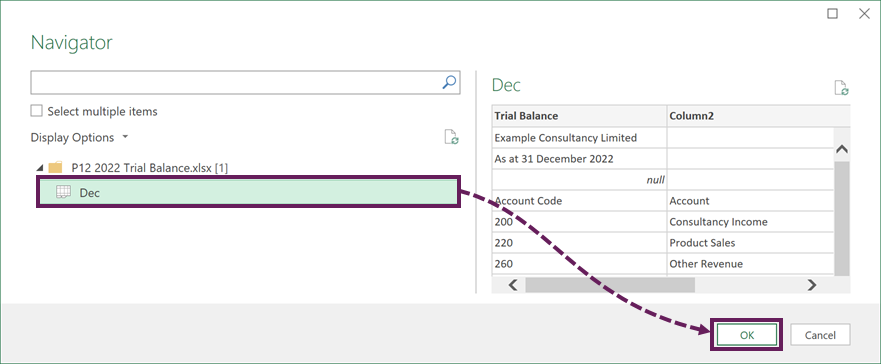
In the Navigator window, select the relevant source data, then click OK.
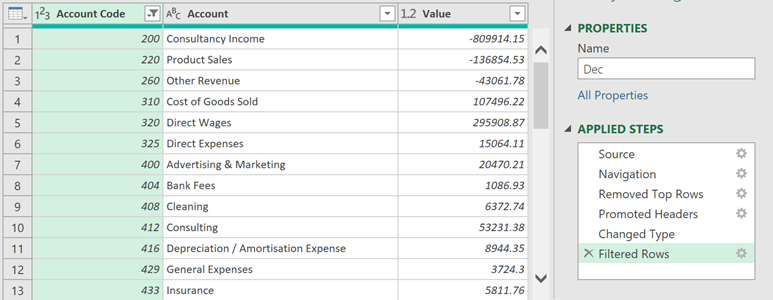
Next, we need to make any necessary transformations for that single workbook.
For the example:
- Removed the top 4 rows
- Promoted the headers
- Changed the data type
- Filtered to exclude null values from the Account Code column
Here is the final table for a single workbook of the example data.
Reuse the transformation steps
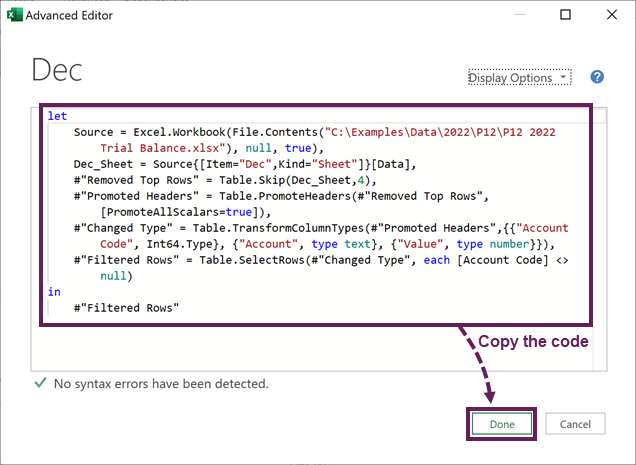
In the single workbook query, click View > Advanced Editor.

Copy all the code, then click Done to close the window.
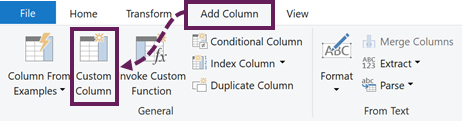
Go back to the query which lists all the files.
Click Add Column > Custom Column
In the Custom Column dialog box, give the column a name (I’ve used Data) and paste the code we copied earlier into the Custom Column formula box.
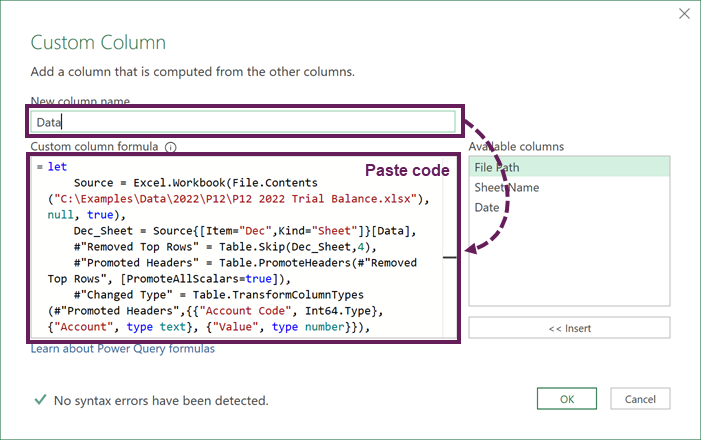
We just need to make a few small adjustments to the code.
- Where the file path is hardcoded, change it for the column name containing the file path.
- Where the sheet name is hard coded, change it for the column name containing the sheet name.
For our example. The code changes from this:
Source = Excel.Workbook(File.Contents("C:\Examples\Data\2022\P12\P12 2022 Trial Balance.xlsx"), null, true),
Dec_Sheet = Source{[Item="Dec",Kind="Sheet"]}[Data],[insert code]
To this:
Source = Excel.Workbook(File.Contents([File Path]), null, true),
Dec_Sheet = Source{[Item=[Sheet Name],Kind="Sheet"]}[Data],
Click OK to close the Custom Column dialog box.
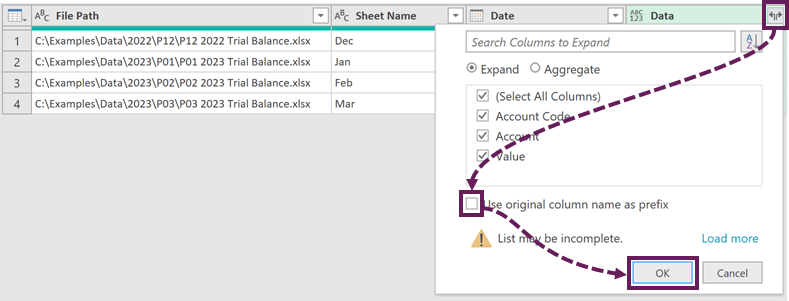
The Power Query preview window now looks like this:

Expand the data to combine files
For the sake of simplicity, we will expand the columns using the Expand icon. If you could have new data at any point, you should expand the columns dynamically. There is a blog post about that method here: How to expand columns dynamically in Power Query
Click the expand icon. We don’t want the original column name as prefix, so uncheck that, then click OK.
BOOM!
That’s it. You’re done!
We can now delete the single workbook query, as it serves no purpose.
If we add more rows to the SourceFiles Table, the query will incorporate those files too.
Making additional transformations later
At some point, the source data may change, and you may want to change the query. So, what can we do?
- Create a new blank query – right-click on the Queries pane, click New Query > Other Sources > Blank Query.
- Copy and paste the code from the Custom column step into the new query.
- Change the [File Path] and [Sheet Name] columns back to hard-coded values which reference a specific file.
- This changes the new query back to a standard query.
- Make any amendments you wish to that query.
- Finally, Copy and paste the code back into the Custom Column.
Conclusion
We’ve seen that we can easily combine all the files in a list using Power Query. It takes a few minor amendments to the automatically generated code, but nothing we can’t handle. Now, it doesn’t matter where the files are, or what the sheets are called; we can easily combine them into a single data source.
Related Posts:
- Get data from folder in Power Query: combine files quickly
- How to use Power Query Custom Functions
- How to get data into Power Query – 5 common data sources
Discover how you can automate your work with our Excel courses and tools.
The Excel Academy

Make working late a thing of the past.
The Excel Academy is Excel training for professionals who want to save time.
It’s very inventive of you to come up with this solution, but wouldn’t it be better to create a function for the transformation process?
Yes, I could have done. But I don’t think it’s a matter of better or worse.
Creating a custom function provides a mechanism for passing the variables into the let/in statement. It would still be the same underlying M inside the let/in. Therefore, it would have make little to no difference, apart from how the variables are managed.
This post:
https://www.thebiccountant.com/2020/07/15/transform-a-query-into-a-function-in-power-query-and-power-bi/
… describes how to create a function with a parameter, so that the steps themselves are stored in a standalone, editable query, which seems much better to me.
However, I have tried both ways and I’m hitting the query firewall issue.
Ah, OK, you mean that method of creating a function.
That method is just adds too much complexity.
I’m happy for combine files to build it for me, but to create it myself, is a sledgehammer to crack a nut.
But it is a completely valid option, if you want to take it.