
Copying, pasting, and moving cells are simple everyday tasks for Excel users. But what if something already occupies the area we want to paste to? We must perform the move-move-move shuffle by moving something into a temporary location before placing everything into its final destination. Wouldn’t it be better if there were a simple way to swap ranges in Excel? Wouldn’t it be better to just select the ranges and click one button? Yes, it would, and that is what we are covering in this post.
Table of Contents
Download the example file: Click the button below to join the Insiders program and gain access to the example file used for this post.
File name: 0180 VBA swap ranges.xlsm
Watch the video

When to swap ranges
Here is a scenario I’m sure you can identify with. You’ve received a workbook that is used within a presentation. However, you (or your manager) want to present the items in a different order.
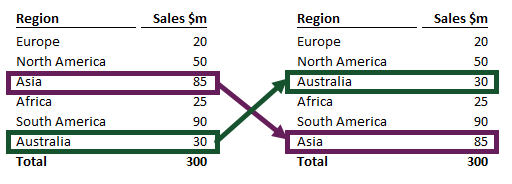
You could start with the move-move-move shuffle. Alternatively, if the following VBA code is available in your Personal Macro Workbook, you can simply select the ranges and run the macro.
VBA code
Paste the code below into a standard code module of your Personal Macro Workbook.
To make the code more reusable, add a button to your ribbon or quick access toolbar; then it’s just one click away. 👍
Sub SwapSelectedRanges()

'Set up the macro
Application.DisplayAlerts = False
Application.ScreenUpdating = False

'Create variables to hold the ranges
Dim rng As Range
Dim temp1Ws As Worksheet
Dim temp2Ws As Worksheet
Dim temp1Rng As Range
Dim temp2Rng As Range

'Get the selected ranges
Set rng = Selection

'There must be two areas selected
If rng.Areas.Count <> 2 Then
    MsgBox "Please select two ranges."
    GoTo CleanUp
End If

'All areas must be the same size
If rng.Areas(1).Rows.Count <> rng.Areas(2).Rows.Count Or _
    rng.Areas(1).Columns.Count <> rng.Areas(2).Columns.Count Then
    MsgBox "All ranges must have the same number of rows and columns."
    GoTo CleanUp
End If

'Check that ranges don't intersect with each other
If Not Intersect(rng.Areas(1), rng.Areas(2)) Is Nothing Then
    MsgBox "Selected areas must not overlap."
    GoTo CleanUp
End If

'Create temporary sheet for moving values
On Error Resume Next
Set temp1Ws = ThisWorkbook.Sheets.Add
Set temp2Ws = ThisWorkbook.Sheets.Add
If Err.Number <> 0 Then
    MsgBox "Unable to create a temporaray worksheet for moving cells."
    GoTo CleanUp
End If
On Error GoTo 0

'Create a temporary range
Set temp1Rng = temp1Ws.Range("A1").Resize(rng.Areas(1).Rows.Count, rng.Areas(1).Columns.Count)
Set temp2Rng = temp2Ws.Range("A1").Resize(rng.Areas(2).Rows.Count, rng.Areas(2).Columns.Count)

'Perform the swap
On Error Resume Next
rng.Areas(1).Copy Destination:=temp1Rng
rng.Areas(2).Copy Destination:=temp2Rng
temp1Rng.Copy
rng.Areas(2).PasteSpecial Paste:=xlPasteAll
temp2Rng.Copy
rng.Areas(1).PasteSpecial Paste:=xlPasteAll
If Err.Number <> 0 Then
    'Error occured, so restore previous ranges and clean up
    temp1Rng.Copy Destination:=rng.Areas(1)
    temp2Rng.Copy Destination:=rng.Areas(2)
    MsgBox "Unable to swap the selected ranges"
    GoTo CleanUp
End If

'Clean up and reset
CleanUp:
On Error Resume Next
temp1Ws.Delete
temp2Ws.Delete
On Error GoTo 0
Application.DisplayAlerts = True
Application.ScreenUpdating = True

rng.Select

End Sub
Using the VBA code
The macro is simple to use:
- Select the first range
- Hold Ctrl, select the second range
- Run the macro
Done! That’s it – how easy was that!
When using the macro, there are a few things to be aware of:
- The code requires two separate ranges to be selected.
- The two ranges must be the same size (i.e., containing the same number of rows and columns).
- The range swap includes any hidden columns or rows
- Formatting is also swapped as part of the range
- The workbook containing the macro must be unlocked to create a temporary location on a new worksheet.
- The code only works on ranges that exist in the same worksheet
Adapting the code to your needs
What if you don’t want to swap everything in the range? For example, you may want to swap values but not formats.
It is simple to change the macro above for more scenarios.
Change the xlPasteAll code for one of the following:
- xlPasteFormulasAndNumberFormats: Swap values and formulas, keeping the number formatting but not other cell formatting.
- xlPasteValuesAndNumberFormats: Swap values and hard code formulas, keeping the number formatting but not other cell formatting.
- xlPasteFormats: Swap the cell formats only; the values and formulas do not move.
- xlPasteFormulas: Swap values and formula only, formatting does not move.
- xlPasetValues: Swap values and hard code formulas, formatting does not move.
A list of other types can be found here: https://learn.microsoft.com/en-us/office/vba/api/excel.xlpastetype
Conclusion
Rather than using the move-move-move shuffle, add the VBA macro in this post to your Personal Macro Workbook to easily swap ranges in Excel with 1-click.
Related Posts
Discover how you can automate your work with our Excel courses and tools.
The Excel Academy

Make working late a thing of the past.
The Excel Academy is Excel training for professionals who want to save time.