Excel has a dirty little secret – The data validation does not stop a user from entering an incorrect value. That’s pretty shocking, as that’s the whole point of data validation. 😲
Many of us rely on data validation to ensure other users only provide valid data entry. However, many are not aware of how easy it is to enter invalid values.
I’m not talking about malicious actions here. I’m talking about simple everyday methods that circumvent data validation without users realizing it.
If you are ready to find out what the issue is… and possible ways to resolve it, then let’s go!
Table of Contents
Download the example file: Click the button below to join the Insiders program and gain access to the example file used for this post.
File name: 0200 Don’t trust data validation.zip
Watch the video
The problem
Let’s start by looking at the problem.
Example
Our example file includes an area we wish users to complete (Cells B5:D15).
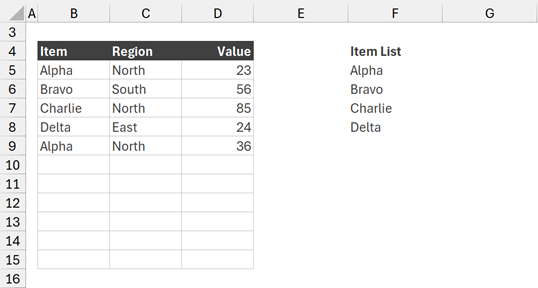
We want to ensure the values in B5:B15 only include the items listed in F5:F8 (Alpha, Bravo, Charlie, and Delta).
Setting up data validation
Data validation is easy to set up in Excel. For this post let’s use a data validation list.
Select the cells, then click Data > Data Validation from the ribbon.
The Data Validation dialog box appears, enter the following in the Settings tab:
- Allow: List
- Source: =$F$5:$F$8
- Click OK
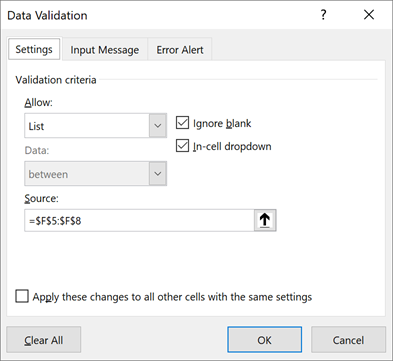
The data validation list is ready.
If a user clicks on the cell, a small icon with a down arrow appears. Clicking on the arrow reveals the list of valid options.
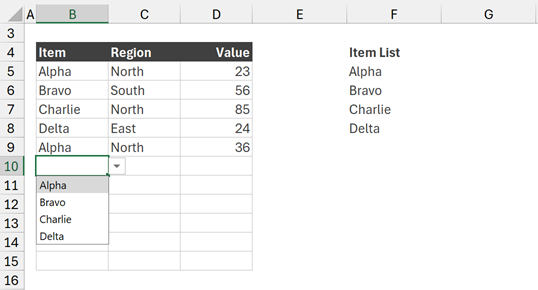
Selecting one item from the list enters that value into the cell.
We can also enter the values manually by typing text into the cell.
If we try to manually enter a value not in the list, Excel displays an error message.
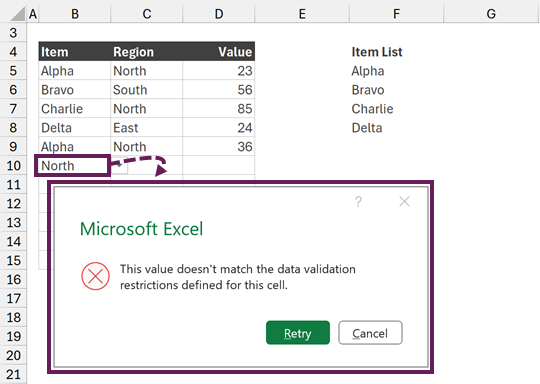
We can customize this message box in the Data Validation dialog box if we want to. That is outside the scope of this post.
Now let’s protect the worksheet. Remember, cells requiring input should be unlocked so users can enter values.
Breaking data validation
So far, everything is working as we would expect. So, what’s the problem?
The data validation check executes when we press enter or select from the drop-down list. The data is not validated when we copy and paste or drag and drop values.
Breaking data validation method #1
To break the data validation all we need to do is copy and paste a value.
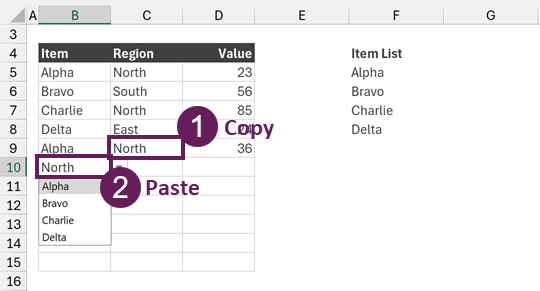
Look at the screenshot above, we have entered enter North into cell B10, even though North is not valid data entry.
Copying and pasting does not trigger the validation check; therefore, we can enter any value. The data validation list remains on the cell, but the value entered is not valid.
Breaking data validation method #2
Alternatively, another method is to drag and drop a cell over the data validation cell.
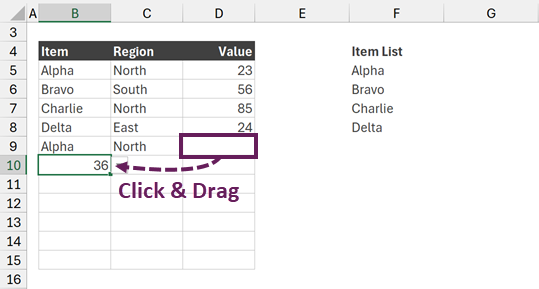
Look at the screenshot above, we have been able to drag 36 into cell B10, even though 36 is not valid data entry.
Again, the validation check is not triggered.
NOTE:
This is the behavior in Excel 365. In earlier versions, depending on settings, copy/paste and drag/drop could remove the data validation list entirely.
Breaking data validation wasn’t too difficult, was it? Any user without any malicious intent could copy/paste or drag cells.
So, let’s see what we can do. Let’s look at a few possible solutions.
Circle invalid data
After users enter data and return the sheet back to us, we can check to see if all the data is valid.
Start by removing the protection from the sheet.
Next, click Data > Data Validation (drop-down) > Circle Invalid Data

Excel now displays a circle around any values that do not meet the data validation criteria for the cell.
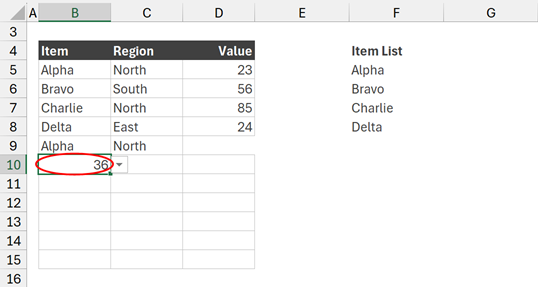
We can then investigate the issues and fix any invalid values.
To clear the circles, click Data > Data Validation (drop-down) > Clear Validation Circles
This is a useful check if users are sending a workbook back to us. However, it does not indicate to a user that there is an issue.
Use a formula to show invalid entries
How can we give users an indicator to show an incorrect value? One of the easiest is through a check formula.
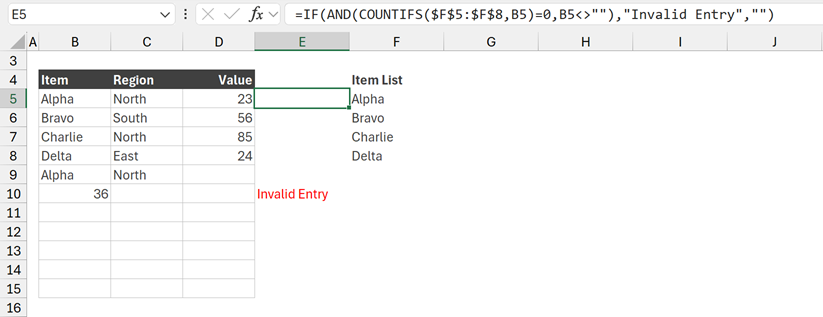
The formula in cell E5 is:
=IF(AND(COUNTIFS($F$5:$F$8,B5)=0,B5<>""),"Invalid Entry","")The formula has been copied down into the cells below.
Since the value in B10 is not in cells F5-B8, and it is not blank, E10 displays Invalid Entry.
We could also apply a dynamic array version if it meets our requirements better:
=IF((COUNTIF(F5:F8,B5:B15)=0)*(B5:B15<>""),"Invalid Entry","")This provides a visual cue to the user about an issue with their data entry.
For this approach, we need to ensure the formula and the data validation both refer to the same range for performing the check (F5:F8 in our example).
Conditional formatting
An alternative option to a formula is to apply conditional formatting to the data validation cells.
Select the cells containing the data validation check, click Home > Conditional Formatting > New Rule
In the New Formatting Rule dialog box, select the use a formula to determine which cells to format option.
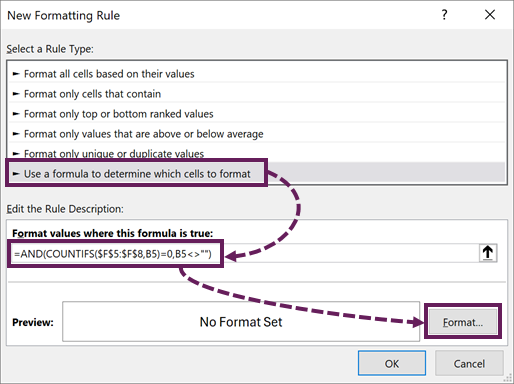
In the format values where this formula is true box, enter the following formula:
=AND(COUNTIFS($F$5:$F$8,B5)=0,B5<>"")Then click the Format… icon, and apply a suitable format.
Now, when a user enters an invalid value, the cell color changes to indicate an issue exists. This also triggers even if values are copy/pasted or drag/dropped.
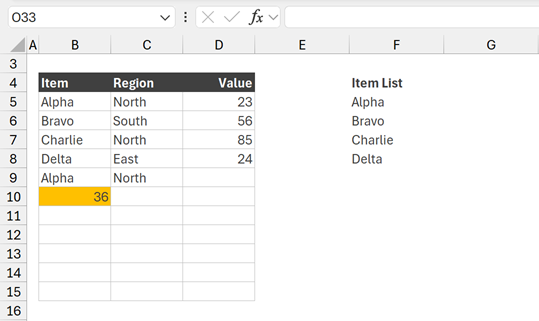
Just like the formula option, this method only works if the conditional format checks against the same cells as the data validation list.
VBA options
The options we looked at above do not prevent invalid data entry; only highlight invalid data. So, what about VBA Macro options? Can they help us prevent invalid data entry?
There are plenty of ways to tackle this situation with VBA Macros. However, since users need to enable workbooks containing macros, VBA does not provide a guaranteed method. If a user does not enable macros, then we have the same situation as above.
Please note, that even after applying the VBA codes below, it is still possible to enter invalid data using other more advanced methods (VBA & Office Scripts). Therefore, while VBA gets us closer, it is still not 100% guaranteed.
There are many VBA methods that we could apply. The methods we are covering below are to prevent drag and drop and copy and paste.
Prevent drag and drop
If a user does enable macros, then we can disable drag and drop.
Enter the following code into the worksheet module of the sheet containing the data validation.
'Disable drag and drop
Private Sub Worksheet_Activate()
Application.CellDragAndDrop = False
End Sub

'Enable drag and drop
Private Sub Worksheet_Deactivate()
Application.CellDragAndDrop = True
End Sub
Let’s take a brief look at this code.
Application.CellDragAndDrop enables or disables a user’s ability to drag and drop. However, we must take care as this is an application-level setting, which impacts everything else in Excel.
The first code disables drag-and-drop when the worksheet is activated, and the second code enables it when the worksheet is deactivated.
If a user closes a workbook without deactivating the sheet, the setting remains active. Also, if a workbook opens with the data validation sheet selected initially, the activate action is not called.
Therefore, we also need the following code included in the workbook module to tackle these issues.
'Enable drag and drop on workbook close
Private Sub Workbook_BeforeClose(Cancel As Boolean)
Application.CellDragAndDrop = True
End Sub

'Activate the sheet on workbook open
Private Sub Workbook_Open()
Run "Sheet1.Worksheet_Activate"
End Sub
Sheet1 is the codename of the sheet containing the data validation; adjust this for your requirements.
WARNING!
If Excel crashes while the application level setting is applied, the Workbook_BeforeClose action does not execute. Therefore, your workbook could leave a user without the ability the Drag & Drop!
You need to decide if that is really a risk you want to take!
Prevent copy and paste
Next, let’s move on to look at preventing copy and paste.
We can disable copy/paste by canceling the behavior each time a user selects a cell on the worksheet.
Add the following code to the worksheet code module.
'Disable copy and paste
Private Sub Worksheet_SelectionChange(ByVal Target As Range)
Application.CutCopyMode = False
End Sub
Application.CutCopyMode determines whether Excel is in copy/cut mode. It is not a permanent application-level setting.
By setting Application.CutCopyMode to False when a user clicks a cell in the worksheet; it prevents the pasting behavior from being available.
Conclusion
In this post, we have seen how easy it is to break data validation in Excel, even on a protected worksheet.
Options such as Circle Invalid Data, formulas, and conditional formatting can provide visual cues for invalid data but cannot prevent the input of invalid data.
By using VBA macros with worksheet events, we can apply application-level settings to prevent drag/drop and copy/paste. Care must be taken with the application level settings as they change user settings for the whole Excel application.
Even after applying all these techniques, if a user wants to, there are still advanced ways to enter invalid data.
So, if we can’t trust data validation, is it pointless? No. Even if it is not 100% perfect, it’s still better than no validation at all.
Related Posts:
- Change number format based on a cell value in Excel
- Application.CutCopyMode = False (How to use it)
- How to use Excel Table within a data validation list (3 ways)
- How to loop through each item in Data Validation list with VBA
Discover how you can automate your work with our Excel courses and tools.

Excel Academy
The complete program for saving time by automating Excel.

Excel Automation Secrets
Discover the 7-step framework for automating Excel.

Office Scripts: Automate Excel Everywhere
Start using Office Scripts and Power Automate to automate Excel in new ways.


Nice article. I’ve long known how easy it is for an innocent copy/paste to circumvent validation, but I wasn’t aware that 365 preserved data validations and conditional formats during copy/paste as long as worksheet protection is in place. So that’s a fantastic tip!