
Creating multiple PDFs based on a list is a common use case in Excel. I’m asked about it regularly.
A few weeks ago, I received this question about our Office Scripts course:
Before I start the course on Office Scripts, I was wondering if it is possible to loop through a spreadsheet and with each iteration of the loop save the spreadsheet as a PDF?
I thought it would be helpful to share how to do this. It is super easy with Office Scripts and Power Automate.
If you’re looking for a VBA solution, you can find that here: https://exceloffthegrid.com/excel-create-pdfs-based-on-a-list/
Table of Contents
Download the example file: Join the free Insiders Program and gain access to the example file used for this post.
File name: 0157 Multiple PDFs – Office Scripts and Power Automate.xlsx
Watch the video
Example
We have two Excel files for our example: Reporting Example.xlsx and PDF Save List.xlsx.
Save both files in a OneDrive folder (OneDrive for Business, not OneDrive personal).
Report Example.xlsx
Reporting Example.xlsx is the information we wish to save as a PDF; it is included in the Report sheet.
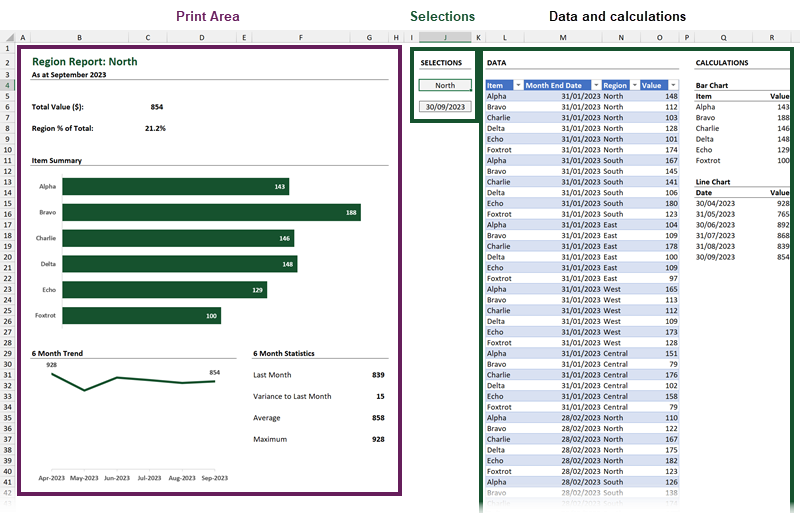
Only the print area of the report will be saved as a PDF.
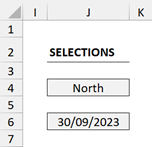
Changing the values in cells J4 (Region) and J6 (Date) causes the report to recalculate to display different views of the data.
- Valid regions in cell J4 are North, South, East, West, Central, or * to include all regions.
- Valid dates in cell J6 are any month ends from 31 July 2023 to 31 December 2023
PDF Save List.xlsx
PDF Save List.xlsx includes a Table called ReportList.
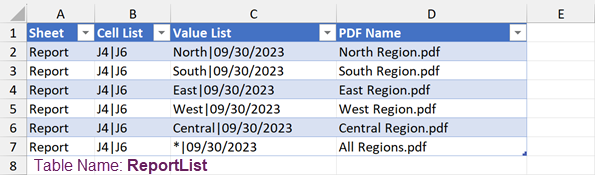
The Table contains all the information we need:
- Sheet: The name of the sheet with the parameters to change for each loop iteration.
- Cell List: The list of cells we need to change for each loop. These could be named ranges if we had set them up.
- Value List: The list of values to apply for each iteration of the report. The values must correspond to the same positions in the Cell List.
- PDF Name: The name we wish to give to the saved PDF.
There are a few things to make you aware of here:
- I used US dates in the mm/dd/yyyy format because UK dates of dd/mm/yyyy caused calculation issues (not sure why).
- The separator between the Cell List and Value List is a pipe symbol ( | ). You can use other separators if you prefer.
Office Script
As part of our Office Scripts course, we give our Power Automate Ready Code library as a bonus. We are going to use one of the scripts from that library for this project.
In Excel, click Automate > New Script. Then copy and paste the following code into your Script Editor. Make sure you save the script. I have called it PA – Change Cell Values.
The script simply changes values on a worksheet, based on a list of cells and values.
function main(workbook: ExcelScript.Workbook, wsName: string, cellList: string, valueList: string, separator: string) {

  /*
  Purpose: Power Automate script to change cell values on a worksheet

  Parameters:
    - wsName - The name of the worksheet
    - cellList - String value of cell references or named ranges
        separated by a comma
    - valueList - String value of values separated by a comma
    - separator - The character(s) separating each item in the
        cellList and valueList parameters

  Notes:
   - Multiple cells can be changed at the same time.
   - The cellList must be the same length as the valueList

    */

  //Script variables
  let ws = workbook.getWorksheet(wsName);
  let cellListArr: string[] = cellList.split(separator);
  let valueListArr: string[] = valueList.split(separator);

  //Loop through all cells and apply new value
  for (let i = 0; i < cellListArr.length; i++) {
      ws.getRange(cellListArr[i]).setValue(valueListArr[i]);
  }

}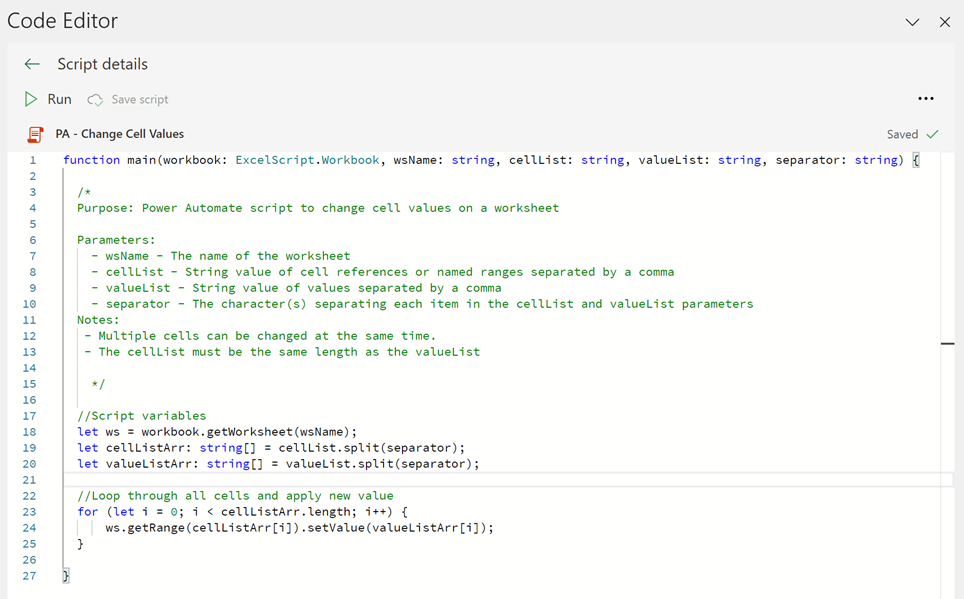
The comments at the top of the code detail the arguments we must pass from Power Automate.
Building the Power Automate Flow
Now let’s head over to Power Automate. Build the following flow.
There are additional notes below the image. Watch the video to see the flow created from the start.
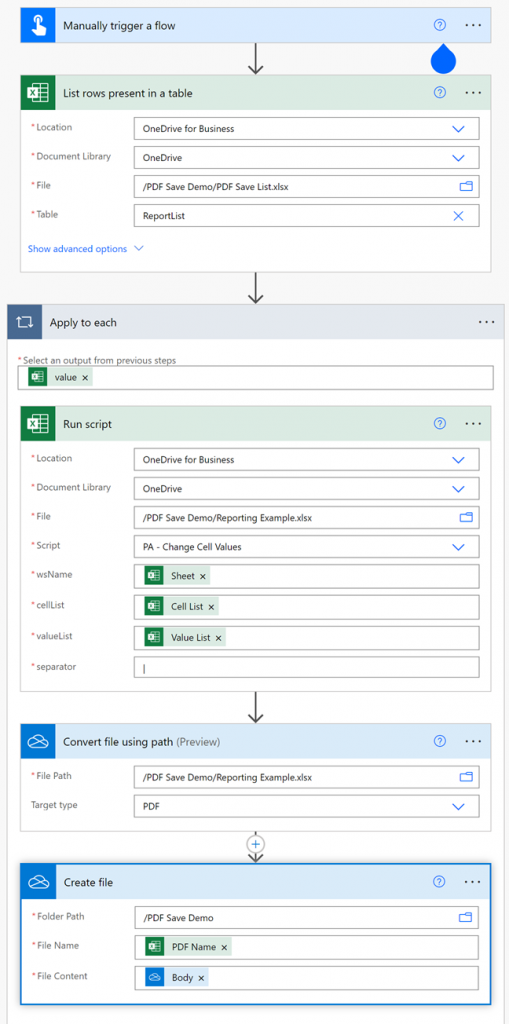
NOTES:
- Manually trigger a flow: I have used a manual trigger for simplicity of demonstration, but this could be any relevant trigger.
- List rows present in a Table:
- File: This is the full file path to the PDF Save List.xlsx file noted above
- Table: This is the name of the Table containing the data we need (ReportList)
- Apply to each: Don’t worry about this part initially; Power Automate adds this when you try to use any values from the ReportList table.
- Value: This is added automatically to represent each row of the Table.
- Run script: This calls our script to change the cell values for the specified workbook.
- File: The file to run the script on (e.g., our Reporting Example.xlsx workbook)
- Script: Find the script we saved earlier. After selecting the script, the script parameters appear
- wsName: Select the Sheet from the Dynamic Content pop-up
- cellList: Select the Cell List from the Dynamic Content pop-up
- valueList: Select the Value List from the Dynamic Content pop-up
- separator: The charactor used between the Cell List and Value List in the ReportList (a | symbol in our example)
- Convert file using path: This step creates a PDF from our Excel File. The file is converted in memory; we need to use the Create File step to save the file.
- File Path: The name of the file to convert to a PDF
- Target Type: The file type we wish to generate
- Create file: This step saves the PDF file
- Folder Path: The folder to save the PDF
- File Name: The name of the file. Select the PDF Name from the Dynamic Content pop-up
- File Content: The content to be included in the file. Select the File Content from the Convert file using path step section of the Dynamic Content pop-up
Running the Flow – Create multiple PDFs
Now let’s test the flow and see if this works.
Click the Test button in the top right corner and run the flow manually.
If we set up everything correctly, the individual PDFs will generate in the specified Folder Path. Select one of the PDFs to check; you know you want to.
Now change the date in the PDF Save List and rerun it. The PDFs are created with the new data.
Pretty neat, right?
Conclusion
Power Automate and Office Scripts provide a modern alternative to VBA for creating multiple PDFs based on a list. With one simple reusable script and a Table of parameters to loop through, we can quickly create multiple PDFs.
Related Posts:
- Move data between workbooks (Power Automate+Office Scripts)
- How to run Power Automate from Excel with Office Scripts or VBA
- Use Office Scripts with Power Automate
- How to save Excel as PDF with VBA (10 examples)
- Excel – Create multiple PDFs based on a list with VBA
Discover how you can automate your work with our Excel courses and tools.
The Excel Academy

Make working late a thing of the past.
The Excel Academy is Excel training for professionals who want to save time.