In this post, we are looking at how to use Office Scripts with Power Automate. They are both relatively new tools in the online world, and when used together, they create a new ecosystem for automation with Excel.
Power Automate is a cloud-based low-code / no-code tool that enables automation through connectors into many Microsoft and 3rd party applications.
Office Scripts are a feature of Excel online which enables users to record or write scripts that automate Excel workbook-based tasks.
I like to think of it as two levels: the micro-level and the environment-level.
- Micro-level: Office Scripts only work on one workbook at a time. There are limited features to work outside of a workbook, and even passing data between multiple workbooks is tricky.
- Environment-level: Power Automate interacts with different applications; it has connectors for Outlook, Excel, Gmail, Twitter, Adobe, and many, many more.
The most important thing about these two applications is that they can work together. We can call an Office Script from Power Automate, and pass values from Office Scripts back to Power Automate. By using both, they create a framework in which we can achieve some amazing things.
In this post, we will not cover the basics of Power Automate or Office Scripts. Instead, we will focus on getting the two to interact with each other, and how to do so in the most reusable way.
Table of Contents
- The scenario
- Explicit script
- Return values from a script
- Dynamic script
- Reusable scripts
- Change a cell value (reusable script)
- Hardcode a sheet (reusable script)
- Delete specific sheets (reusable script)
- Return values from cells (reusable script)
- Updating the dynamic script
- Performance impact
- Conclusion
Download the example file: Join the free Insiders Program and gain access to the example file used for this post.
File name: 0060 User Office Scripts with Power Automate.zip
The scenario
To demonstrate the benefits of using Office Scripts and Power Automate, I will be taking you on a journey through multiple stages. The scenario we are looking at is this:
- A company has 4 regions North, East, Central and Head Office, each of which is looked after by a different region manager.
- From a consolidated report, we have to create a separate e-mail for each region manager, with their individual hardcoded report attached.
- The data is not shared, only the final summary report.
Example file
The file contains:
- Data tab containing a Table called Data:
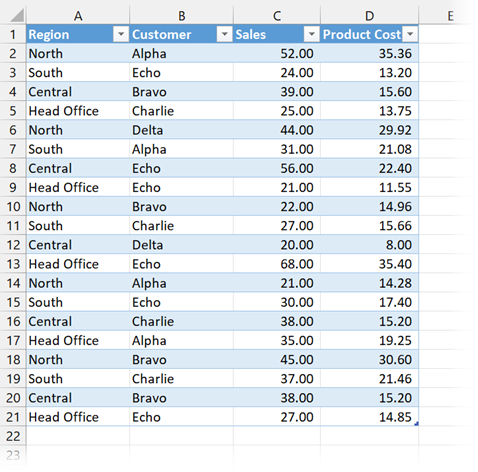
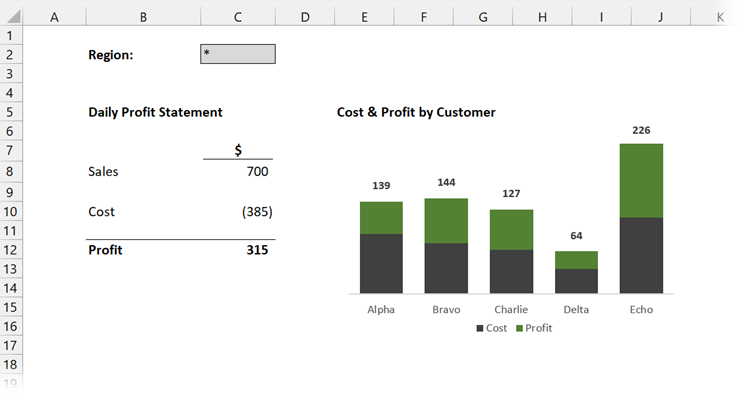
- Report tab containing a profit statement and chart by customer. Changing the value in Cell C2 updates the profit statement and chart for the selected region.
Explicit script
The initial version of our Office Script undertakes the following actions:
- Changes the value of cell C2 of the Report tab to the value North (this automatically causes the workbook to recalculate)
- Hardcodes the values in the Report tab to remove calculations
- Deletes all sheets except the Report tab
Each numbered step corresponds to the numbers in the script below.
function main(workbook: ExcelScript.Workbook)
{

  //Assign name of report sheet to variable
  let wsReportName = "Report";
  let wsReport = workbook.getWorksheet(wsReportName);

  //[1] Change the cell value
  let selectedRegion = "North";
  wsReport.getRange("C2").setValue(selectedRegion);

  //[2] Copy and paste values on the sheet
  let rng = wsReport.getUsedRange();
  rng.setValues(rng.getValues());

  //[3] Loop through each sheet delete if not the report sheet
  let wsArr = workbook.getWorksheets();
  wsArr.forEach(ws => {
    if (ws.getName() != wsReport.getName()) {
      ws.delete();
    }
  })
}
When reading through the code above, take note of the parameters used (we will be using these later):
- “Report” – this is the name of the Tab
- “North” – the name of the region
- “C2” – the cell in which the region name is entered
Within Power Automate, there is an action called run script, which requires 4 parameters:
- Location, Document Library, and File are all used to reference the workbook on which to run the script.
- Script references to the script to run (we will see later that we can pass additional parameters to a script).
The complete Power Automate flow for this process has 5 steps:
- On a manual trigger
- Copy the file to create a version for the North region
- Run the script on the new file
- Get the content of the new file
- Send the new file as an attachment to an e-mail
Here are the 5 steps in detail:
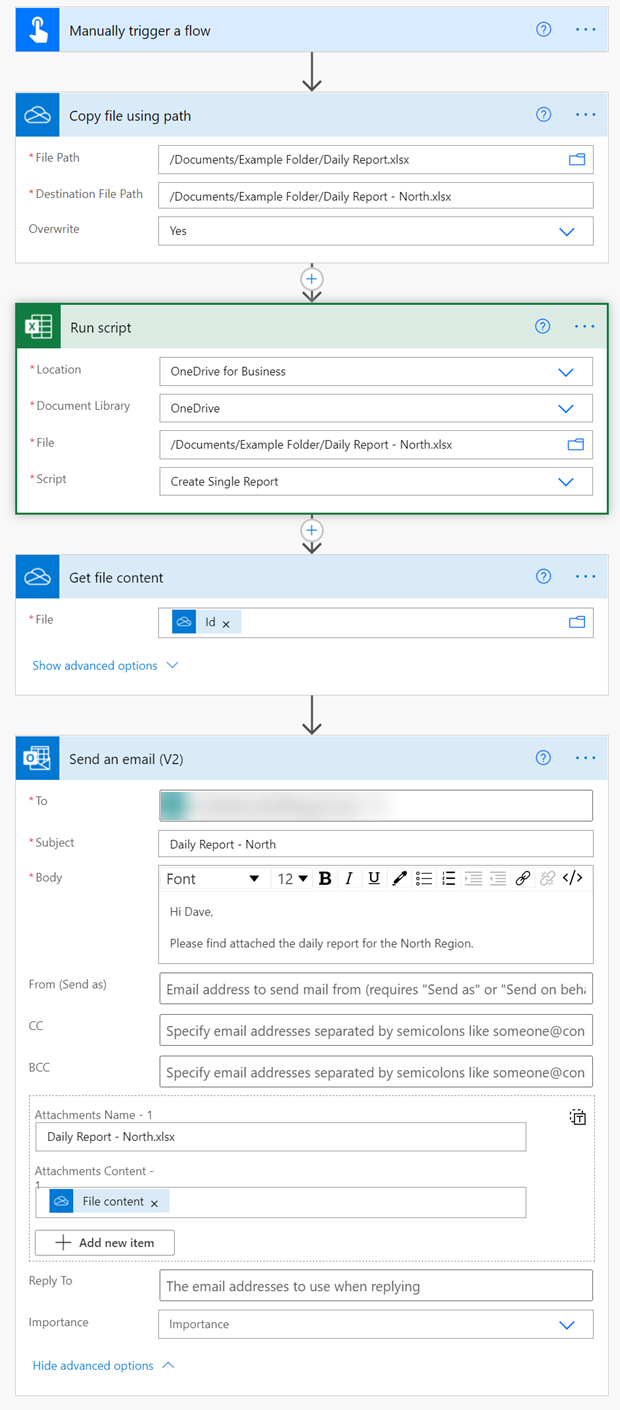
By running the flow above, it will create and e-mail the report for the North region. If we wanted to do this for all 4 regions, we could create 3 more Office Scripts; one for each region, then expand our flow to do the creation and e-mail process 3 more times.
It would work, but it’s not particularly reusable; we would need to create new scripts and significantly change the Power Automate flow to add regions. So, in a later section, we will make this more dynamic by looping through a parameter table.
Return values from a script
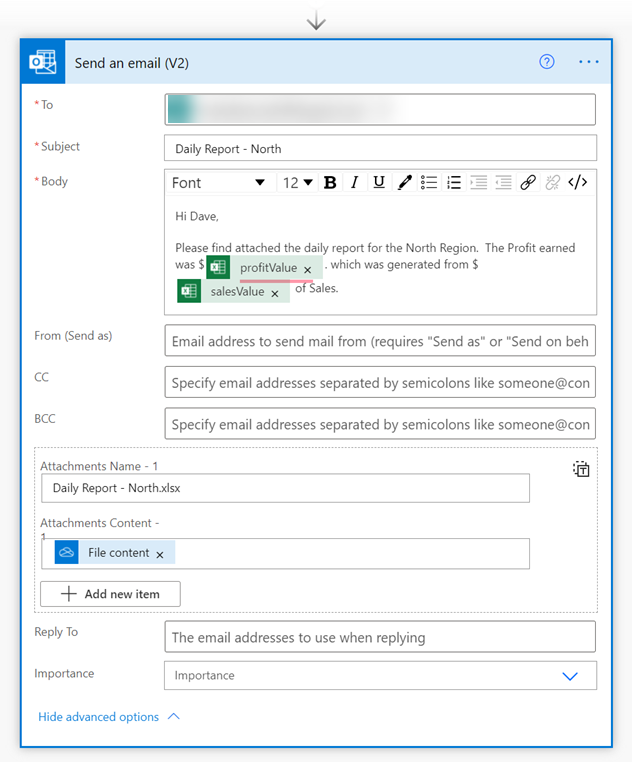
The first improvement is to make the e-mail more dynamic. Let’s suggest that in our scenario, we want to include values from the report directly within the body of the e-mail. Let’s assume the message we wanted was:
Hi Dave,
Please find attached the daily report for the North Region. The Profit earned was $59. which was generated from $184 of Sales.
The highlighted sections in the message above are to be dynamic values based on the Excel report. To achieve this, we add a return statement to our script (see the bold section at the bottom, everything else remains the same).
function main(workbook: ExcelScript.Workbook)
{

  //Assign name of report sheet to variable
  let wsReportName = "Report";
  let wsReport = workbook.getWorksheet(wsReportName);

  //[1] Change the cell value
  let selectedRegion = "North";
  wsReport.getRange("C2").setValue(selectedRegion);

  //[2] Copy and paste on the sheet
  let rng = wsReport.getUsedRange();
  rng.setValues(rng.getValues());

  //[3] Loop through each sheet delete if not the report sheet
  let wsArr = workbook.getWorksheets();
  wsArr.forEach(ws => {
    if (ws.getName() != wsReport.getName()) {
      ws.delete();
    }
  })

  //[4] Return the profit and sales values
  let profitValue = wsReport.getRange("C12").getValue();
  let salesValue = wsReport.getRange("C8").getValue();

  return {profitValue, salesValue};

}
The return statement has been used, followed by the 2 values to be returned in curly brackets.
While we are here, just take a mental note of these two additional parameters:
- “C12” – the cell containing the profit value
- “C8” – the cell containing the sales value
When we run the script through a flow, the profit and sales values are now passed back to Power Automate. This enables us to use those values in our flow. Look at the email extract below; the Body section has been updated, so the profit and sales values are now based on the values returned from the Office Script.
Dynamic script
Now let’s move on to make everything dynamic. As stated earlier, we really don’t want to write separate Office Scripts for each region..
Making the script dynamic
As a reminder, the 5 parameters which I have asked you to make a note of so far are:
- “Report” – this is the name of the Tab
- “North” – the name of the selected region
- “C2” – the cell in which the region name is entered
- “C12” – the cell which contains the profit value
- “C8” – the cell which contains the sales value
We now change the function statement at the top of the script to include the 5 parameters.
- wsReportName
- selectedRegion
- regionCell
- profitCell
- salesCell
Note: By adding required parameters into a script, it can no longer be run manually in Excel online; it can only be used with Power Automate.
In the script below, the parameters and their usage have been highlighted.
function main(workbook: ExcelScript.Workbook, wsReportName: string,
  selectedRegion: string, regionCell: string, profitCell: string,
  salesCell: string) {

  //Assign name of report sheet to variable
  let wsReport = workbook.getWorksheet(wsReportName);

  //[1] Change the cell value
  wsReport.getRange(regionCell).setValue(selectedRegion);

  //[2] Copy and paste values on the sheet
  let rng = wsReport.getUsedRange();
  rng.setValues(rng.getValues());

  //[3] Loop through each sheet delete if not the report sheet
  let wsArr = workbook.getWorksheets();
  wsArr.forEach(ws => {
    if (ws.getName() != wsReport.getName()) {
      ws.delete();
    }
  })

  //[4] Return the profit and sales values
  let profitValue = wsReport.getRange(profitCell).getValue();
  let salesValue = wsReport.getRange(salesCell).getValue();

  return { profitValue, salesValue }

}
There are now no hardcoded values in our script. We can change any of the parameters, and the script will run.
Setting up a parameter table
One Power Automate action, which sits at the environment level, is to loop through each item in an Excel Table. If we create a table of every parameter we need, our entire flow can be based on that table.
We can amend/add/remove details about any region in the parameter table. If a region manager changes, no problem, we update the parameter table with the new name and email address, and the flow continues to run.
Our parameter table has 9 parameters, including the 5 used for the Office Script.
- Region – the name of the region to select in the Excel file
- Name – the name of the individual who will receive the report
- Email address – the email address where the file should be sent
- File Path – the file path to the attachment to be sent
- File Name – the file name of the attachment to be sent
- Tab Name – the name of the tab to be sent
- Region cell – the cell reference to where the region name is entered
- Sales Cell – the cell in the tab which contains the sales value
- Profit Cell – the cell in the tab which contains the profit value

Using the dynamic flow
Our flow now needs to change:
- On a manual trigger
- Retrieve all rows from the parameter table
- For each row of the parameter table:
- Copy the file to create a new version
- Run the script on the new file
- Get the content of the new file
- Send the new file as an attachment on an email
We can now send reports for as many regions as we wish; we just add or remove rows from the parameter table.
Here are the 5 steps in detail:

Just take a second to look at the Run Script step. You will notice that Power Automate requires the 5 script parameters we defined in our Office Script. Each of these parameters has been populated with values taken from the parameter table.
Reusable scripts
But wait… before you go and start using this technique, let me ask you this: How reusable is the Office Script? Not very.
It takes specific parameters and provides a specific outcome, but it does so using 4 very common steps.
- Change a cell value
- Copy and paste values on a sheet
- Delete all sheets except one
- Return values from cells
If we use Power Automate and Office Scripts a lot, we are likely to use these 4 actions over and over in different automations. Therefore, let’s take a modular approach and create 4 separate reusable scripts, one for each common step.
I won’t go over each script in detail; this is intended to demonstrate the principles of using reusable modules rather than creating reusable modules.
Change a cell value (reusable script)
function main(workbook: ExcelScript.Workbook, wsName: string, cellList: string,
  valueList: string, separator: string)
{
  //Script variables
  let ws = workbook.getWorksheet(wsName);
  let cellListArr: string[] = cellList.split(separator);
  let valueListArr: string[] = valueList.split(separator);

  //Loop through all cells and apply new value
  for (let i = 0; i < cellListArr.length; i++) {
    ws.getRange(cellListArr[i]).setValue(valueListArr[i]);
  }

}
Parameters:
- wsName – the name of the worksheet on which to change the values
- cellList – the text string containing the cell references of the values to change. Where there are multiple cells (e.g., “A10,B12,A11”), they must be separated by a separator character(s).
- valueList – the text string containing the values to apply to the equivalent cell references. Where there are multiple values, they must be separated by a separator character(s).
- separator – the text string used to separate the valueList and cellList (e.g., in the cellList and valueList above, the separator is a comma “,”)
Notes
- The cellList and valueList must contain the same number of items for the script to operate correctly.
- This script does not work with named items, only cell references.
Hardcode a sheet (reusable script)
function main(workbook: ExcelScript.Workbook, wsList: string)
{

  //Script variables
  let wsArr = workbook.getWorksheets();
  let wsListArr: string[] = wsList.split(",");

  //Copy and paste values for used range for each worksheet in the array
  wsArr.forEach(ws =>
    wsListArr.forEach(wsInList => {
      if (ws.getName() == wsInList) {
        ws.getUsedRange().setValues(ws.getUsedRange().getValues());
      }
    })
  )

}
Parameters:
- wsList – String value of worksheet names separated by a comma.
Delete specific sheets (reusable script)
function main(workbook: ExcelScript.Workbook, method: string, wsList: string)
{

  //Script variables
  let wsArr = workbook.getWorksheets();
  let wsListArr: string[] = wsList.split(",");
  let booleanVar: boolean;

  //If method == "Listed" the apply to sheets in array
  if (method == "Listed") {
    wsArr.forEach(ws =>
      wsListArr.forEach(wsInList => {
        if (ws.getName() == wsInList) {
          ws.delete();
        }
      })
    )
  }

  //If method == "Unlisted" then apply to sheets not in array
  if (method == "Unlisted") {
    wsArr.forEach(ws => {
      booleanVar = false;
      wsListArr.forEach(wsInList => {
        if (ws.getName() == wsInList) {
          booleanVar = true;
        }
      });
      if (booleanVar == false) {
        ws.delete();
      }
    });
  }

}
This script is a little tricky to understand as it contains a method parameter. The method parameter is used to determine whether the sheets to be deleted are those included or excluded from the wsList parameter.
Parameters:
- method – string value of:
- “Listed” – script is applied to worksheets in the wsList
- “Unlisted” – script is applied to all worksheets not in the wsList
- wsList – String value of worksheet names separated by a comma
Return values from cells (reusable script)
function main(workbook: ExcelScript.Workbook, wsName: string, cellRef: string)
{

  //Script variables
  let ws = workbook.getWorksheet(wsName);
  let cellValue: string | number

  //Get the cell value
  cellValue = ws.getRange(cellRef).getValue();

  //Return the value
  return cellValue;

}
Parameters
- wsName – the name of the worksheet from which to return the value
- cellRef – text string containing the cell references of the value to be returned.
Updating the dynamic script
We can now update our flow to use the 4 reusable scripts (highlighted below):
- On a manual trigger
- Retrieve each row of the parameter table
- For each row on the table:
- Copy the file to create a version
- Run script to change the cell value
- Run the script to copy and paste values
- Run the script to delete sheets
- Run the script to return the profit value
- Run the script to return the sales value
- Get the content of the new file
- Send the file as an attachment to on e-mail
Our flow now looks like this:

Performance impact
Power Automate and Office Scripts are not particullarly fast. Calling multiple scripts, instead of one, adds a lot of time to the process:
- Original dynamic flow: 34 seconds to run.
- Reusable dynamic flow: 204 seconds to run.
Each call of an Office Script adds approx 10 seconds no matter what it is doing. Therefore, by using small reusable scripts, there is a significant time overhead involved.
Power Automate runs online and does not lock up any other resources for you, so if a flow takes 170 seconds longer, does it really matter? Probably not. However, for all of us, there will be a tipping point where it just takes too long. In these scenarios, one targeted script will be a better option, as the time impact should be reduced significantly.
Conclusion
There we go, that’s how to use Office Scripts with Power Automate. We have seen how to pass values/parameters to/from Office Scripts and Power Automate. We have also seen how to make our scripts dynamic and reusable. Hopefully, this post has given you some new techniques to use.
For our scenario, we used a manual trigger. However, automated triggers, such as when an e-mail is received or when a file is created, would turn this into a truly automated flow.
If we start building a library of reusable Office Scripts, we will soon have a large collection of scripts we can call upon when need. This enables us to building new flows with Power Automate in minutes, rather than the hours we may have previously taken with VBA.
Discover how you can automate your work with our Excel courses and tools.

Excel Academy
The complete program for saving time by automating Excel.

Excel Automation Secrets
Discover the 7-step framework for automating Excel.

Office Scripts: Automate Excel Everywhere
Start using Office Scripts and Power Automate to automate Excel in new ways.

Clear, sweet and short explanation yet power packed to advanced steps in one post.
Thank you and hats off!
Thank you, I appreciate the feedback 🙂