Office Scripts have workbook scope. Which means they can’t move data from one workbook to another. In fact, they don’t even know another workbook exists. However, they can pass data to Power Automate, which has the ability to pass data to other workbooks. So, in this post, we look at how to move data between workbooks automatically with Power Automate and Office scripts.
Table of Contents
Watch the video
Example
The example we are looking at in this post is as follows:
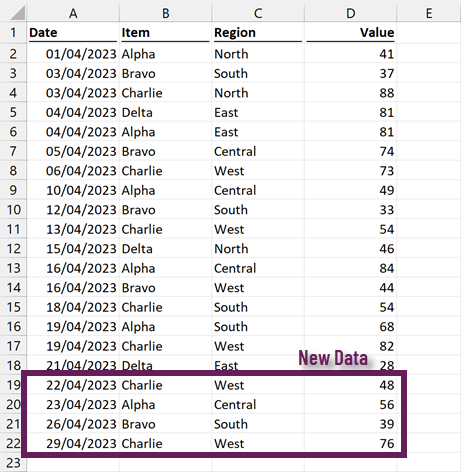
The Complete Data.xlsx workbook contains our complete dataset. It includes the following on the Data tab.
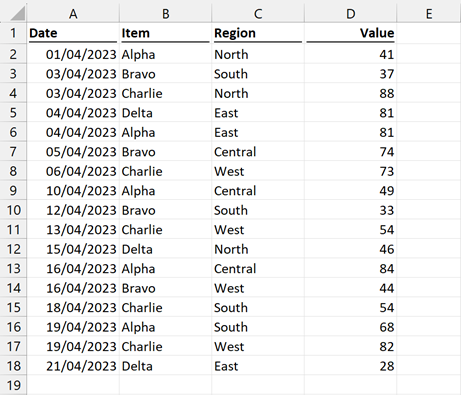
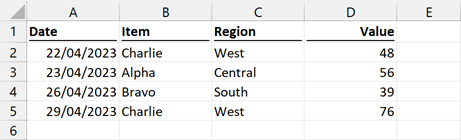
Whenever we receive a file with new data, we want Complete Data.xlsx to update automatically with that new data. Below is an example of what each new data file looks like. It’s on a tab called Data.
Solution overview:
For this solution, we are using only 3 steps
- We will use the When a new file is created trigger for OneDrive for Business. Therefore, the flow executes any time we add a file to a specific folder.
- After the trigger, an Office Script runs to retrieve the data from the new workbook and passes the data back to Power Automate.
- Finally, another Office Script runs to append the data from step 2 into the Complete Data.xlsx workbook.
Office Script to get data from Excel
The first step is to create the script for getting the data from Excel.
First, let’s create the script for getting the data from Excel.
There are a few quirks to be aware of:
- We don’t know how many rows there are in a new data set. We use the getSurroundingRegion() method to move all the data in the contiguous range.
- The new data will likely include header rows or calculation rows at the bottom. However, these are not part of the dataset. Therefore, the Office Script below has parameters to remove a specified number of rows at the top and bottom.
- The final return statement passes the array of the data to Power Automate in an object called wsRngArr.
Copy and paste the following into the Office Scripts code editor. In the example, I saved the script as PA – Get Data from Excel.
The comments provide more detail about each line of code.
function main(workbook: ExcelScript.Workbook,
  wsName: string, startCell: string,
  headerRowsToRemove: number,
  footerRowsToRemove: number) {

  //Declare and assign the worksheet
  let ws = workbook.getWorksheet(wsName);

  //Delare and assign the data range
  let wsRng = ws.getRange(startCell).
    getSurroundingRegion()

  //Get the values of the data range in array
  let wsRngArr = wsRng.getValues();

  //Count the rows in array
  let wsRngArrRowCount = wsRngArr.length;

  //Calcualte the number of rows to return
  let wsRngArrRowLength = wsRngArrRowCount -
    headerRowsToRemove - footerRowsToRemove + 1;

  //Remove the top and bottom rows
  wsRngArr = wsRngArr.slice(headerRowsToRemove, wsRngArrRowLength)

  //Return the range
  return { wsRngArr };

}
The parameters needed for the script:
- workbook: The workbook object to get the data from
- wsName: The name of the worksheet containing the data
- startCell: The first cell containing the data (e.g., “B2”)
- headerRowsToRemove: This is the number of header rows to remove from the top of the range (the value can be 0 if there is no header row)
- footerRowsToRemove: This is the number of footer rows to remove from the bottom of the range (the value can be 0 if there is no footer row)
Office Script to paste data from Power Automate
In the previous script, we retrieved the data from the workbook and passed it to Power Automate. We now need a second script to paste the data from Power Automate into another workbook.
The example we are looking at here appends the data to an existing data set.
Copy and paste the following into the Office Scripts code editor. In the example, I have saved the script as PA – Paste Append Data to Excel.
The comments provide more detail about each line of code.
function main(workbook: ExcelScript.Workbook, wsName: string,
  startCell: string, strArr: string) {

  //Convert the strArr to an array
  let newDataArr: string[][] = JSON.parse(strArr)

  //Declare and assign the worksheet
  let ws = workbook.getWorksheet(wsName);

  //Get the old data
  let dataArr = ws.getRange(startCell).getSurroundingRegion().
    getValues()

  //Join the dataArr and newDataArr
  dataArr = dataArr.concat(newDataArr)

  //Get the size of the range to paste to
  let dataRng = ws.getRange(startCell).
    getAbsoluteResizedRange(dataArr.length, dataArr[0].length)

  //Set the values of the new data set
  dataRng.setValues(dataArr)

}
The parameters needed for the script are:
- workbook: The workbook object to paste the data to
- wsName: The name of the worksheet on which to paste the data
- startCell: The first cell in the data range to which the new data is appended
- strArr: The array of data, as a string, passed from the first script (i.e., the object called wsRngArr)
Power Automate Flow to move data between workbooks
The complete Power Automate flow for this example is as follows:
Power Automate steps
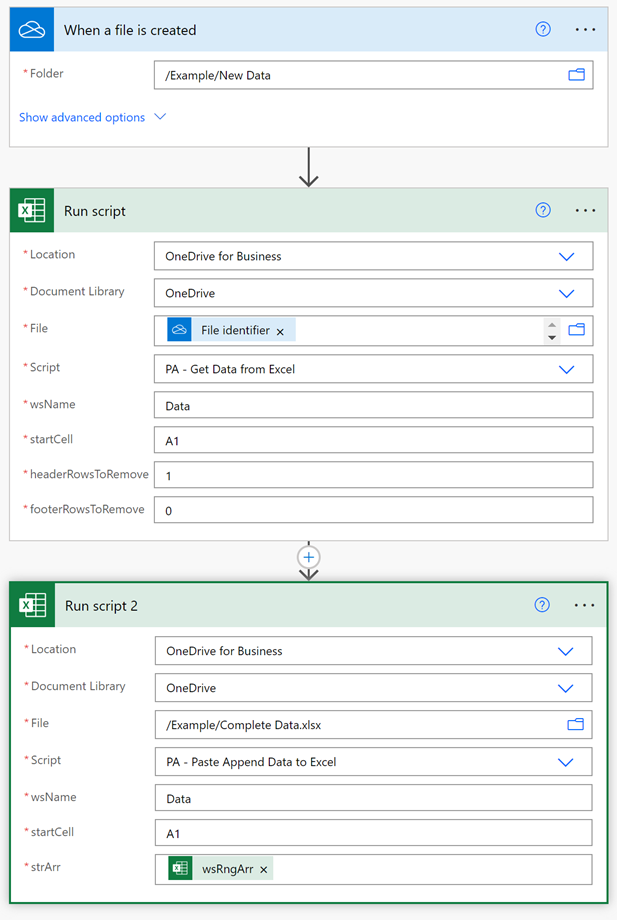
Notes:
- In the Run Script step, we do not know the file name. Therefore, the File identifier value from the When a file is created step has been used to capture the file name dynamically.
- As shown in the Run Script step, the new data has 1 header row to remove, but zero footer rows.
- Using the Run Script step, the wsRngArr is passed to Power Automate from the PA – Get Data from Excel script.
- In the Run Script 2 step, the wsRngArr is passed to the PA – Paste Append Data script.
Running the flow
To run the flow, we just need to upload a file with the new data into the One Drive /Example/New Data/ folder. This starts the trigger.
Give the script a few seconds to run, and Ta-Dah! The new data is added automatically.
NOTE: The when a file is created step does not execute when a file is moved within OneDrive, only when a new file is added to the folder.
Conclusion
By using Office Scripts and Power Automate, we can easily move data between workbooks automatically. This is a great way to control our data, as we can maintain a single file containing all records.
Related posts:
- Use Office Scripts with Power Automate
- How to email or save Excel images with Power Automate
- Office Scripts – Reverse number signs
Discover how you can automate your work with our Excel courses and tools.
The Excel Academy

Make working late a thing of the past.
The Excel Academy is Excel training for professionals who want to save time.
Hello, I tried to use your script and it did worked for some 1500 rows. I want to copy pate around 10000 rows and get this error:
We were unable to run the script. Please try again.
Office JS error: Line 22: Range setValues: Timeout
Could you please suggest a way I can use this script for large data.
Did you ever figure this out? Having the same issue.
I’m also facing this issue, were you able to resolve it?
I have the same issue, did anyone find a solution for this?
Hi, please help me. in the 2nd Run script step, I cannot choose any dynamic content in strArr field. It says “No dynamic content available”
Just start typing the text of the name of the parameter, it will appear.
Hi, I’m getting the same error:
Office JS error: Line 22: Range setValues: The number of rows or columns in the input array doesn’t match the size or dimensions of the range.
Any news or solutions?
I got below error during my flow run get data from XLS script
The parameter ‘file’ could not be URI encoded. It may be too long or have an invalid sequence.
I suspect it has to be a .xlsx file, rather than a .xls (which were superseded 16 years ago).
Sorry, yes, I would mentioned xlsx.
So source data is located in XLSX file and destination also XLSX file. And for me seems it stop when the wsRng range would be set (row 10)