I was on a call recently where somebody asked if it was possible to create a unique PDF for each item in a list. The answer is “Yes”, so in this post, I want to show you how to do it; how to create multiple PDFs based on a list in Excel.
Table of Contents
Download the example file: Join the free Insiders Program and gain access to the example file used for this post.
File name: 0073 Save PDFs based on a list.zip
Watch the video
Scenario
The scenario we are looking at is reasonably straightforward, so you should be able to adapt it to your specific circumstances.
In the example file, we want to create an exam report for each student based on their ID number (see screenshot below).
When the Student ID value in Cell G4 changes, the report recalculates to return the results for the selected student.
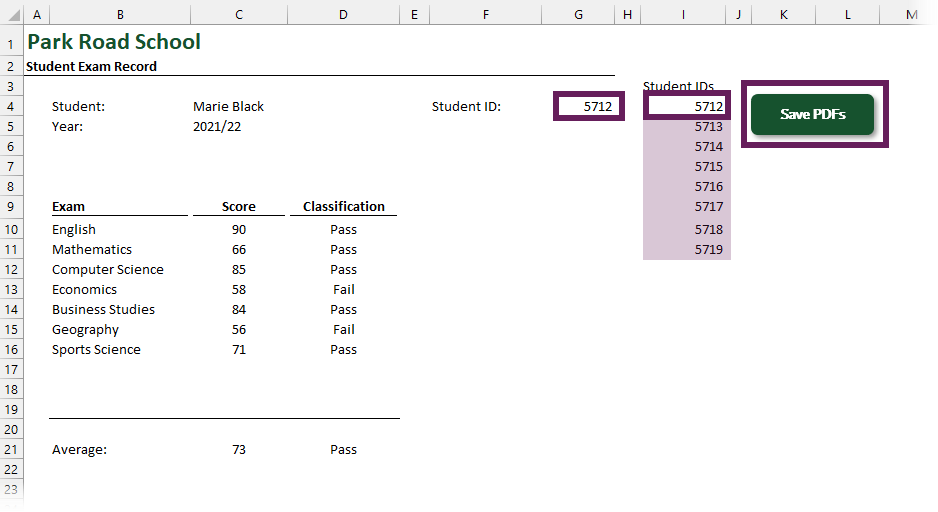
Cell G4 is based on a data validation list, using the values starting in Cell I4.
There is a shape labeled Save PDFs; we will assign the macro to this button later.
The entire report is based on data contained in an Excel Table (see screenshot below)
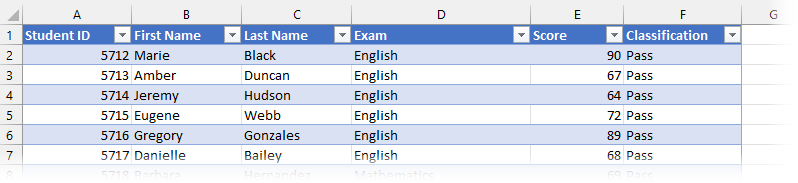
I have used XLOOKUP, UNIQUE, and FILTER functions for ease of demonstration. Therefore, the example file will only function correctly if you have a dynamic array-enabled version of Excel (i.e., it won’t work on Excel 2019 and earlier). However, I have not used any dynamic array functionality in the VBA macro. You should be able to adapt the code, even if you do not have a dynamic array-enabled version of Excel.
VBA macro
Insert the code below into a standard code module.
Sub SavePDFsFromList()

'Declare the Variables
Dim ws As Worksheet
Dim rngID As Range
Dim rngListStart As Range
Dim rowsCount As Long
Dim i As Long
Dim pdfFilePath As String
Dim tempPDFFilePath As String

'Stop the screen updating while running
Application.ScreenUpdating = False

'Reference Report Sheet
Set ws = ActiveWorkbook.Sheets("Report")

'Reference the Student ID cell
Set rngID = ws.Range("G4")

'Reference the start of the Studend ID List
Set rngListStart = ws.Range("I4")

'Count the rows in the Student ID List
rowsCount = rngListStart.CurrentRegion.Rows.Count - 1

'Create the PDF File Name
pdfFilePath = "C:\Test Folder\PDF Export\Student Exam Record - [ID].pdf"

For i = 1 To rowsCount

    'Change the current student ID
    rngID.Value = rngListStart.Offset(i - 1, 0).Value

    'Replace [ID] with the Student ID Value
    tempPDFFilePath = Replace(pdfFilePath, "[ID]", rngID.Value)

    'Create the PDF
    ws.ExportAsFixedFormat Type:=xlTypePDF, _
        fileName:=tempPDFFilePath

Next i

'Restart the screen updating
Application.ScreenUpdating = True

End Sub
Adapting the code to your scenario
There are too many scenarios where this type of solution could be applied. Therefore, you will need to adapt the code above to meet your specific requirements. The essential items to change are:
Set rngID = ws.Range("G4")
The cell reference G4 should be changed to be the parameter that causes the report to change.
Set rngListStart = ws.Range("I4")
The cell reference I4 should be the first cell in the list of items to loop through.
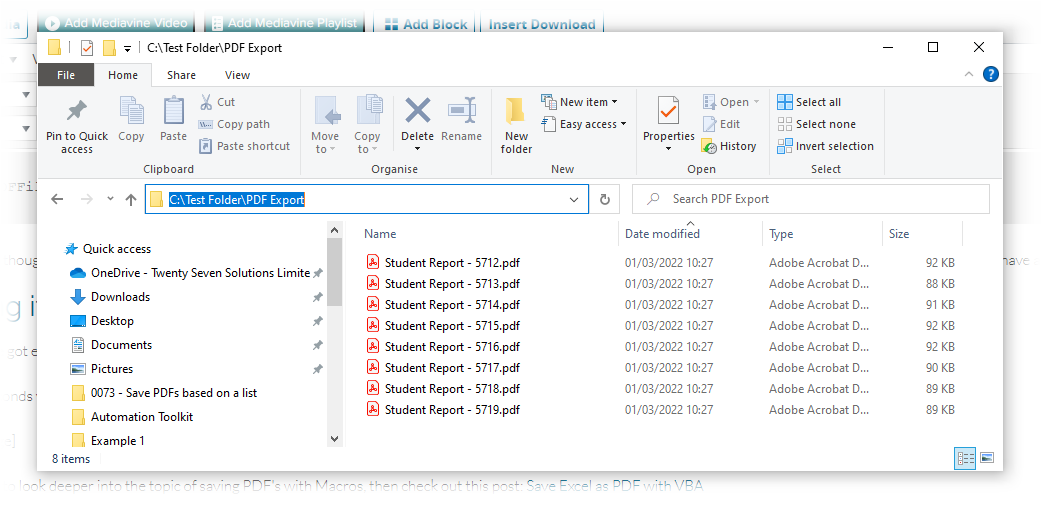
pdfFilePath = "C:\Test Folder\PDF Export\Student Exam Record - [ID].pdf"
The pdfFilePath should contain a valid folder path on your PC or network.
The string of [ID] identifies the reference that should be replaced within the PDF file path. This text string needs to be the same in the code above and below.
tempPDFFilePath = Replace(pdfFilePath, "[ID]", rngID.Value)
Testing it out
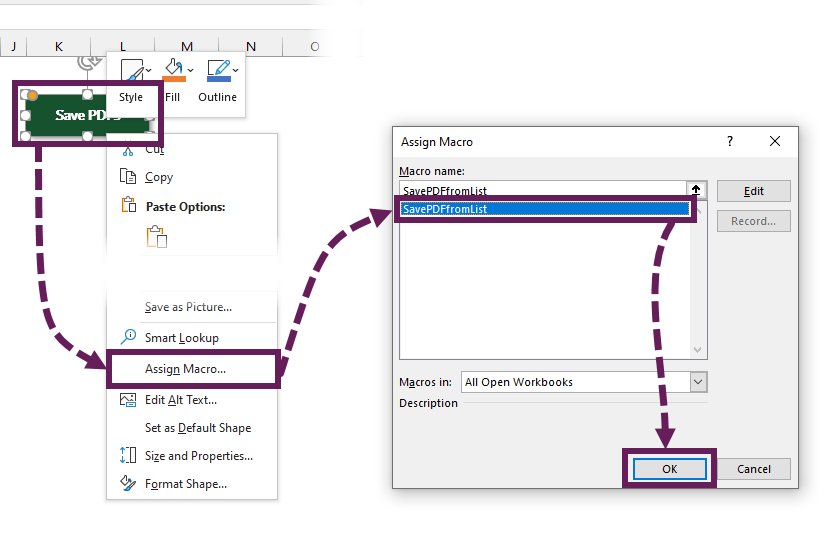
Now, let’s assign the macro to the shape so we can test it out.
- Right-click on the shape
- Select Assign Macro… from the menu
- In the Assign Macro dialog box, select the macro
- Click OK
Everything is now set up; let’s test it out. Click the Save PDFs button.
We have the individual student reports all saved down in a few seconds. So even if you had hundreds, it really shouldn’t take long 😀.
If you want to look deeper into the topic of saving PDFs with VBA macros, then check out this post: Save Excel as PDF with VBA.
Discover how you can automate your work with our Excel courses and tools.
The Excel Academy

Make working late a thing of the past.
The Excel Academy is Excel training for professionals who want to save time.
Hi,
This is a great tutorial, I’ve been looking for something like this for a while.
I have a macro that creates a pdf file and attaches it to an email with recipients and email body text included, would it be possible do you think to combine this with the macro here to open up multiple emails and attach each individual file? Or does the format of how this macro works prohibit this in someway?
Thanks again
Yes, that sounds possible to me.
This is amazing. I have a 40 person sales team and this will save me hours of saving individual files. Is there a way to do this same thing but save file as an excel file instead of a pdf? Thanks for the awesome work.
Hello, thanks for this tutorial – very useful.
I am trying to add the code to save the pdf files in the same location as the workbook is saved. Do you know is this is possible?
Thank you
Yes, this is possible.
Actually, I don’t think uploading the documents to a 3rd party site is an easier option. Also, this is likely to be in breach of most company IT policies. I can’t think of many organization that are happy for employees to upload sensitive information to a 3rd party websites.
Love this.
I needed to include an auto fit for cell height since the incoming data size varied.
Easy add with:
Range(“[insert range]”).Select
Selection.Rows.AutoFit
Working on having it save as the name vs ID now. Would be helpful to include that along with how to add each file as an attachment to an email!
Hello Mark
Very usefull video, thanks.
Quick question, as you can see, there are some blank lines between the line 19 and the data in the Filter function. Which code we can use there so that blank lines collapse before the file transformed into the PDF and expanded at the end of the process?
Cheers
For FILTER it will convert blank lines to 0, because it is a calculate inside the array.
So you would use something like this:
=FILTER(Data,Data[Item]<>0)
However, if you’re getting your data through Power Query initially, you should be handling zero blank values in there. Therefore this ensures blank values are removed before it even gets into Excel.
Great tutorial!
How can we enhance it to send the PDF’s to the student emails at the click of the button?
Thank you it’s very useful.
Still wondering if you can address how to save all the sheets in one PDF file?
Thanks in advance!
Assuming you still want to loop through a list…
You would need to create a macro which:
1) Adds a hard coded sheet for each item in the list
2) Saves the workbook as a PDF
3) Deletes the hardcoded sheets created.
Or… you could
1) Save down the PDFs individually
2) Use Power Automate Desktop (Microsoft tool which is free for Windows 10, and already installed by Windows 11) to merge the PDFs together.