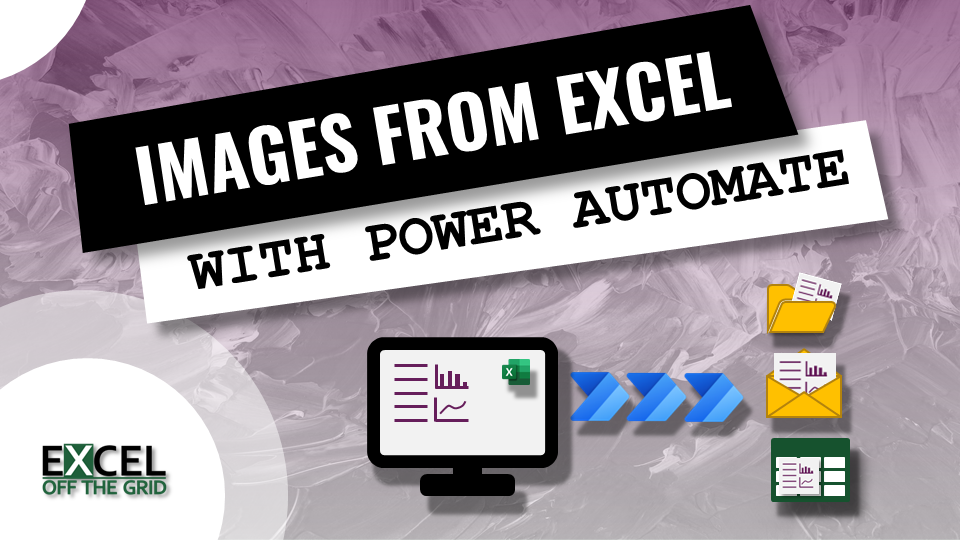
It is common in many businesses to send regular email summaries or reports to senior executives. Typical scenarios include daily sales reports or cash-flow positions. These emails often contain images displaying the key information. With the current cloud technologies, we now have an easy way to automate this. So, in this post, we look at how to email or save images from Excel using Office Scripts and Power Automate.
Table of Contents
Download the example file: Click the link below to download the example file used for this post:
Watch the video
Background to images in Office Scripts
Within Office Scripts, there are three objects for which we can obtain images:
- Ranges – This could be a cell range (such as A1:D10) or a named range. Note: It does not include any objects, such as shapes or charts placed on top of the range.
- Charts – These are the standard chart objects. Note: charts can also be treated as shape objects.
- Shapes – This includes individual shapes, shape groups, and charts.
When an image is generated from Ranges, Charts, or Shapes using Office Scripts, these are created as Base 64 encoded text strings. This is text which represents the image.
This Base 64 text string can easily be passed into other applications, such as Power Automate because it is text. Those applications can then convert the text to image objects for the user to see.
This is the process we are undertaking in this post.
Office Script to generate Base 64 encoded image
Depending on how we intend the use the Base 64 encoded image with Power Automate, there are three formats we may want to use.
- Base 64 text – The raw text string generated with the .getImage() or .getImageAsBase64 methods in Office Scripts
- Base 64 text + image type – The same Base 64 image as above, but is preceded by data:image/png;base64,. This text informs the recipient application of the image type, such as PNG, JPEG, BMP, or GIF. For our example, everything will be PNG.
- Base 64 text + image type + HTML – The same Base 64 text + image type above, but wrapped in HTML tags so it can be rendered within a HTML email.
The script returns three values base64, base64img, base64imgHTML. These three values cover all the possible use cases.
The script is intended to be reusable for any scenario where an image is required. It has been written to accept 4 parameters:
- workbook – The workbook on which to run the Office Script
- wsName – The name of the worksheet which contains the range, chart, or shape
- objType – The text string of Range, Chart, or Shape which is used to declare the type of object
- objName – This is the name of a specific range, chart, or shape from which the image is generated
Copy the script below into the Office Scripts editor, then save it. For this example, I have used the name PA – Get image from Excel.
The comments within the script describe each code section.
function main(workbook: ExcelScript.Workbook,
  wsName: string,
  objType: string,
  objName: string) {

  //Declare the variables
  let ws = workbook.getWorksheet(wsName);
  let base64: string;
  let base64Img: string;
  let base64ImgHTML: string;

  //Return image from range or change based on request
  if (objType == "Range") {
    base64 = ws.getRange(objName).getImage();
  } else if (objType == "Chart") {
    base64 = ws.getChart(objName).getImage();
  } else if (objType == "Shape") {
    base64 = ws.getShape(objName).
      getImageAsBase64(ExcelScript.PictureFormat.png);
  }

  //Add image type to the pure base64
  base64Img = "data:image/png;base64," + base64

  //Add HTML tags to base64 imgBase64
  base64ImgHTML = '<img src="' + base64Img + '"/>'

  //Return the result
  return {base64, base64Img, base64ImgHTML}

}
We are now ready to use the script within our Power Automate flows.
Examples
All the examples below are based on the following workbook:
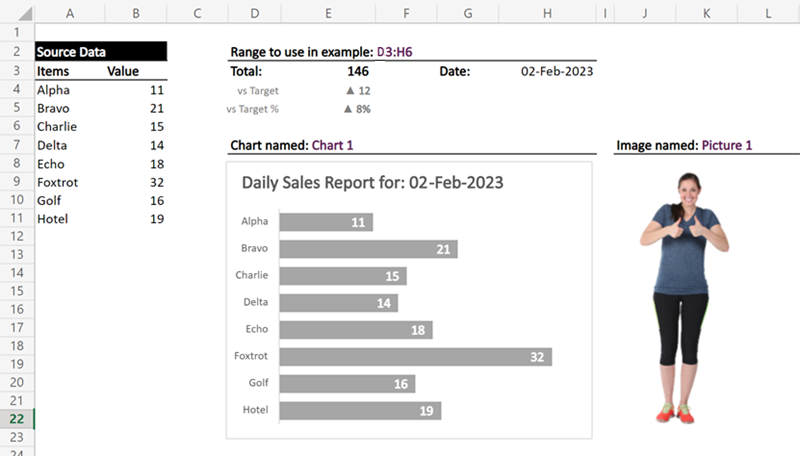
The key elements of the example are:
- Worksheet called Sheet 1
- Range of cells containing the summary D3:H5
- Chart called Chart 1
- Image called Picture 1
Flow #1: Save images from Excel to OneDrive or SharePoint
The first Power Automate flow captures an image from an Excel range and saves the file to OneDrive or SharePoint.
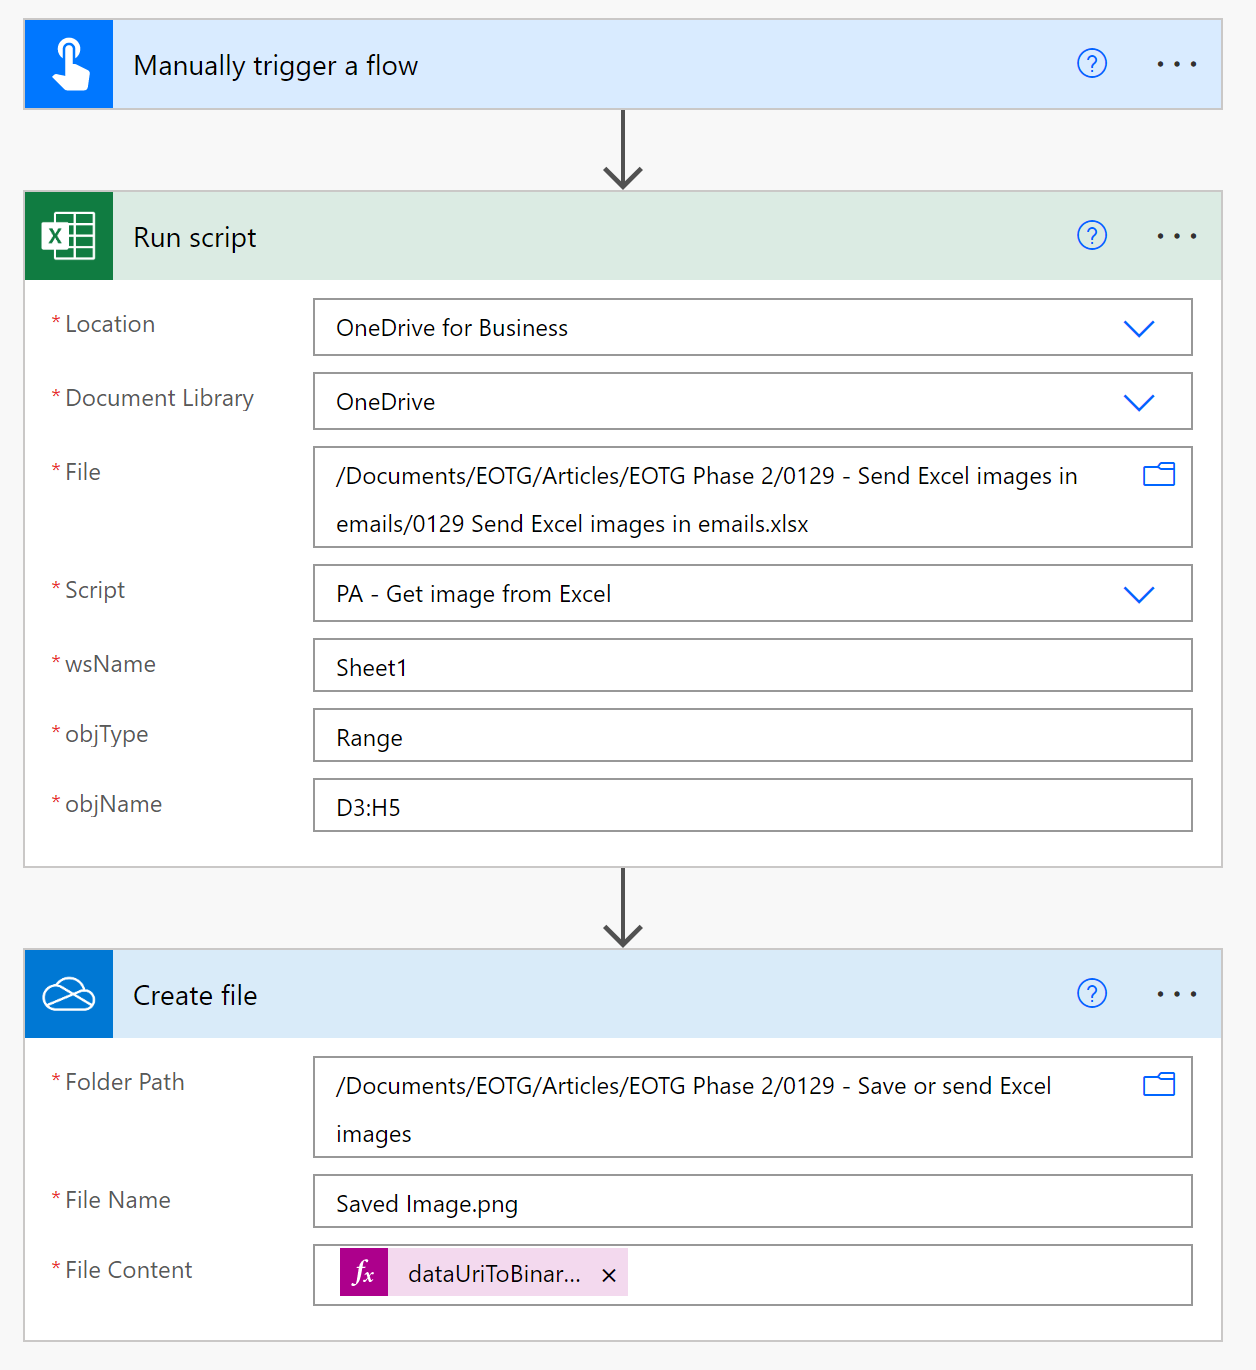
The parameters passed to the PA – Get image from Excel script are:
- workbook: /Documents/_______/0129 Send Excel images in emails.xlsx
- wsName: Sheet1
- objType: Range
- objName: D3:H5
These parameters ensure the image returned is from Range D3:H5 of Sheet1 from the selected workbook.
In this flow, we used the base64Img return value to get the Base 64 text. But we can’t save this string as an image; we need to use the dataUriToBinary function to convert the Base 64 text to an image file. The function in the File Content parameter of the Create file step is:
=dataUriToBinary(outputs('Run_script')?['body/result/base64Img'])The function takes the imgBase64 output of the script and converts it to binary, which can be saved as a png file.
Flow #2: Email images of Excel charts or ranges
We can send emails containing images using the Send an email (v2) action within Power Automate.
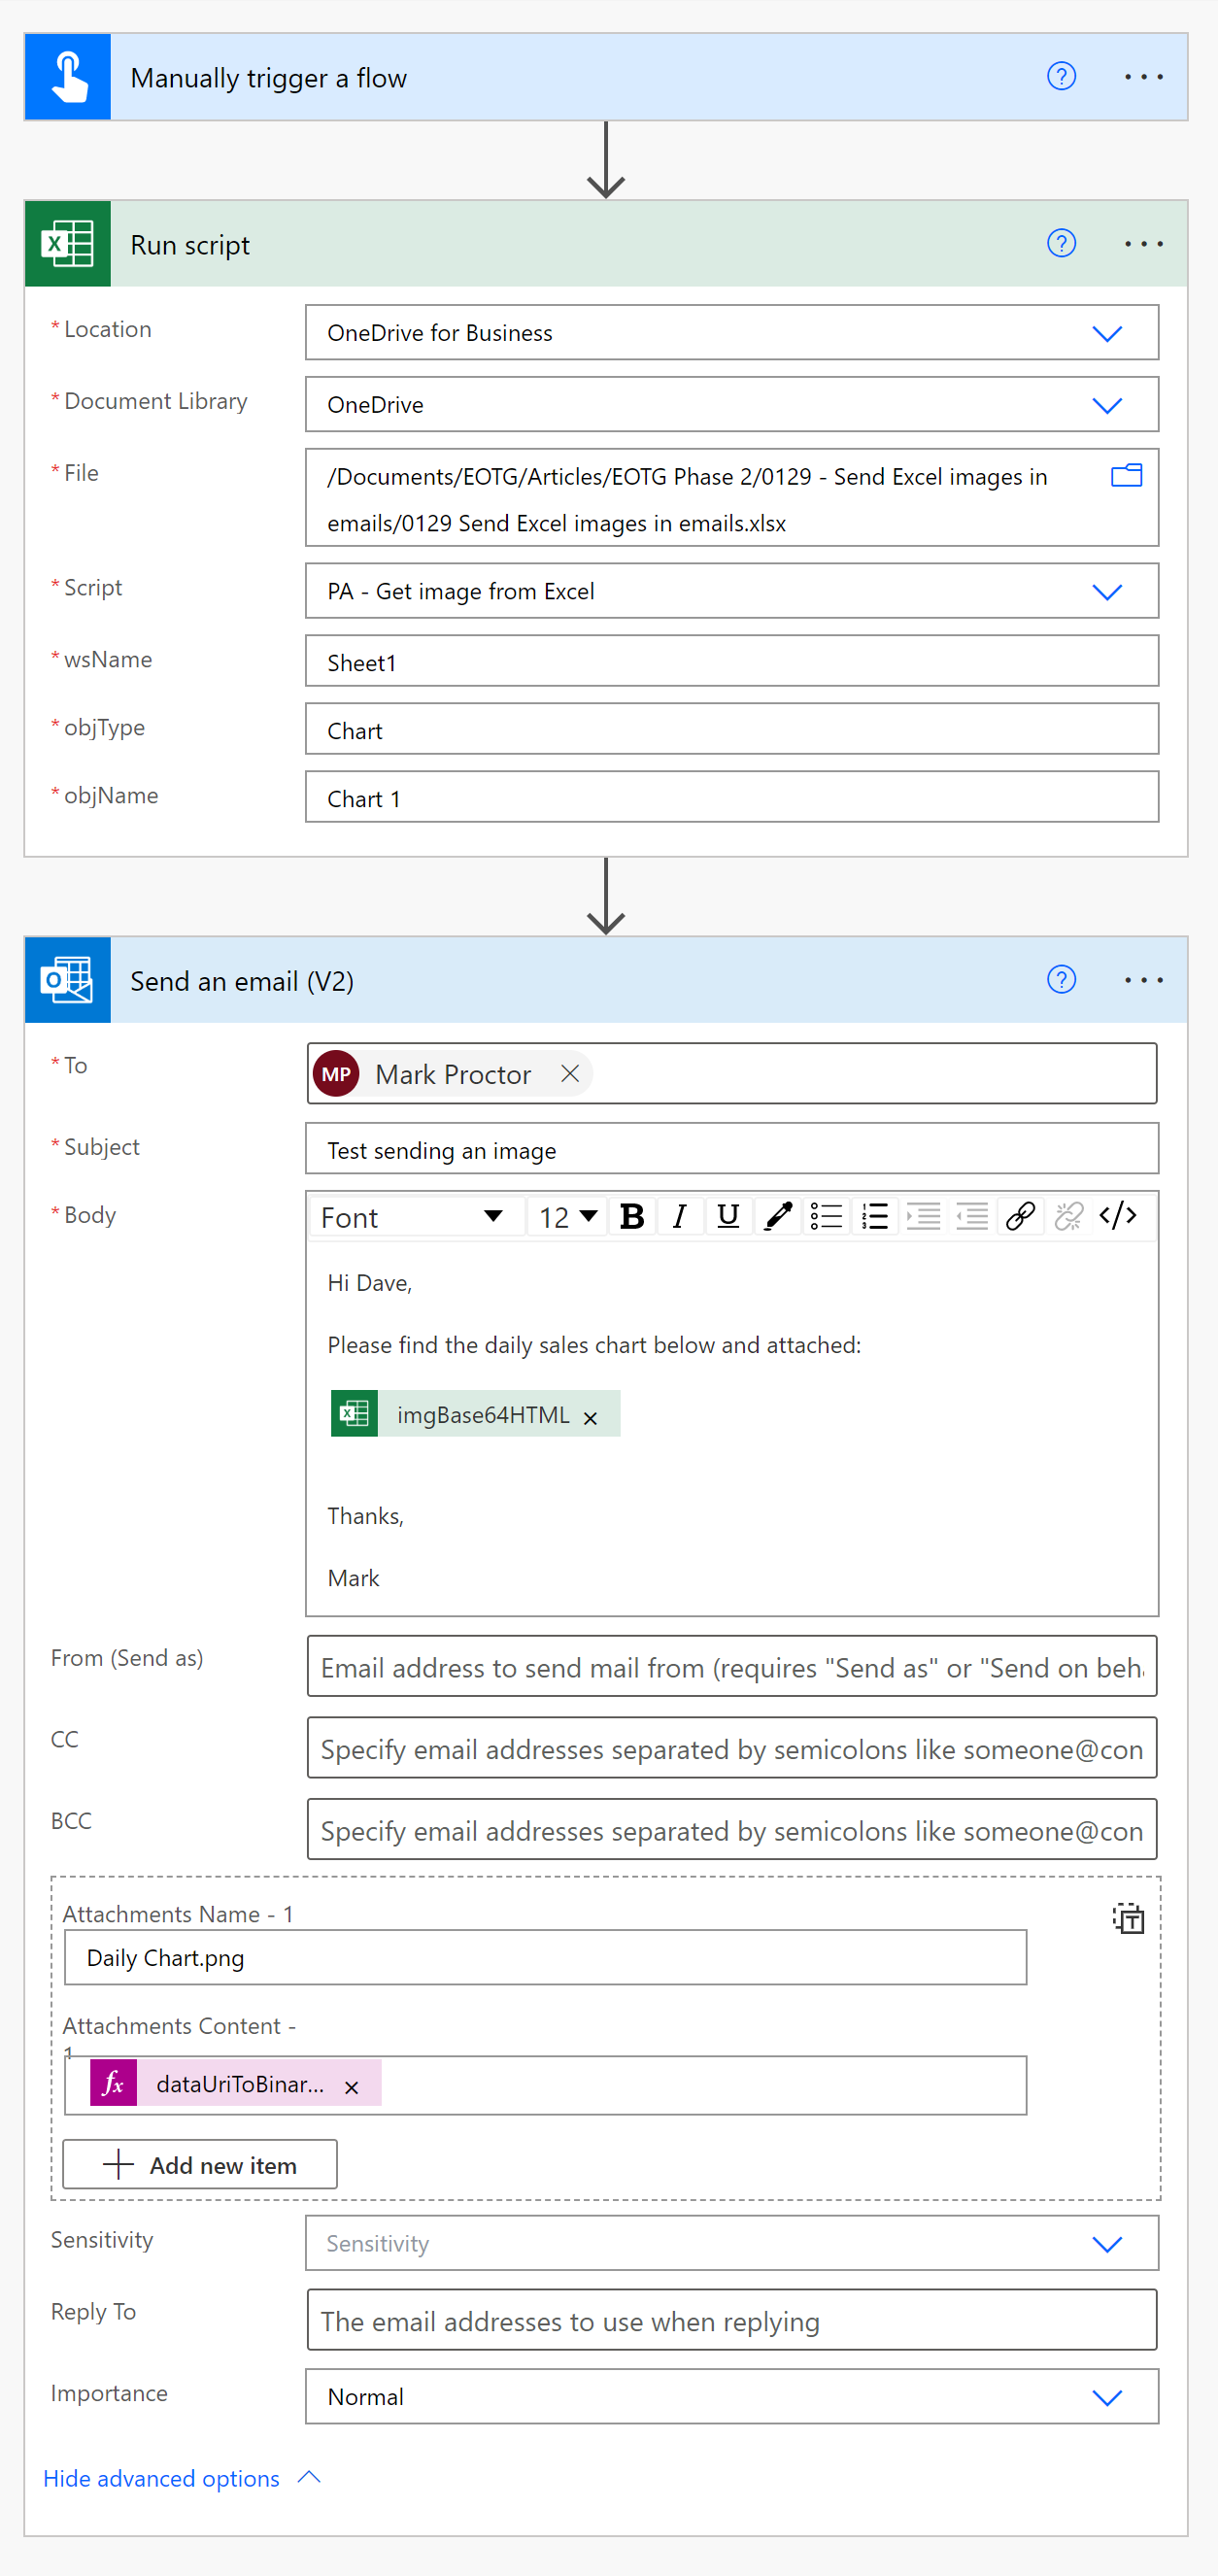
The parameters passed to the script are:
- workbook: /Documents/_______/0129 Send Excel images in emails.xlsx
- wsName: Sheet1
- objType: Chart
- objName: Chart 1
These parameters ensure the image returned is Chart 1 from Sheet1 from the workbook.
There are two ways to send images via email:
- Include images in the email body – For this, we use the imgBase64HTML value returned by the Office Script. The script has already added the relevant HTML tags, so, we can use the return value directly in the email body.
- Include images as attachments – To Include images as attachments, we must convert the base64Img value to a binary file. This is the same method as noted in Flow #1 above.
It is unlikely we would ever do both, but they are included in the flow to illustrate both methods.
Note: There is a caveat to this method. While Outlook is happy to work with Base 64 encoded images in the email body, Gmail and some other email providers do not support this. They allow attached images but not Base 64 embedded images. If sending emails outside your organization, do some testing to find out if the images render correctly. There are some technical workarounds, but these are outside the scope of this post.
Flow #3: Pasting images between Excel workbooks
In the final example, we pass an image between two Excel workbooks.
Office Script to paste an image
We already have a script to convert the image to Base 64, but now we need a second script to convert Base 64 back to an image and place it on a specific worksheet.
The script below accepts 4 arguments:
- workbook – This is the workbook on which to run the Office Script
- base64 – The text value obtained from the PA – Get image from Excel script
- wsName – The name of the worksheet to place the image
- imgName – The name to be applied to the final image
Copy the script below into the Office Scripts editor and save it. For this example, I have used the name PA – Paste image in Excel.
function main(workbook: ExcelScript.Workbook,
  base64: string,
  wsName: string,
  imgName: string) {

  //Declare the workbook
  let ws = workbook.getWorksheet(wsName);

  //Declare and add the image
  let img = ws.addImage(base64)

  //Change the image name
  img.setName(imgName);

}
Having saved the script, we can now use it in Power Automate.
Power Automate flow to paste image between workbooks
This flow uses both Office Scripts.
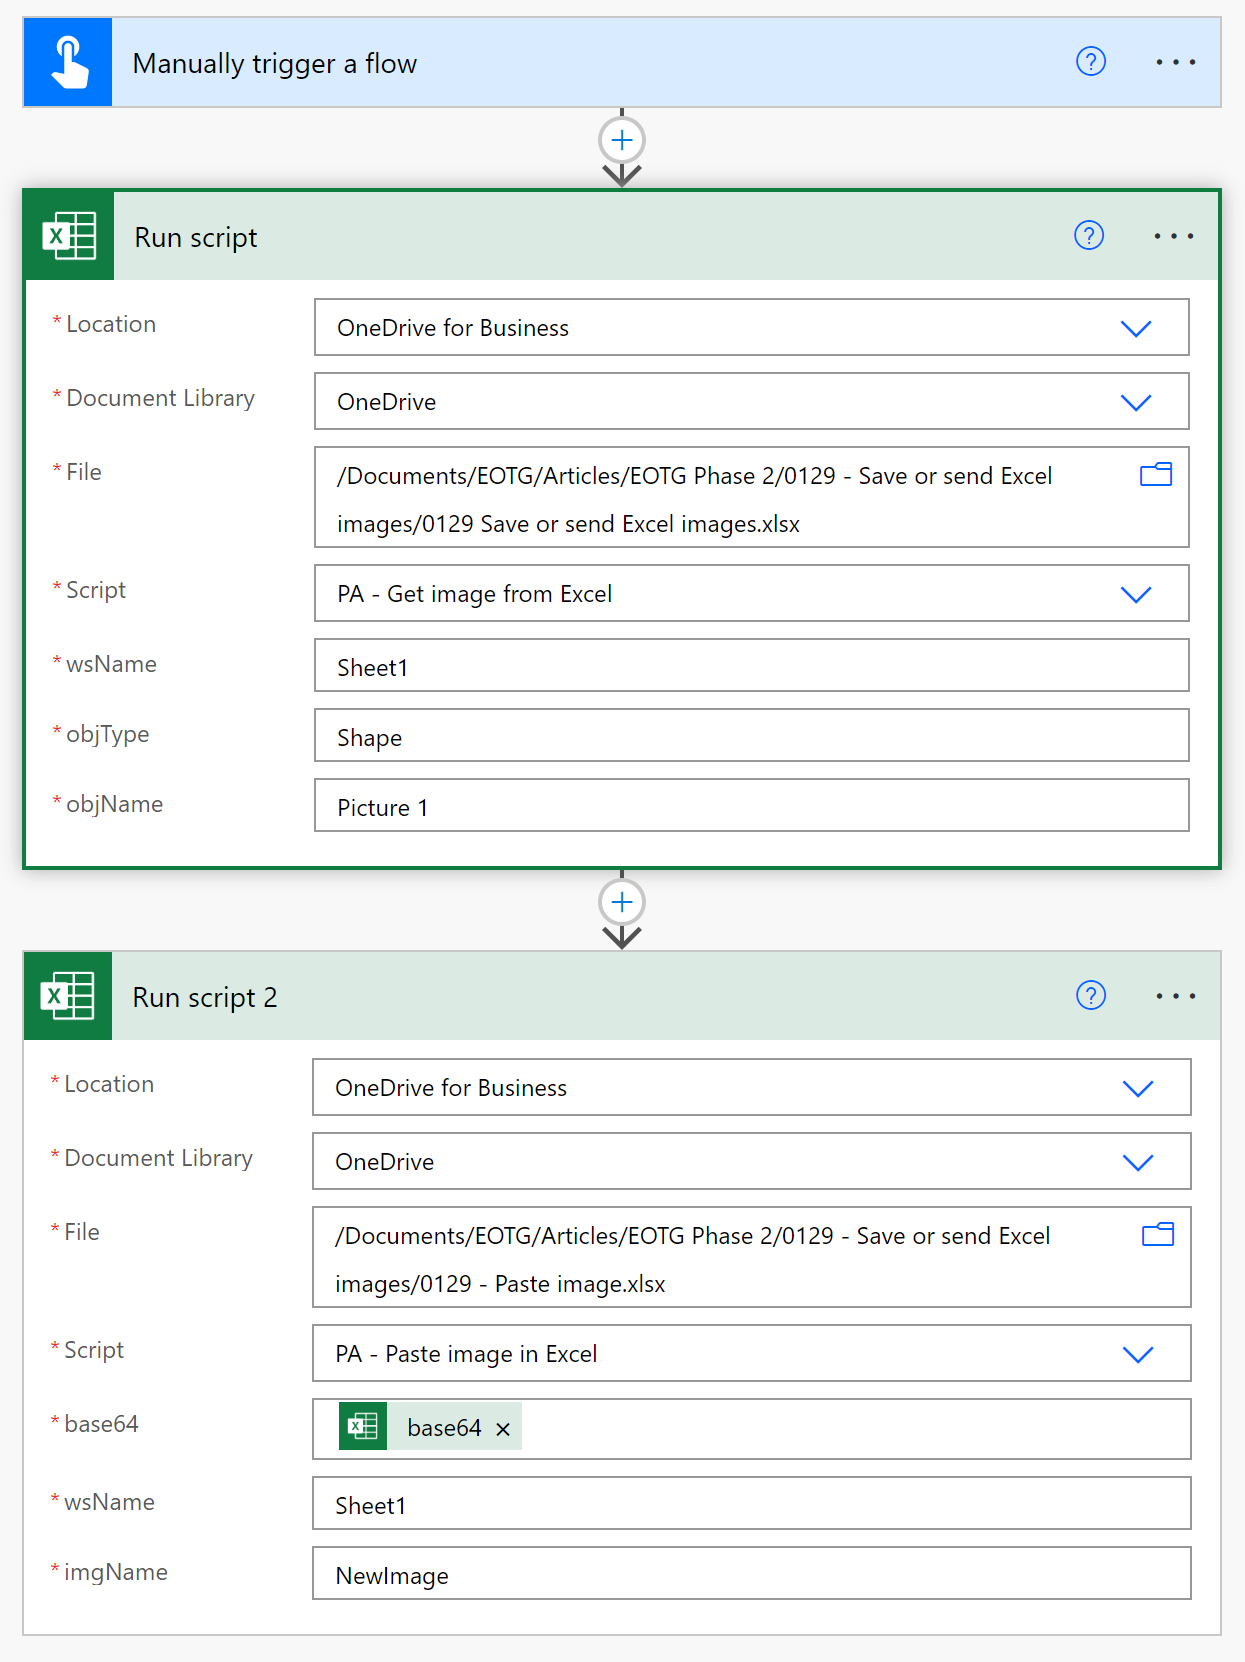
The parameters used in the PA – Get image from Excel script are
- workbook: /Documents/_______/0129 Send Excel images in emails.xlsx
- wsName: Sheet1
- objType: Shape
- objName: Picture 1
The parameters used in the PA – Paste image in Excel script are:
- workbook: /Documents/_______/0129 Paste Image.xlsx – the name of the workbook receiving the image
- base64: base64 – the value returned by the first script
- wsName: Sheet1
- imgName: NewImage – the name to give to the pasted image. This is required if we want to run any more scripts on this image (such as to move or resize).
Conclusion
Hopefully, you agree that Office Scripts and Power Automate provide us with lots of options for using images from Excel. Since scenarios require different information, the script featured in this post returns 3 values to meet all three uses cases. I hope you can put this to good use.
Happy automating.
Related Posts:
- How to run Power Automate from Excel with Office Scripts or VBA
- Use Office Scripts with Power Automate
- Power Automate CSV to Excel (via Office Script: Easy Method)
Discover how you can automate your work with our Excel courses and tools.
The Excel Academy

Make working late a thing of the past.
The Excel Academy is Excel training for professionals who want to save time.
Its returning the image but the text inside of each cell is not wrapped, its getting cut from side.
Unfortunately, how Excel renders and scales text has always been an issue. For example sometimes you can view a number, zoom out and suddenly it shows #####. You will need to do some testing to get it exactly as you want.
Thanks for your explanation! Great work!
In the video you mentioned that base64 is not supported by Gmail to embed the image into the email body and the workaround is complicated. May I know what is the workaround method? And apart from Gmail, are there other e-mail services which do not support this method as well?
The work around is to use publically, anonymously available images. Accessible using the HTML image tag.
I’m not sure about other email providers.
Good evening, first of all thank you so much for sharing. I was able to solve much of my problem.
Is there any way to: when taking the information from a Range, bring all the elements contained in the range such as tables and graphs together?
Another thing I’ve noticed, is that it’s not re-enderized as image icons of conditional formatting. Is there a way to capture this content (Icon) within a Range?