I was recently asked this question – “How can I make my workbook read-only?”. I gave the person an answer. However, the real question they were asking turned out to be “How can I make my workbook read-only for everybody but me”. In this post, we will explore some of the options available.
Save the file as “read-only recommended”
There is a setting to save the file as read-only recommended. To use this feature, click File -> Save As. The Save As window will appear.
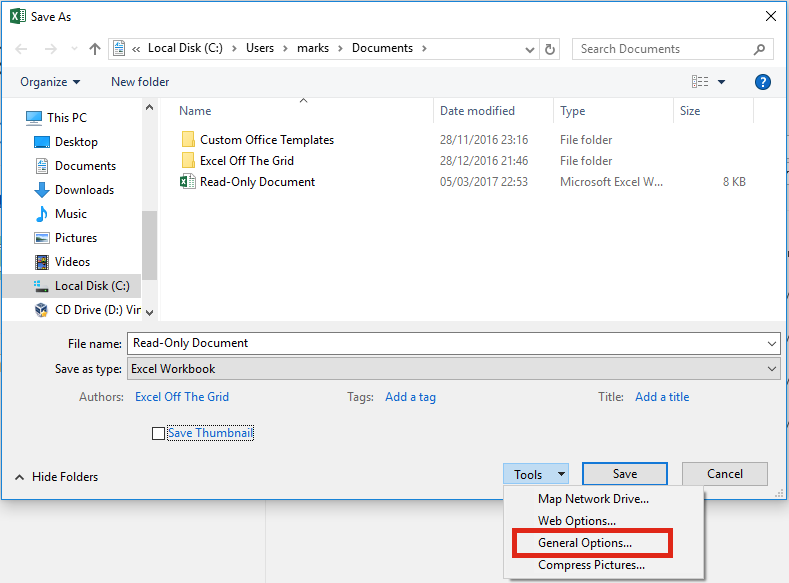
From the Save As window click Tools -> General Options…
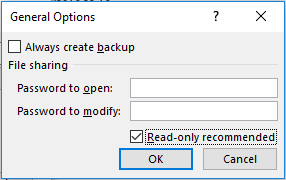
From the General Options window select the read-only recommended option. Click OK. Then save the file.
When the file is opened, a message is displayed asking the user if they wish to open as read-only.

The biggest issue with this option is that the user can click ‘No’. The file will be opened, but not as read-only.
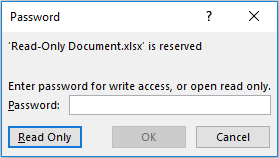
Save the file as “read-only” with a password
Using the same method as described above, a password can be entered. It is important that the password is only set for modifying the document. If you set a password to open the document the users will not be able to open the file without a password.
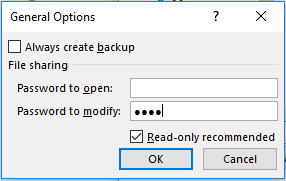
Passwords entered using this method are not encrypted and can be cracked. Therefore, anybody who really, really wants to could get access to your document.
This is certainly more stringent than the non-password option. The user must open the file as read-only unless they have the password.
Set the file to read-only with a Macro
By using a Macro, it is possible to set the file to read-only when the file is opened. To enter the Visual Basic Editor press ALT+F11. Select ThisWorkbook for the file you wish to make Read-only.
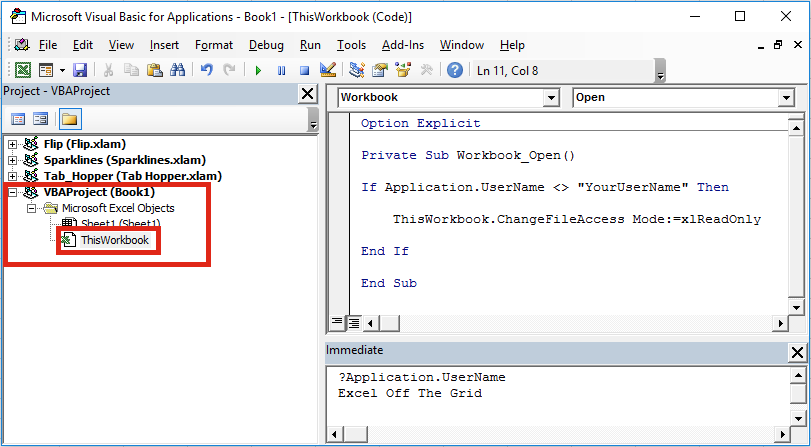
Enter the VBA code below into the code window as shown above:
Private Sub Workbook_Open()

If Application.UserName <> "YourUserName" Then

    ThisWorkbook.ChangeFileAccess Mode:=xlReadOnly

End If

End Sub
Edit the code so that it is your username. If necessary you can protect your VBA project and save the file (note VBA passwords are also not 100% secure either).
If you do not know your Excel username – in the Visual Basic Editor select View -> Immediate Window (or Ctrl + G). The Immediate window will open below the code window. Type the following into the Immediate Window and press enter (see example in the screenshot above). Your Excel username will appear below.
?Application.UserName
What if you need a secure read-only option?
The truth is, you are not able to fully protect your Excel file with just Excel. If a user has write access to the folder in which the file is saved they could just save down a version of your file, delete the original file, then save a new version with the same name. Also, as mentioned above, Excel passwords are not secure. You will have to decide for yourself how bad it would be if somebody were to crack your password or save over your file.
The best option is to restrict access to the folder in which file is saved. But that is outside the scope of this post (and outside the scope of my ability – that’s why IT departments exist, right?).
Discover how you can automate your work with our Excel courses and tools.
The Excel Academy

Make working late a thing of the past.
The Excel Academy is Excel training for professionals who want to save time.
Great, post…loved the simple, yet concise detail of all options related to the making a workbook read-only. Well-written and personable to, easy to read. Thank you!
Thanks Matt, It’s always nice to hear from happy readers. I’m glad you found it useful.
i am Refreshing and Save excel file every 5 minute automatically using macro.
The following code :
Sub Button1_Click()
Call RefreshAllFormulas
End Sub
Sub auto_open()
Call RefreshDataAtInterval
End Sub
Sub RefreshAllFormulas()
Dim i As Integer
Dim CurCell As Object
Dim lastCellFx As Object
MousePointer = fmMousePointerHourGlass
Total = 0
For i = 1 To ActiveWorkbook.Sheets.Count
Subtotal = 0
On Error Resume Next
Sheets(i).Activate
Selection.SpecialCells(xlCellTypeFormulas, 23).Select
For Each CurCell In Selection
If lastCellFx.Formula CurCell.Formula Then
CurCell.Activate
mnuRefreshSelection
Set lastCellFx = CurCell
End If
Next CurCell
Next i
MousePointer = fmMousePointerDefault
Sheets(1).Activate
Call RefreshDataAtInterval
End Sub
Sub RefreshDataAtInterval()
Application.OnTime Now + TimeValue(“00:05:00”), “RefreshAllFormulas”
Application.DisplayAlerts = False
ActiveWorkbook.SaveAs (“C:\Users\WWSUPPORT\Desktop\1032018\TEST ” & Format(Now(), “DD-MMM-YYYY hh mm AMPM”) & “.xlsx”), xlOpenXMLWorkbook
End Sub
. now i have open saving excel file but that time macros run again. i
don’t want to run macros again.
what code for that . please help me
Hi Hardik,
Why are you wanting to Save As every 5 minutes? Is it to create a backup of the file? If so you could try:
ActiveWorkbook.SaveCopyAs
Instead of:
ActiveWorkbook.SaveAs
please tell Me the code of ActiveWorkbook.SaveCopyAs to save automatically file
Based on your original code change the SaveAs code to this:
ActiveWorkbook.SaveCopyAs Filename:=”C:\Users\WWSUPPORT\Desktop\1032018\TEST ” & Format(Now(), “DD-MMM-YYYY hh mm AMPM”) & “.xlsx”
Note: Sometimes the browser changes the quotation marks, so if you copy and paste you might need to fix these afterwards.
Thank you so much for kindly support me.
but there was issue to save copy as “.xlsx” file.
.xlsx file is not supported.
Is there any macro code during SaveCopyAs time remove the macros in Copy file.
There is not an option to do that using SaveCopyAs.
Assuming there is no VBA code within the any of the sheets you could try something like the following. It will create a copy of each worksheet listed in a new workbook, then save and close the workbook.
Dim newWb As Workbook
Dim currentWb As Workbook
Set currentWb = ActiveWorkbook
Set newWb = Workbooks.Add
currentWb.Sheets(Array(“Sheet1”, “Sheet2″)).Copy Before:=newWb.Sheets(1)
newWb.SaveAs Filename:=”C:\FilePath\FileName.xlsx”
newWb.Close
Has anyone else had issues with errors popping up for others when you have the file open? It works as expected for folks opening in read only when I’m not in the file, but there are issues for others when I have it open.
If anybody else has experienced the same issues as Greg, please leave a comment.
Would I just need add Notify = True? I’ve added in below but I’m curious if the issue is something else.
Private Sub Workbook_Open()
Application.DisplayAlerts = False
If Application.UserName “My Username” Then
ThisWorkbook.ChangeFileAccess (xlReadOnly)
ThisWorkbook.Saved = True
Notify = True
Application.DisplayAlerts = True
End If
End Sub
It didn’t paste, but I do have the does not equal portion prior to my username in mine.
I have a file whose data is only displayed / edited via emeded Userform. Do you have an idea how I set it up that the file is always opened in read-only mode, but the user has an “edit” button, with which he can change the mode? It must be taken into account that no other user edited …
Use the following code to switch between Read-Only and Read/Write access.
Make File Read-Only:
Make File Read/Write access:
Also, check out this post. It details how to find out if a file is already open by another user.
https://exceloffthegrid.com/vba-find-file-already-open/
Can this macro be used to open the workbook as read only based on the workbook name? When the file is named “Template” then it will open Read Only, but once someone saves under a different name then it will no longer open as Read Only?
You could use an if statement to test for the file path and file name. Here is an example:
Excellent!!!
Thank you!
Very useful code
Thanks you so much