Named ranges are a useful feature of Excel. We often use them to build more complex tools that we may share with other users. Therefore, those named ranges become a critical part of our spreadsheet. Unfortunately, if those users modify or delete the named ranges, it may break the calculations. So, in this post, I want to share 4 ways that you can hide named ranges (and of course, how to unhide them again).
Table of Contents
- Hide named ranges from formulas (Method #1)
- Hide named ranges with VBA macros (Method #2)
- Hide individual named ranges
- Hide all named ranges
- List all hidden named ranges
- Unhide individual named ranges
- Unhide all named ranges
- Hide named ranges with Office Scripts (Method #3)
- Hide individual named ranges
- Hide all named ranges
- List all hidden named ranges
- Unhide individual named ranges
- Unhide all named ranges
- Changing file structure (Method #4)
- Sheet scope vs workbook scope named ranges
- Unknown named ranges
- Wrap-up
Hide named ranges from formulas (Method #1)
When we create named ranges, they are found in three places in the user interface
- In formulas (if used)
- Name Box
- Name Manager
To prevent users from seeing formulas we can:
- Format the cell containing formulas to be Hidden.
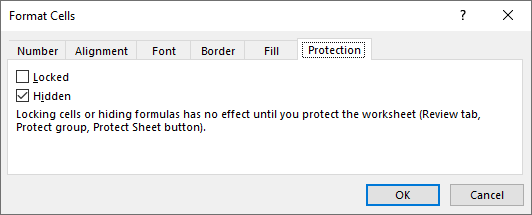
- Then protect the worksheet by clicking Review > Protect Sheet from the ribbon
No formulas will appear in the formula bar if that cell is selected.
However, this doesn’t help with the Name Box [1] or the Name Manager [2].
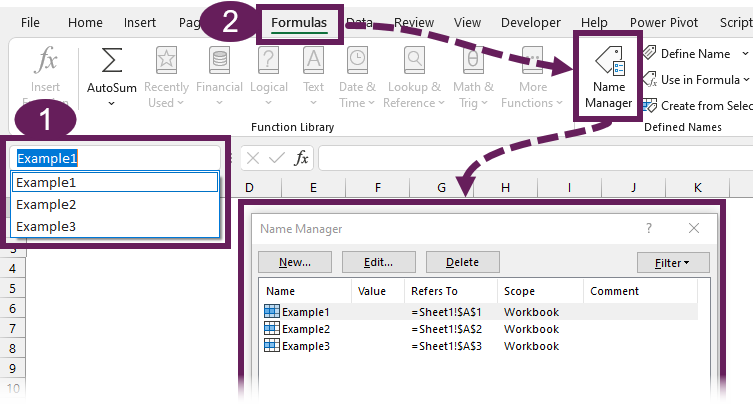
In the remainder of this post, we look at methods to further hide named ranges, as we don’t want them visible in either Name Box or Name Manager.
The user interface does not provide any tools to help us with this; therefore, we need to look at other more advanced methods.
Hide named ranges with VBA macros (Method #2)
Let’s start by looking at VBA macros. Below are 5 code examples for hiding, listing, and unhiding named ranges. Please note, these will only work on Excel desktop.
Hide individual named ranges
The example below hides an individual named range called Example1 from the active workbook.
Sub hideIndividualNamedRange()

'Hide an individual named range from the active workbook
ActiveWorkbook.Names("Example1").Visible = False

End Sub
Hide all named ranges
The code below loops through every named range in the active workbook and hides all of them.
Sub hideAllNamedRanges()

Dim wb As Workbook
Dim nm As Name

Set wb = ActiveWorkbook

'Loop through all names and hide them
For Each nm In wb.Names

    nm.Visible = False

Next nm

End Sub
List all hidden named ranges
Having hidden named ranges, we may then want to know what those names are so we can use them or unhide them. The following code lists all the hidden named ranges in the active workbook. The list starts on cell A1 of the active sheet. Macros cannot be undone, so start a new worksheet to avoid overwriting anything you want to keep.
If you see items in the list that you were not expecting, check out the Unknown named ranges section at the bottom of this post.
Sub listAllHiddenNamedRanges()

Dim wb As Workbook
Dim ws As Worksheet
Dim nm As Name
Dim i As Integer

Set wb = ActiveWorkbook
Set ws = ActiveSheet

'Loop through all names
For Each nm In wb.Names

    'If names are hidden then list them
    If nm.Visible = False Then
        ws.Range("A1").Offset(i, 0).Value = nm.Name
        i = i + 1
    End If

Next nm

End Sub
Unhide individual named ranges
After you’ve hidden some named ranges, the next question is: how do you unhide them again? The code below unhides a named range called Example1.
Sub unhideIndividualNamedRange()

'Unhide an individual named range from the active workbook
ActiveWorkbook.Names("Example1").Visible = True

End Sub
Unhide all named ranges
The example below unhides all named ranges from the active workbook.
Sub unhideAllNamedRanges()

Dim wb As Workbook
Dim nm As Name

Set wb = ActiveWorkbook

'Loop through all names and hide them
For Each nm In wb.Names

    nm.Visible = True

Next nm

End Sub
If you want to know more about using named ranges with VBA check out our guide: VBA Named Ranges – Common Properties & Methods
Hide named ranges with Office Scripts (Method #3)
Now let’s move on to Office Scripts. These will work in Excel online, and hopefully, be fully working on desktop soon. At the time of writing, there is partial support for Office Scripts in Excel Desktop.
The codes below mirror those in the VBA macro section above.
Hide individual named ranges
The example below hides a named range called Example1 from the Active Workbook.
function main(workbook: ExcelScript.Workbook) {

//Hide an individual named range from the active workbook
workbook.getNamedItem("Example1").setVisible(false)

}
Hide all named ranges
The code below hides all the named ranges in a workbook.
function main(workbook: ExcelScript.Workbook) {

//Declare variable to hold array of names
let nm = workbook.getNames()

//Loop through array and hide names
for (let i = 0; i < nm.length; i++) {
  nm[i].setVisible(false)
}

}
List all hidden named ranges
The example code below lists the hidden named ranges in a workbook. The list starts on Cell A1 of the active sheet, so make sure it won’t overwrite anything important before you run the script.
If you see items with strange names you were not expecting, check out the Unknown named ranges section below.
function main(workbook: ExcelScript.Workbook) {

//Declare variable to hold array of names
let nm = workbook.getNames()

//Loop through array of names
for (let i = ; i < nm.length; i++) {

  //Check if name is hidden
  if (nm[i].getVisible() == false) {

      //Add name to the active worksheet
      workbook.getActiveWorksheet().getRange("A1").
        getOffsetRange(i,0).setValue(nm[i].getName())
    }

}
}
Unhide individual named ranges
The code below unhides a named range called Example1.
function main(workbook: ExcelScript.Workbook) {

//Unhide an individual named range from the active workbook
workbook.getNamedItem("Example1").setVisible(true)

}
Unhide all named ranges
The code below unhides all named ranges in the workbook.
function main(workbook: ExcelScript.Workbook) {

//Declare variable to hold array of names
let nm = workbook.getNames()

//Loop through array and unhide names
for (let i = 0; i < nm.length; i++) {
  nm[i].setVisible(true)
}

}
Office Scripts are still a relatively new way of working with Excel. To find out more, check our other Office Scripts posts.
Changing file structure (Method #4)
You are unlikely to use this final method often. However, you never know; it might be helpful at some point. To hide named ranges using this method, we unpack the Excel workbook file structure and change the source code.
Be aware, this method may corrupt your file if it goes wrong. Please backup for attempting this method.
- Rename the Excel workbook so the file extension is .zip, instead of .xlsx or .xlsm
- Navigate into the zip file and find the file called \xl\workbook.xml
- Copy and paste the workbook.xml file outside of the zip folder
- Open the copied XML file using a text editor like Notepad
- Within the text, you will find code similar to the following
<definedName name=”Example1″>Sheet1!$A$1</definedName>
In that code, we can add a property to make the named range hidden (highlighted in bold below)
<definedName name=”Example1″ hidden=”1″>Sheet1!$A$1</definedName> - Save the XML file. Then, copy and paste the file back into the \xl\ zipped folder.
- Change the file extension of the zip file back to .xlsx or .xlsm
- Reopen the Excel workbook. All the names set with hidden=”1″ will be hidden.
Most users are not aware that Excel files are zipped folders. If this is new to you, you might find this interesting.
Sheet scope vs workbook scope named ranges
The examples above all use workbook scoped named ranges. However, named ranges can also be worksheet scoped. For these, the method of referencing the name changes to include the sheet name.
The following references a workbook named range:
ActiveWorkbook.Names("sheetExample").Visible = FalseWhile the following references a named range scoped to Sheet1
ActiveWorkbook.Names("'Sheet1'!sheetExample").Visible = FalseThe underlined section identifies the sheet to which the named range relates.
Unknown named ranges
When you list or unhide all named ranges, you may be surprised to find items you did not create. These are items that Excel creates in the background for its own usage.
For example, if you have a filter applied, the named range might appear as ‘Sheet1’!_FilterDatabase
Or, if you have a dynamic array function in the workbook, the named range might appear as _xlfn._xlws.SORT
Do not delete any of these, they are how Excel controls other parts of the workbook.
Wrap-up
As we have seen, to fully hide named ranges, we need a 2 step approach:
- Hide the names using VBA, Office Scripts, or by changing the file structure (Method #2, #3 and #4)
- Set the formulas as Hidden in the Format Cells dialog box (Method #1)
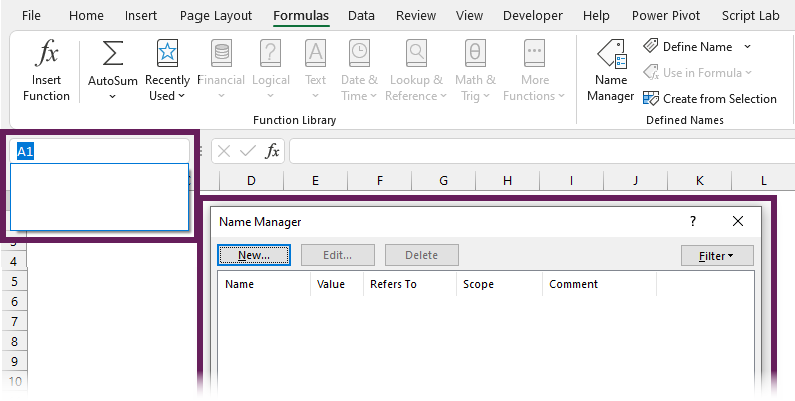
After applying these two steps, users will now see the named ranges. The names will exist but not be visible in the Name Box, Name Manager any formulas.
Discover how you can automate your work with our Excel courses and tools.
The Excel Academy

Make working late a thing of the past.
The Excel Academy is Excel training for professionals who want to save time.