Things change, and life moves on. Therefore, as organizational IT systems evolve, the Power Query solution you built previously might no longer use the right connector. Common examples are local Excel workbooks now stored on SharePoint, or SQL databases replacing CSV files.
Previously, we looked at changing the location of the source data, but for this, we need to go one step further. We need to change the connector itself!
The good news is we don’t need to rebuild our entire solution from scratch. Instead, we just need to make a few changes to the M code at the start of the query.
I know, I know—changing M code can be daunting, but don’t worry—it’s not as hard as it might sound.
So, let’s fire up Excel and see how we can change the source data connector in Power Query.
Watch the video

Example
In this example, we will things simple. The aim is to show the concepts and methods so you can apply them to any situation.
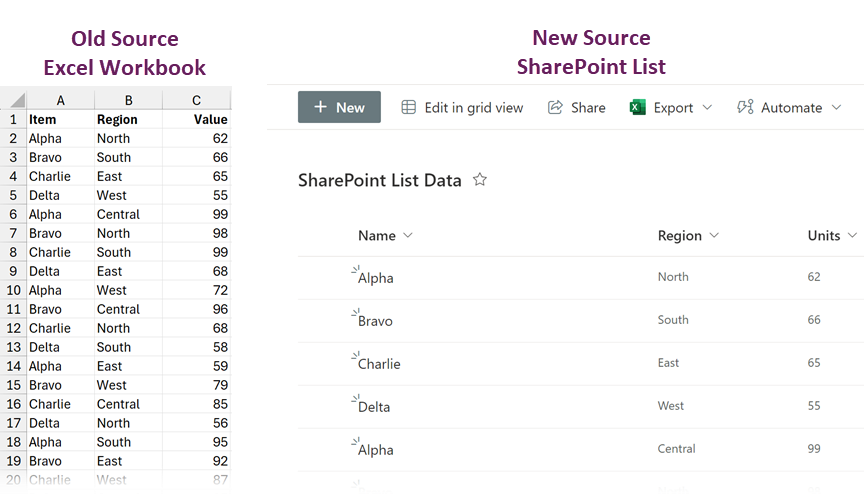
We have a query built with a local Excel Workbook connection (i.e., the workbook exists on a file server or C drive). However, the data is now stored in a SharePoint List.
After connecting to the data source there are some additional steps. What these steps are, is irrelevant for our example.
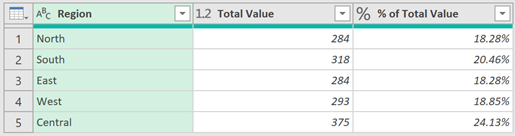
The final query result looks like this:
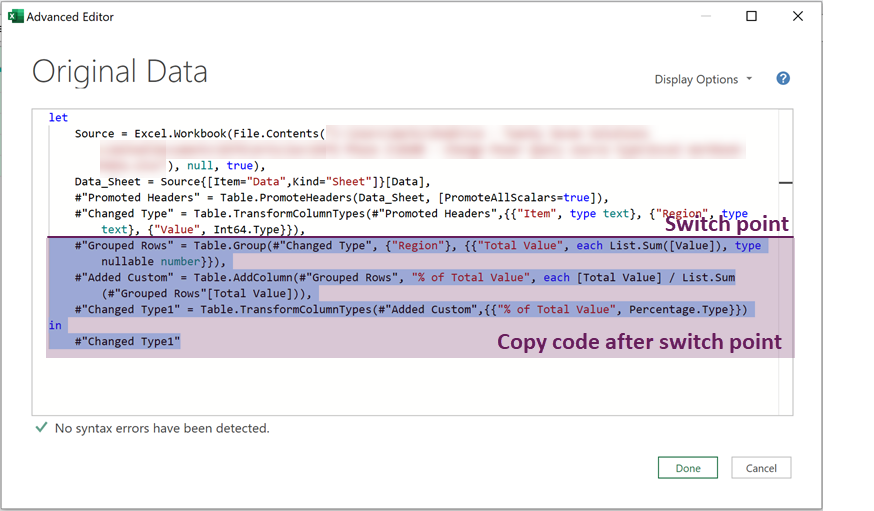
The Source step in the existing M code shows the following:
= Excel.Workbook(File.Contents("C:\Examples\Excel Workbook Data.xlsx"), null, true)This uses the File.Contents and Excel.Workbook functions. We can’t use these to connect to SharePoint Lists, so we need to change the connector.
Backup
We really don’t want to break everything, so before we do anything else, we will create a backup query.
In the Power Query Editor, right-click on the existing query and select Duplicate.
Rename the query to Backup. At least if everything else goes wrong, we can still go back to the Backup query.
Find the switch point
The connector is the first part of the query, so the M code in this section needs to change. If we do that correctly, the end of the query remains the same.
We need to click through the steps until we find the earliest point at which a table could be constructed from the new connector. Let’s call this the switch point.
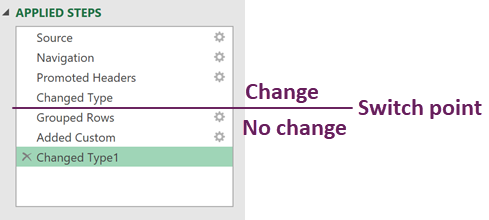
In this example, the switch point is up to the Changed Type step.
The screenshot below shows the table at the switch point (yours will look different).
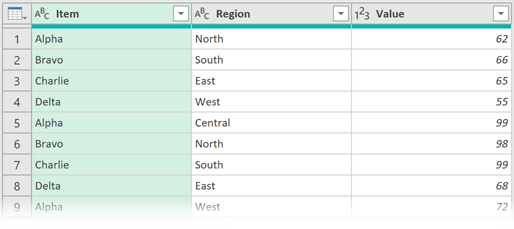
Our goal is to build a query that produces exactly the same table. Remember, we are not rebuilding the entire query. We are only building the steps up to the switch point.
Create the new query
Now, let’s build a query using the new connector.
If you are also using a SharePoint list, you can find the instructions here: https://exceloffthegrid.com/get-data-from-sharepoint-list/
Build the new query until it produces a table with exactly the same structure as the switch point we noted earlier.
Things to check:
- Contains the same number of columns
- Column names are identical
- Data types are identical
Build full query as a test
Select the original query and click View > Advanced Editor.
Find the switch point. In this example, it is the #”Changed Type” step. Copy the M code after the switch point step.
Click Done to close the Advanced Editor.
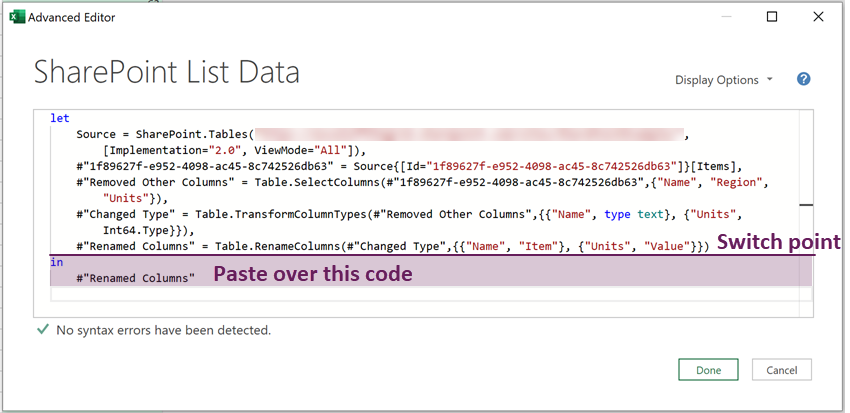
Select the new query and click View > Advanced Editor. Paste the code over the in keyword and any subsequent code.
Next, we must blend the two sections of code to work with each other:
- Add a comma to the line before the switch point.
- Change the step name in the pasted code to match the last step name before the switch point.
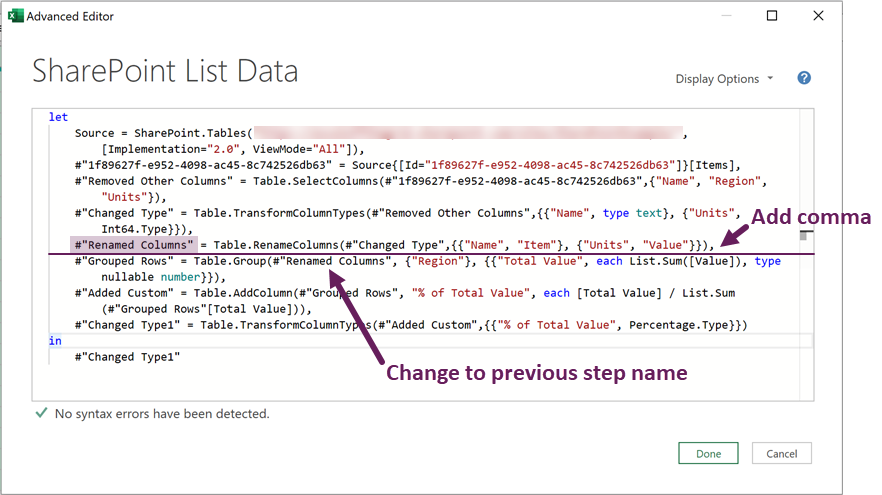
In the example, within the #”Grouped Rows” step, we amended #”Changed Type” to #”Renamed Columns”.
If everything is working, there will be no syntax errors. Click Done to close the Advanced Editor.
The new query should now have the identical output as the original query.
Deploy
We now know the query is working and has no issues, so we are ready to deploy it.
Open the Advanced Editor of the new query and copy all the code.
Then, open the Advanced Editor in the old query. Delete all the code, then paste the code from the new query.
That’s it. Your old query is now using the new connector.
The output is exactly the same as before the change. Therefore, any dependent queries, PivotTables, Tables, or data models will also continue to work correctly.
Clean up
Once we are happy that everything is working, we can clean up.
We no longer need the new query or the backup query, we can delete them.
Conclusion
Changing to a new source can be scary. Whenever we mess with the M code, we can break a solution that is currently working.
Your queries are likely to be much larger than those shown in this example, but the process is the same. The key is to get to the switch point, and then it’s just a matter of copying the relevant code.
Related Posts
- How to change source data location in Power Query
- Change the Power Query source based on a cell value
- How to get data into Power Query
Discover how you can automate your work with our Excel courses and tools.
The Excel Academy

Make working late a thing of the past.
The Excel Academy is Excel training for professionals who want to save time.