
In a previous VBA Code Snippet, we covered protecting and unprotecting worksheets. In this post, we will consider protecting and unprotecting workbooks. The two topics are closely related, so if this post does not provide the information you need, then read that post too.
Before getting started, there is an important change in Excel 2013 to be considered.
The difference between Single & Multiple Document Interface
In Excel 2010 and prior Excel had a Multiple Document Interface (MDI), which means multiple workbooks opened within the same Excel window. Excel 2013 introduced the Single Document Interface (SDI), where each document has its own window with its own Ribbon.
When protecting workbooks the Windows option is disabled within Excel 2013 and above.
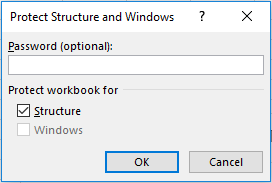
The purpose of the Windows setting was to fix the size of the spreadsheet within the instance of Excel. However, now that each spreadsheet behaves as if a separate instance, fixing the size of the window now serves no purpose.
The code below will work for both MDI and SDI, however protecting the Workbook window will have no use in Excel 2013 and above.
Basic Protecting and Unprotecting
'Protect a workbook
ThisWorkbook.Protect

'Unprotect a workbook
ThisWorkbook.Unprotect
Checking if a workbook is protected
'Show message box if the Structure is Protected
If ThisWorkbook.ProtectStructure = True Then MsgBox "Structure Protected"

'Show message box if the Window is Protected
If ThisWorkbook.ProtectWindows = True Then MsgBox "Windows Protected"

'Show message box if both the Structure or Window are Protected
If ThisWorkbook.ProtectStructure = True Or ThisWorkbook.ProtectWindows = True Then
    MsgBox "Windows and Structure Protected"
End If
Protecting and unprotecting with a password
'Protect with a password
ThisWorkbook.Protect Password:="myPassword"

'Unprotect with a password
ThisWorkbook.Unprotect Password:="myPassword"
If an incorrect password is provided the following error message will show.
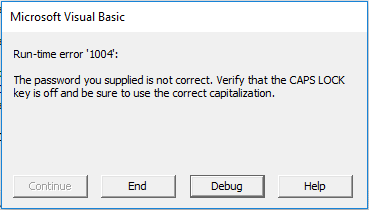
The code below will catch the error and provide a custom message.
'Catch the error caused by an incorrect password
On Error Resume Next
ThisWorkbook.Unprotect Password:="incorrectPassword"

If Err.Number <> 0 Then
    MsgBox "The Password provided is incorrect"
    Exit Sub
End If

On Error GoTo 0
Protect the Structure or the Windows
Protecting the structure prevents users from creating, moving, deleting, hiding and unhiding worksheets. Protecting windows is described above.
'Protecting the Structure or the Windows
ThisWorkbook.Protect Password:="myPassword", Structure:=True, Windows:=True
Other related VBA code snippets
The following VBA Code Snippets will be useful for applying this post in a wider context.
- Protect and unprotect worksheets
- Loop through every worksheet or every workbook
- Workbook properties and actions
- Password protect an Excel file
Discover how you can automate your work with our Excel courses and tools.
The Excel Academy

Make working late a thing of the past.
The Excel Academy is Excel training for professionals who want to save time.
All the codes are helpful and provided description that are easily to understand. but, my concern is can you provide a specific location where should i put the block of codes. for example, this block of codes put it in module then this one for form load, and then this one is for workbook, etc. I’m frustrated to run the system because there are to many errors occurred. Please, I hope my suggestion will be accepted. Thank you more power.!
Thank you for the feedback Francis. I will take this on board and include it as part of the next full site maintenance.