
Have you ever experienced the issue where Excel’s scroll bars become tiny? A small movement in the mouse can change the view by hundreds of rows or columns. This makes the worksheet exceptionally difficult to navigate around.
The problem might reveal itself with an error message when trying to insert new rows or columns.

In this post, we’ll look at why this happens and the different options for resetting the scroll bar.
Table of Contents
Watch the video:

Why does the tiny scroll bar occur?
Two potential factors determine the size of the scroll bar:
- Size of the used range
- Size and placement of worksheet objects
Let’s look at each of these in detail.
Size of the used range
The sizes of the horizontal and vertical scroll bars is normally determined by the dimensions of the used range. This is the range of cells containing any values, formulas, formatting, etc. For example, if a worksheet has only two changes (1) Cell A1 contains the letter “A” (2) Cell F10 is empty but has been formatted, then the used range is A1:F10.
Occasionally, the used range can become excessively large, which is nearly always caused by user error. A user might accidentally stray into cells outside of the area needed then make some changes.
For example, press Ctrl + Down Arrow and suddenly the cell the bottom of the spreadsheet is in full view and selected. Formatting that cell, or entering data into it by accident will result in that cell, and every cell above or to the left of it being in the used range. This is an extremely easy mistake to make (I know, I’ve made it myself many times). Once this has happened, the scroll bar needs to be tiny as the worksheet might now be 1,048,576 rows high or 16,384 columns wide.
Size and placement of worksheet objects
The scroll bar size can also be determined by the bottom right position of a worksheet object. That object could be a comment/notes box, a chart or shape, etc. The scroll bars must be big enough to enable the user to view the full width or height of these objects.
Depending on the settings applied, inserting new rows or columns within the area occupied by the object, could result in that object’s size increasing. Even if the objects are not visible, they still occupy a location on the worksheet, and the scroll bar size will be set accordingly.
Fixing problems caused by the used range
The used range is the most likely cause of issues with the scroll bars, so we will tackle this first.
Option 1: Press Esc & Undo
If you suddenly find yourself in parts of the worksheet you do not wish to populate with data, try this first:
- Press the Escape key to exit data entry for any cell which is selected.
- Keep pressing Ctrl + Z to undo any changes made to those cells.
- Press Ctrl + Up Arrow or Ctrl + Left Arrow to get the selected cell back to a ‘normal location’.
You might be lucky; if Excel deems you’ve not changed the used range, the scroll bars will return to normal size (yay!!! whoop whoop). If you’ve been unlucky (boo!!!), then move onto Option 2 below.
Option 2: Clear all the unnecessary content & save
Looking at your spreadsheet, find the cell you believe should be the last used cell (remember to look in hidden rows and columns too). Select the entire row below this cell. Press Ctrl + Shift + Down Arrow to select all the rows down to the bottom. Click Home > Clear > Clear All
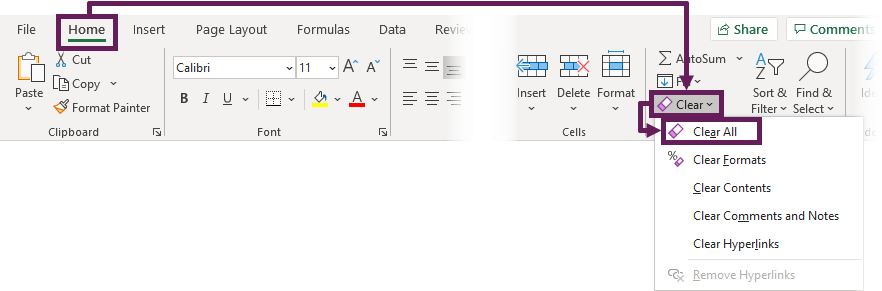
Select the entire column to the right of what should be your last used cell. Press Ctrl + Shift + Right Arrow to select all the columns to the right. Then, once again, click Home > Clear > Clear All.
Now we have cleared all the unnecessary content, save the document (Ctrl + S). The used range has now been reset, and the scroll bars should return back to a more usable size.
If that doesn’t work, repeat the same process, but delete the unnecessary rows by using Home > Delete > Delete Sheet Rows and Home > Delete > Delete Sheet Columns
Option 3: Clear all the unnecessary content & reset used range
Some users report that an additional step is required.
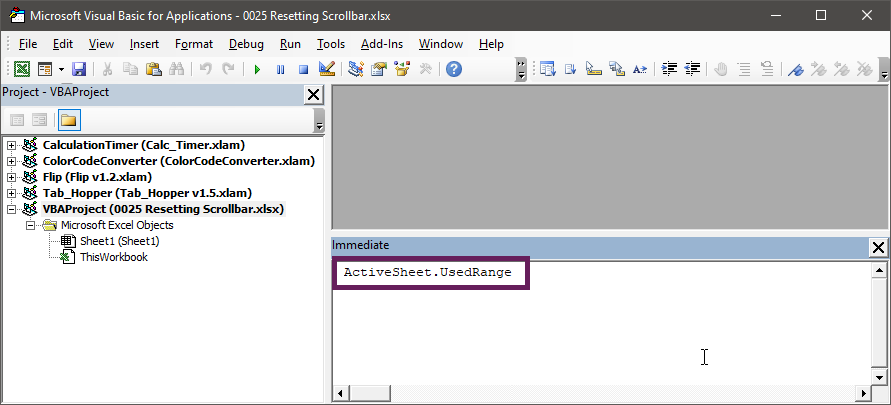
Follow the steps from Option 2 to clear the unnecessary content. Open the Visual Basic Editor from the Developer tab (If you do not have the Developer tab visible, press Alt + F11). Ensure the Immediate window is open by selecting View > Immediate Window (Ctrl + G).

In the Immediate Window, type the following and press Enter.
ActiveSheet.UsedRange
The used range has been reset. When returning to Excel, the scroll bars should hopefully return to a more usable size.
Fixing problems caused by worksheet objects
While it is less likely that worksheet objects are the cause of scroll bar issues, if none of the above options work, then this might just be your problem.
Option 4: Identifying comments / notes
Comment/note boxes are often identified in the worksheet with a small red triangle in the corner of the cell. However, depending on your specific settings, they might not be visible at all.
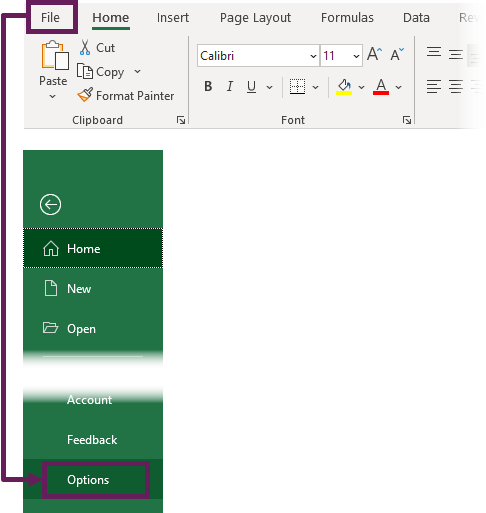
From the ribbon, click File > Options.
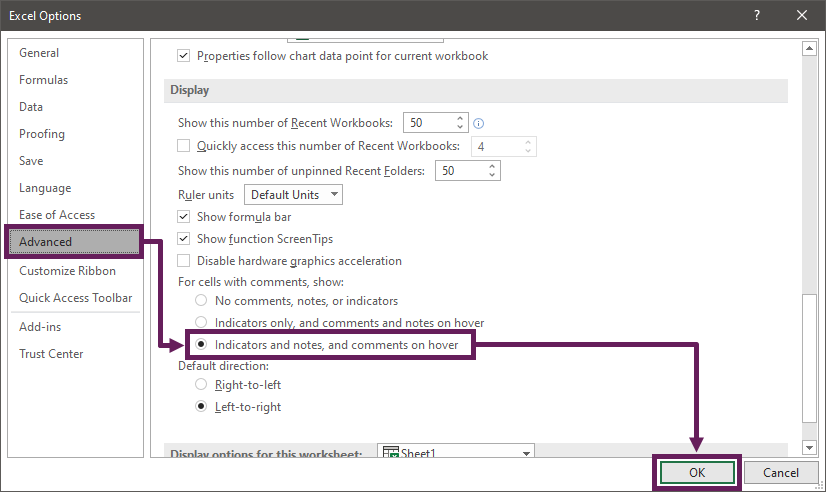
The Excel Options window will open. From the Advanced section, scroll to the Display sub-section and select Indicators and notes, and comments on hover. In older versions of Excel, the description will be Comment and indicators. Click OK to close the Excel Options window.
All the comments/notes will now be visible. Delete or resize any which are outside of the range you wish to use.
Option 5: Identifying charts, shapes and other objects
Usually, charts, shapes, and other objects on the face of the worksheet are visible. Just by scrolling around, we could identify if these are affecting the scroll bars. However, these objects can be made invisible; therefore, they impact scroll bars but can’t be seen.
To solve this, click Home > Find & Select > Selection Pane…
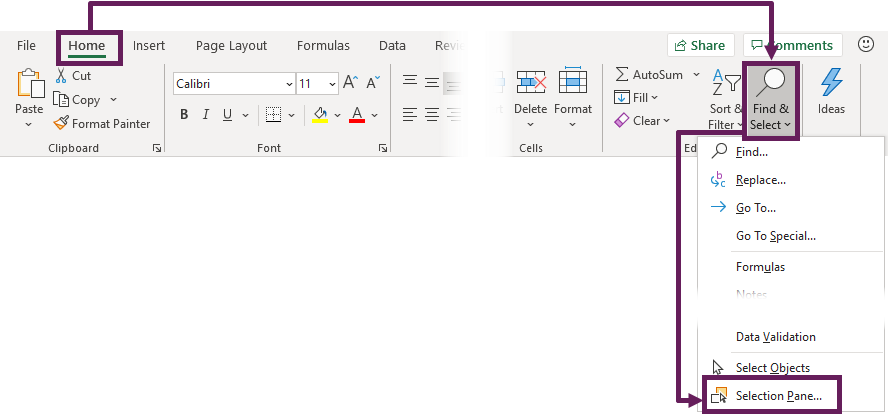
The selection pane will open with all the worksheet objects are listed. The eye icon with a line through indicates the item is not visible.
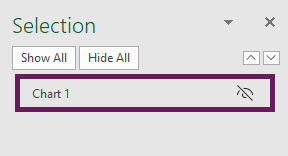
Make all items visible. It should now be possible to find any objects affecting the scroll bars; delete or resize them as required.
Anything else?
This list of options is not exhaustive; they are just solutions that I know about. If you know of, or identify any others, please share in the comments. Hopefully, we can all learn together and ensure that nobody needs to suffer from this problem going forwards.
Discover how you can automate your work with our Excel courses and tools.
The Excel Academy

Make working late a thing of the past.
The Excel Academy is Excel training for professionals who want to save time.
Great stuff Mark. You are a lifesaver!
Fantastic guide for detective work. In my case, it was invisible comments very far down in the sheet, so I had to go through every step. No idea how they got there, but it’s a very old worksheet with over 12,000 rows. Problem solved.
Thank you!
The other option is to copy and paste your content (not the whole worksheet) into a new tab.
That’s pretty much what we want to avoid. Depending on how complex your spreadsheet that could take a long time to rebuild all the cell links and references.
This was so helpful–I was going absolutely insane.
Option 3 worked like a charm. Thank you!
Yes, It’s true . . . . . . simple and just like a charm. Thank you . . . .
Thanks great information!
My issue ended up being in my VBA. I didn’t restrict my column range. Once I corrected that my scroll bar was correct.
I can’t be sure exactly which solution cured my problem but a combination of clearing all formats in unused cells (I’m a sucker for a conditional format!), resetting the ranges of conditional formats and checking and adjusting the ranges my macros applied to seems to have – finally! – fixed the issue. Thanks so much for the comprehensive suggestions given here which served as a catalyst to try a few other things (most notably, the conditional formats and the macros). I know I’ve been guilty in the past of applying CF’s to entire columns simply through laziness. Lesson learned…….
Thank you so much!!
Option 5 worked for me, it unveiled previously unknown boxes which were hidden.
Great news – those sneaky boxes, I wonder how they got there.
Thanks. I was giving up, but option 5 did it for me!
Yay!!! Good news 🙂
Lifesaver! Thank you!
The first few steps didn’t help – I think this was still happening due to additional rows I had already deleted a long time ago. But the VBA tip was exactly what was needed to finish the job. I’m now back to scrolling through 10k rows instead of 100k.
Still using Office 2010, in case anyone was wondering whether this works for the legacy versions, too.
Hello,
This is a different subject matter but your assistance will be greatly appreciated.
I know how to set the scroll area so I won’t fly down to row 1245. How do I save these changes. Whenever I close the workbook, the scroll range is deleted.
Thank you
Hi Grishelda – are you saying that the scroll bar is reset, but then it’s not saved? And you have to keep resetting to scrollbar over and over? That’s a very odd situation.
‘Found a piece of text in one cell way down the sheet (don’t know how it got there). Tried all the techniques above except for the VBA coz I didn’t want to mess with something I’m unfamiliar with.
What solved the problem was when I changed the view to Page Break view and then back to Normal view. Quick and easy!
Thanks Eric – that’s good to know. I should at this into the post.
I had one sheet in a workbook on which the slider in vertical scroll bar filled the entire scroll bar. That sheet had a note and arrow to remind me of a particular step. Those were outside the print area. After seeing Option 4 I moved those objects inside the print area and the scroll bar corrected itself. Interesting that just for the heck of it I moved those items back OUTSIDE the print area and the scroll bar continues to display correctly.
Addition to my comment. After closing and reopening the workbook the scroll bar was again screwed up. Moving the objects inside the print area and clicking any cell again corrected the problem. Close and open and the problem is back. This is a workbook I rarely use which is the reason for the reminder. In the future I will simply remove the reminder when I use the workbook.
Exceptionally helpful after months of frustration. Problem solved.
Thank you!
Thanks Scott, I’m glad it worked 🙂
Awesome fix, thanks heaps
Great news Nicola 🙂
Great!!!!
Option 4 for me! I had notes sooooo down! I don’t know how!
This was really helpful, thanks! I used the “clear all” technique.
Yay!! Great news!
Good.
You may want to add – to find notes on a very large spreadsheet – to find notes, in Review Menu, Find Next Note
Hi John – That’s a great addition. Thank you.
Nothing is working for me in this particular workbook 🙁
I just wanted to say thank you for your help. I was about to give up and start the document over, but you saved me, hhh.
It turned out to be option 4, a rouge comment from a colleague!
Thanks again
You’re welcome, glad I could help.
Wow – I had been searching different sites for a while and they all only had the first three options described. I actually needed option 4. Thanks!
Thanks for your time and knowledge!