A couple of weeks ago we were preparing for a presentation. Much of the presentation is constructed from linked Excel worksheets into PowerPoint. This technique is great because the presentation automatically updates each time the Excel worksheets change. In the presentation, there are also some PowerPoint tables in the default blue striped layout.

Then came the words I had been dreading to hear: “Can you make all the tables in the presentation in the same format with the alternating stripes?”.
How NOT to apply alternating colors to rows
I had been in a similar situation previously. I had spent hours formatting every line to be alternating colors. Then a new line would need to be added into the middle, or the rows had to be re-ordered. Arrrrggghhh!!!! The formatting would then not be alternating, so I would have to go back through and start alternating the colors again.
Then once I was done, I noticed the colors were not exactly the same shade as PowerPoint, they were similar, but not the same. So I only had one option, I had to go back and do it all over again . . . Arrrrggghhh!!!!
If you are ever in this situation, do not do it this way – you will only be wasting your life by having to do it over and over again.
How to apply alternating colors rows using conditional formatting
Firstly, find out the exact colors you wish to apply. Find out the exact RGB (Red, Green, Blue) color values and make note of them, you will want to apply these when applying the conditional formatting.
To apply the colors to alternating rows we will be using conditional formatting combined with the ROW and MOD functions:
ROW – provides the row number of the cell
MOD – provides the remainder of a division (for example MOD(5,2) provides a result of 1, because 5 goes into 2 twice, with a remainder of 1.)
ROW numbers will always be an odd number, then an even number. As a result, the MOD value of the ROW is always 0 for even numbered rows to 1 for odd-numbered rows.
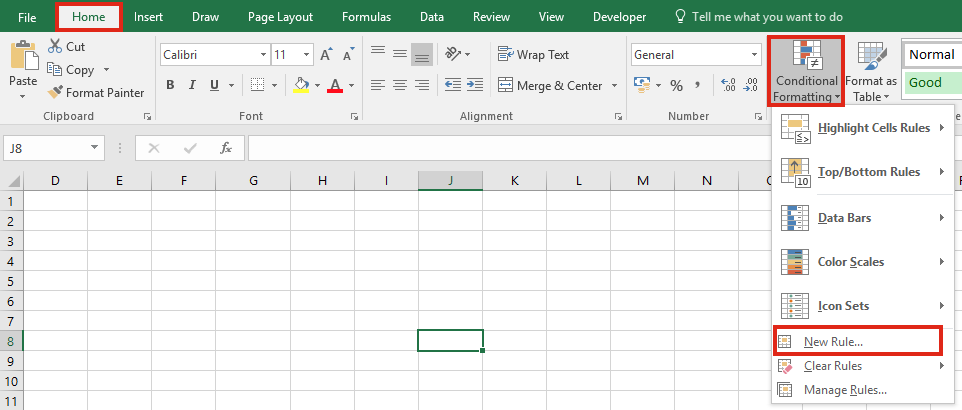
Now we are ready to apply this function with conditional formatting. Select the cells you wish to apply the conditional formatting to. Then click
Home -> Styles-> Conditional Formatting -> New Rule
Select Use a formula to determine which cells to format
In the Format values where this formula is true box enter the following formula:
=MOD(ROW()) = 1
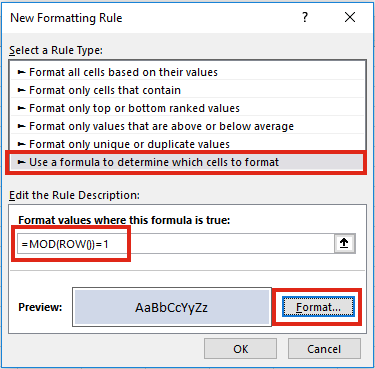
Click the Format button and set the required format. This is where you can use the exact RGB color codes.
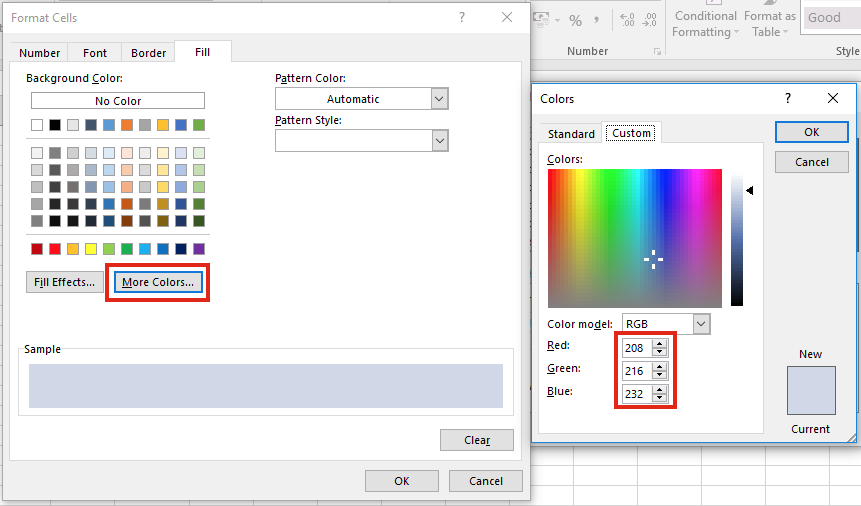
To mimic the Powerpoint look also add a white border.
If you need colors for the other rows, go through the same process again, but change the formula to be:
=MOD(ROW(),2) = 0
Make sure you apply a different color to make the appearance striped.
Automate with VBA
This seemed like a lot of work to me, especially as I had a lot of worksheets to format. But I could automate this by applying the formatting using VBA (I actually used the Macro Recorder for this, then edited the code, it just seemed quicker). I even inserted a button into my Personal Macro book, so that it’s available anytime I need it.
Sub StripeyPresentation()

Dim Rng As Range
Set Rng = Selection

With Rng.FormatConditions.Add(Type:=xlExpression, Formula1:="=MOD(ROW(),2)=0")
    .Interior.Color = RGB(208, 216, 232)
    .Borders.LineStyle = xlContinuous
    .Borders.ThemeColor = 1
    .Borders.Weight = xlThin
End With

With Rng.FormatConditions.Add(Type:=xlExpression, Formula1:="=MOD(ROW(),2)=1")

    .Interior.Color = RGB(233, 237, 244)
    .Borders.LineStyle = xlContinuous
    .Borders.ThemeColor = 1
    .Borders.Weight = xlThin

End With

End Sub
Discover how you can automate your work with our Excel courses and tools.
The Excel Academy

Make working late a thing of the past.
The Excel Academy is Excel training for professionals who want to save time.