
The camera tool is probably one of the most underutilized tools in Excel. The reason it is underutilized is because it is hidden.
This simple tool will take a picture of a range of cells and place the picture of those cells on another part of the workbook. You can move, re-size and add picture formatting options the picture.
The power of this tool is that the picture is not static, if the contents of the original pictured cells change, so does the picture.
What can you use the Camera Tool for?
- A quick and dirty dashboard layout. One of the trickiest issues with dashboards is normally layout, as getting all the elements sized correctly can be a huge challenge. However, with the Camera tool you can simply take pictures of various tables and charts and place the pictures together on a new worksheet.
- In cell charts and sparklines. It was a great day when Microsoft introduced Sparklines. However sometimes you just need something outside of the standard feature set. With the camera tool you can take a picture of a chart, then size the picture to fit into a cell. If the chart data changes so does the picture. Voila! You have just created a custom sparkline!
- Visual check to another worksheet. The “Watch Window” feature, which you may have used previously, is sadly limited. It will only show the result of a formula. But what if you want to track how a chart or a table of data is changing based on inputs in a different worksheet? The camera tool is your solution.
- Rotation of objects. I first came across the Camera Tool when a work colleague suggested it as an option to create a vertical line chart (draw a horizontal line chart, take a picture of it, then rotate the picture). Whilst I think there are better ways to create a vertical line chart, the idea is still valid. You can use the Camera Tool to take a picture of any object, then apply rotation to the picture.
- Pop up window. With a little bit of VBA trickery it is possible to hide/show the picture based on various events (e.g. a mouse click). The picture will then function as an additional data widow. This is great for dashboards, or for example where clicking on a product number will display a picture of the product (very useful if your memory sucks).
How to install the Camera Tool?
On the ribbon
File -> Options -> Customize Ribbon

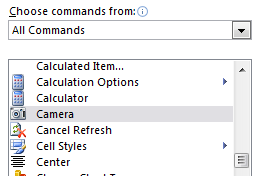
Select the “All Commands” option from the “Choose commands from” drop-down box. Scroll down to find the Camera tool and select it.
In the box on the right find the location in the ribbon where you wish to place the tool. For me, the Insert ribbon appears to make the most sense. Then click New Group at the bottom of the box (or New Tab, then New Group if you are placing the tool on a new ribbon).
Click Add, to add the Camera Tool to the group you have created.
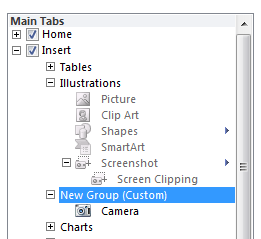
You can choose to rename the group if you wish and then click OK.
On the QAT (Quick Access Toolbar)
Follow the same procedure above, but select Quick Access Toolbar, rather than Customize Ribbon. There is no need to add a new group; you can add the Camera Tool straight into the QAT.
How to use the Camera Tool?
- Select the cells you wish to take a picture of
- Click the Camera Tool
- The mouse will now become a cross-hair icon
- Click and drag the mouse to the location you wish to display the picture (or double-click).
- The picture will appear
- Resize, move and format the picture as if it were any other image.
A few warnings/tips
- Excel will automatically insert a border around the picture. But you can remove it as if it were like any other drawing object.
- Once the picture is selected the formula bar will show the range pictured. Changing the range in the formula bar will change the range pictured. You can also link the image to a named range to create a dynamic picture lookup.
- The pictured range and the picture do not need to be in the same worksheet, but they do need to be in the same workbook.
- If the picture on the screen looks pixelated, just make sure it’s sized to 100%.
Discover how you can automate your work with our Excel courses and tools.
The Excel Academy

Make working late a thing of the past.
The Excel Academy is Excel training for professionals who want to save time.