With macros, we can automate Excel and save time; big tasks or small tasks, it doesn’t matter. All that matters is that we’ve become more efficient.
In this post, I share 30 of the most useful VBA codes for Excel that you can use today.
If you’ve never used VBA before, that’s fine. Part 1 contains instructions of how to use the codes and part 2 contains the code sample themselves.
Table of Contents
- PART ONE: How to use VBA Macros
- PART TWO: 30 Useful VBA codes for Excel
- Hide all selected sheets
- Unhide all sheets
- Protect all selected worksheets
- Unprotect all worksheets
- Lock cells containing formulas
- Hide formulas when protected
- Save time stamped backup file
- Prepare workbook for saving
- Convert merged cells to center across
- Fit selection to screen
- Flip number signage on selected cells
- Clear all data cells
- Add prefix to each cell in selection
- Add suffix to each cell in selection
- Reverse row order
- Reverse column order
- Transpose selection
- Create red box around selected areas
- Delete all red boxes on active sheet
- Save selected chart as an image
- Resize all charts to same as active chart
- Refresh all Pivot Tables in workbook
- Turn off auto fit columns on all Pivot Tables
- Get color code from cell fill color
- Create a table of contents
- Excel to speak the cell contents
- Fix the range of cells which can be scrolled
- Invert the sheet selection
- Assign a macro to a shortcut key
- Apply single accounting underline to selection
PART ONE: How to use VBA Macros
What is VBA?
Visual Basic for Applications (VBA) is the programming language created by Microsoft to control parts of their applications. Most things which you can do with the mouse or keyboard in the Microsoft Office suite, you can also do using VBA. For example, in Excel, you can create a chart; you can also create a chart using VBA, it is just another method of achieving the same thing.
Advantages of using VBA
Since VBA code can do the same things as we could with the mouse or keyboard, why bother to use VBA at all?
Saves time:
VBA code will operate at the speed your computer will allow, which is still significantly faster than you can operate. For example, if you have to open 10 workbooks, print the documents, then close the workbook, it might take you 2 minutes with a mouse and keyboard, but with VBA it could take seconds.
Reduces errors:
Do you ever click the wrong icons or type the wrong words? Me too, but VBA doesn’t. It will do the same task over and over again, without making any errors. Don’t get me wrong, you still have to program the VBA code correctly. If you tell it to do the wrong things 10 times, then it will. But if we can get it right, then it can remove the errors created by human interaction.
Completes repetitive actions without complaining:
Have you ever had to carry out the same action many times? Maybe creating 100 charts, or printing 100 documents, or changing the heading on 100 spreadsheets. That’s not fun, nobody wants to do that. But VBA is more than happy to do it for you. It can do the same thing in a repetitive way (without complaining). In fact, repetitive tasks is one of the things VBA does best.
Integration with other applications:
You can use VBA in Word, Access, Excel, Outlook and many other programs, including Windows itself. But it doesn’t end there, you can use VBA in Excel to control Word and PowerPoint, without even needing to open those applications.
What is programming?
Programming is simply writing words in a way which a computer can understand. However, computers are not particularly flexible, so we have to be very specific about what we want the computer to do, and how we tell it to do it. The skill of programming is learning how to convey the request to the computer as clearly, as simply and as efficiently as possible.
What is the difference between a Macro and VBA?
This is a common question which can be confusing. Put simply, VBA is the language used to write a macro – just in the same way as a paragraph might be written using the English language.
The terms ‘macro’ and ‘VBA’ are often used interchangeably.
The golden rule of learning VBA
If you are still learning to write VBA, there is one thing which will help you. While it may be common practice, to copy and paste code, it will not help you to learn VBA quickly. Here is the one rule I am going to ask you to stick to… type out the code yourself.
Why am I asking you to do this? Because it will help you learn the VBA language much faster.
Let’s get started
Now you know what VBA is, why you should use it, and the golden rule, so there is only one thing left to do… let’s get started!
Setting up Excel
Before you can get stuck in with using the code in this post, you must first have Excel set up correctly. This involves:
- Ensuring the correct macro security settings have been applied
- Enabling the Developer ribbon.
Macro security settings
Macros can be used for malicious purposes, such as installing a virus, recording key-strokes, etc. This can be blocked with the security settings. However, if the settings are set too high, you cannot run any macros, or too low, you will not be protected. Neither of these is a good option.
Let’s apply suitable settings which will give you the power to decide when to allow macros or not.
- In Excel, click File > Options
- In the Excel Options dialog box, click Trust Centre > Trust Centre Settings…
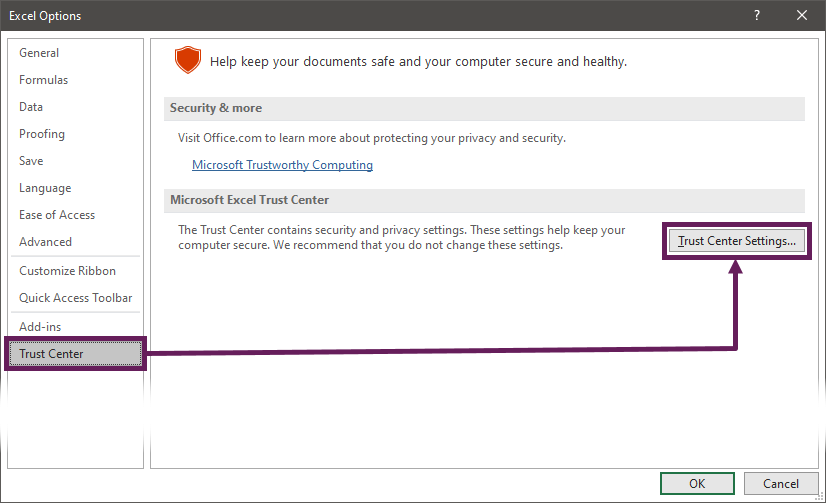
- In the Trust Centre dialog box, click Macro Settings > Disable all macros with notification.
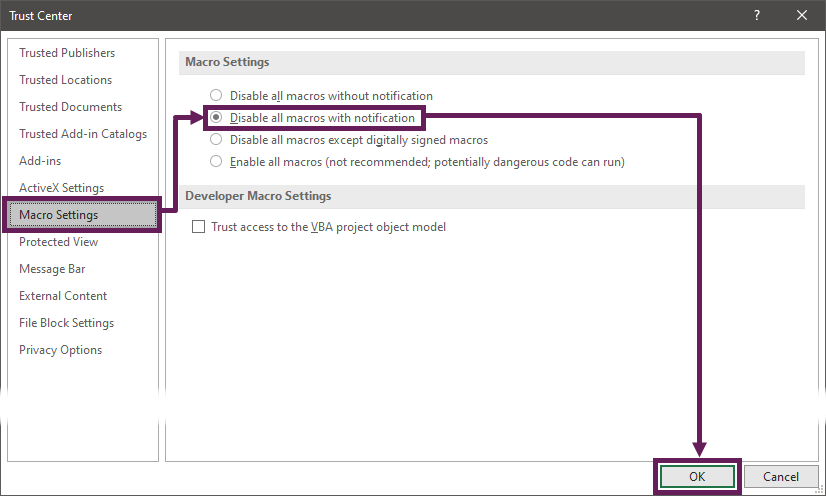
- Click OK to close the Trust Centre, then OK again to close the Excel Options.
Workbooks containing macros will now be automatically disabled until you click the Enable Content button at the top of the screen.
Enable the Developer ribbon
The Developer ribbon is the place where all the VBA tools are kept. It is unlikely that this is already enabled, unless you or your IT department have already done so.
Look at the top of your Excel Window if you see the word ‘Developer’ in the menu options, then you are ready to go. You can skip straight ahead to the next part. However, if the ‘Developer’ ribbon is not there, just follow these instructions.
- In Excel, click File > Options
- In the Excel Options dialog box, click Customize Ribbon
- Ensure the Developer option is checked
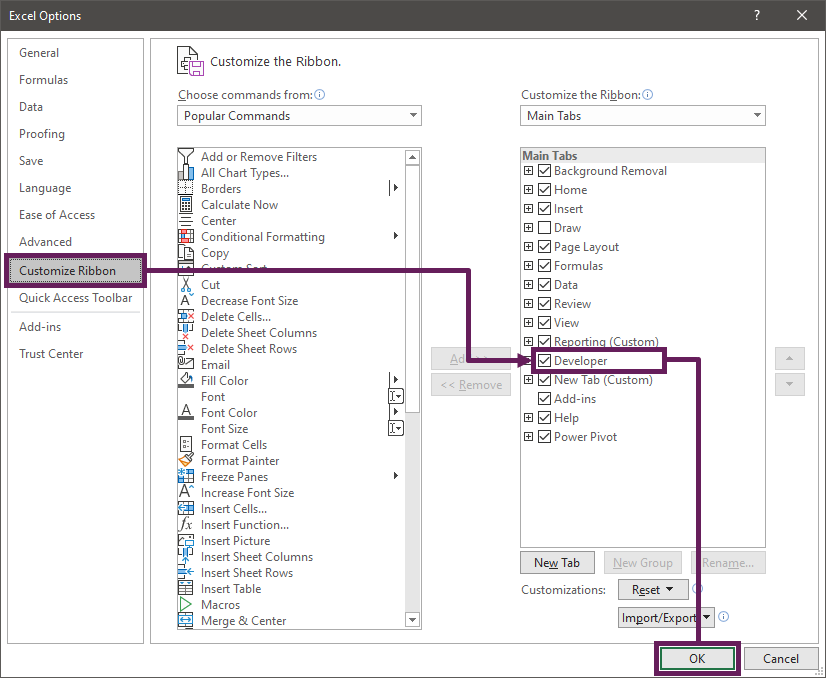
- Click OK to close the Excel Options
The Developer ribbon should now be visible at the top of the Excel window.
File format for macro enabled files
To save a workbook containing a macro, the standard .xlsx format will not work.
Generally, the .xlsm (Excel Macro-Enabled Workbook) file format should be used for workbooks containing macros. However .xlam (Excel Add-in), .xlsb (Excel Binary Workbook) and .xltx (Excel Macro-Enabled Template) are scenario specific formats which can also contain macros.
The legacy .xls and .xla file formats can both contain macros. They were superseded in 2007, and should now be avoided.
The basic rule is… if you don’t know, go for .xlsm.
Personal macro workbook
If we want macros to be reusable for many workbooks, often the best place to save them is in the personal macro workbook.
A personal macro workbook is a hidden file which opens whenever the Excel application opens.
How to create a personal macro workbook?
A personal macro workbook does not exist by default; we have to create it. There are many ways to do this, but the easiest is to let Excel do it for us.
- In the ribbon, click Developer > Record Macro.

- In the Record Macro dialog box, select Personal Macro Workbook from the drop-down list.
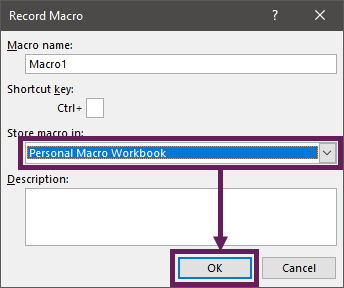
- Click OK.
- Do anything in Excel, such as typing your name into cell A1.
- Click Developer > Stop Recording

- Close all the open workbooks in Excel, this will force the personal macro workbook to be saved. A warning message will appear, click Save.
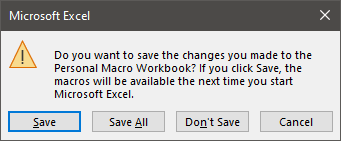
In the next part, we will learn how to use the Visual Basic Editor, which gives us access to the personal macro workbook.
Using the Visual Basic Editor
The Visual Basic Editor (or VBE as it can be known) is the place where we enter or edit VBA code. The Visual Basic Editor is found within the Developer Ribbon
In Excel, click Developer > Visual Basic to open the VBE.
Alternatively, you could use the keyboard; press ALT+F11 (the + indicates that you should hold down the ALT key, press F11, then release the ALT key), which toggles between the Excel window and the VBE.
The Visual Basic Editor Window
The Visual Basic Editor contains four main sections.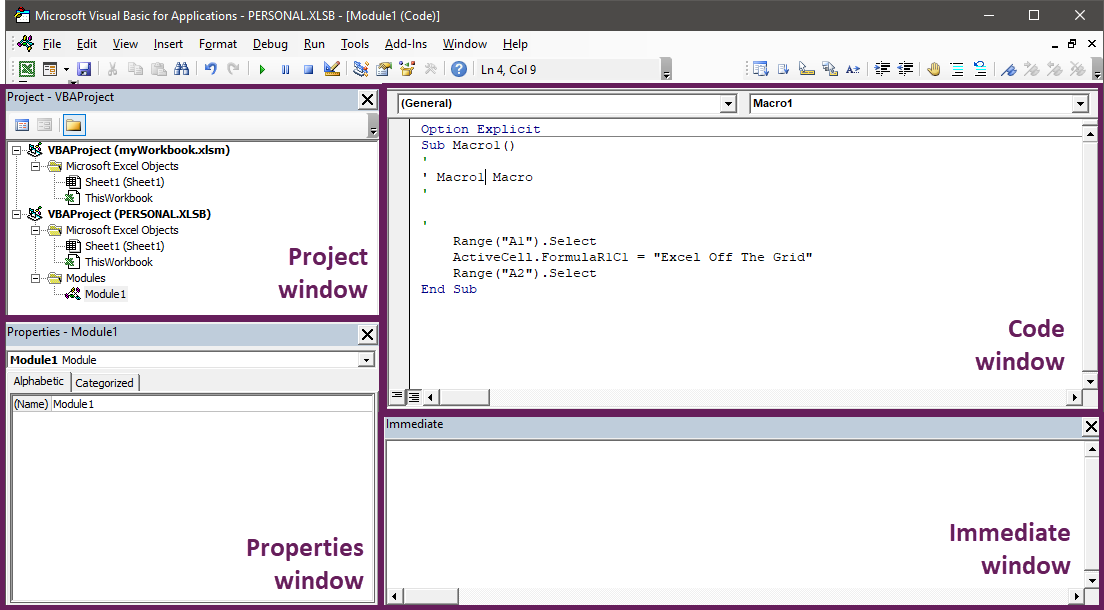
Within the top left of the VBE, we will see a list of items which can contain VBA code (known as the project window)
Double-clicking any sheet name, workbook or module, will open the code window associated with that item. VBA code is entered into the code window.
Unless you have specific reasons, the best option is to enter the macro into a module. To create a module, click Insert > Module within the VBE.
Running a macro
There are many ways to run VBA code. This section is not exhaustive, but is intended to provide an overview of the most common methods.
Running a macro from within Visual Basic Editor
When testing VBA code, it is common to execute that code from the VBE.
Click anywhere within the code, between the Sub and End Sub lines, choose one of the following options:
- Click Run > Run Sub/UserForm from the menu at the top of the VBE
- Using the keyboard, you can press ALT+F5
- Click the play button at the top of the VBE

The code you entered will be executed.
Running a macro from within Excel
Once the code has been tested and in working order, it is common to execute it directly within Excel. There are lots of options for this too (including events, or user defined functions), however the three most common methods I will show you are:
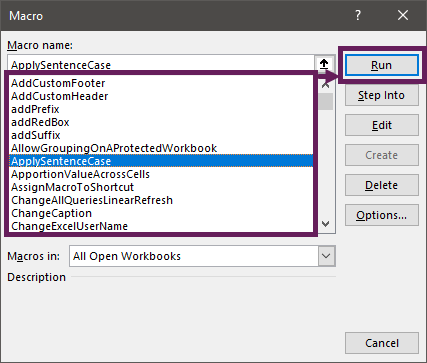
Run from the Macro window
- Click View > Macros or Developer > Macros

- Select the macro from the list and click Run.
Create a custom ribbon
Having macros always available in the ribbon is a great time saver. Therefore, learning how to customize the ribbon is useful.
- In Excel, click File > Options
- In the Excel Options dialog box, click Customize Ribbon
- Click New Tab to create a new ribbon tab, then click New Group to create a section within the new tab.
- In the Choose commands from drop-down, select Macros. Select your macro and click
Add >> to move the macro it into your new group. - Use the Rename… button to give the tab, group or macro a more useful name.
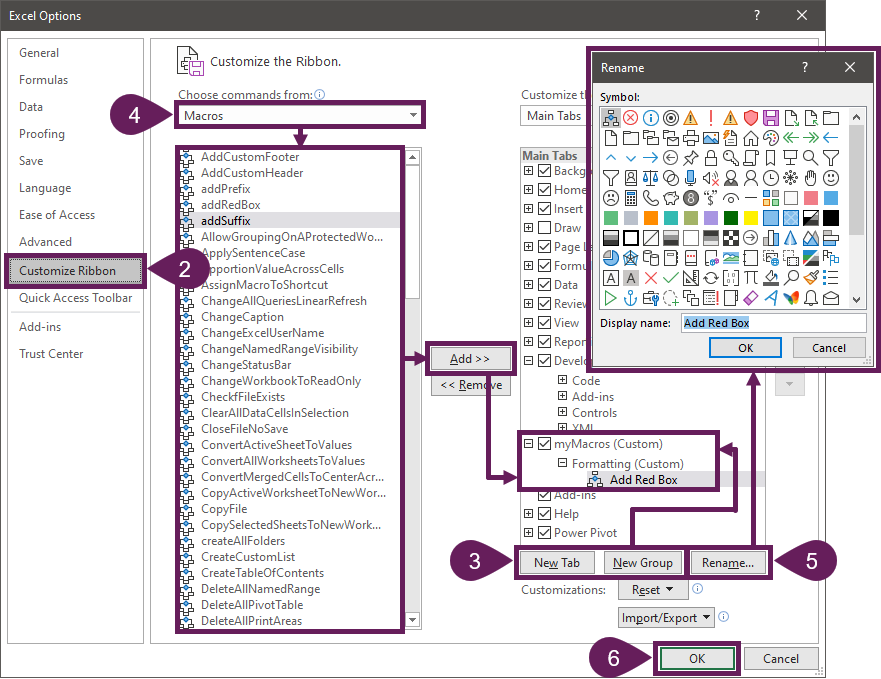
- Click OK to close the window.
- The new ribbon menu will appear containing your macro. Click the button to run the macro.

Create a button/shape on a worksheet
Macros can be executed using buttons or shapes on the worksheet.
- To create a button, click Developer > Insert > Form Control > Button
- Draw a shape on the worksheet to show the location and size of the button
- The Assign Macro dialog will appear, select the macro and click OK.
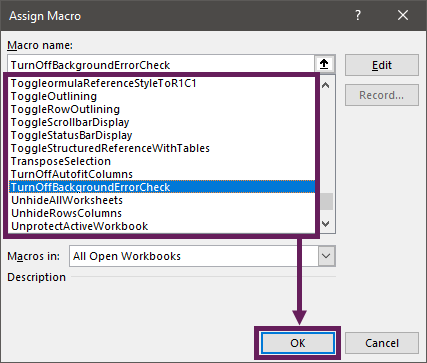
- The button will appear. Clicking the button will run the macro
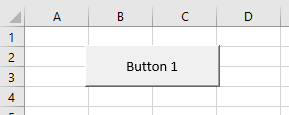
- Right-click on the button to change the description
To assign a different macro, right-click on the button and select Assign Macro… from the menu.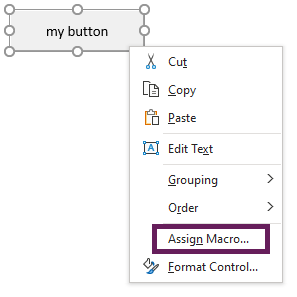
Alternatively, a macro can be assigned to a shape. After creating a shape, right-click on it and select Assign Macro… from the menu, then follow the same process as for a button.
PART TWO: 30 Useful VBA codes for Excel
Hide all selected sheets
What does it do?
Hides all the selected sheets.
VBA code
Sub HideAllSelectedSheets()

'Create variable to hold worksheets
Dim ws As Worksheet

'Ignore error if trying to hide the last worksheet
On Error Resume Next

'Loop through each worksheet in the active workbook
For Each ws In ActiveWindow.SelectedSheets

    'Hide each sheet
    ws.Visible = xlSheetHidden

Next ws

'Allow errors to appear
On Error GoTo 0

End Sub
Notes:
Excel requires at least one active worksheet. If all the visible sheets are selected, to avoid an error, the VBA code will not hide the last sheet.
For other examples of hiding worksheets check out these posts:
Unhide all sheets
What does it do?
Makes all worksheets visible.
VBA code
Sub UnhideAllWorksheets()

'Create variable to hold worksheets
Dim ws As Worksheet

'Loop through each worksheet in the active workbook
For Each ws In ActiveWorkbook.Worksheets

    'Unhide each sheet
    ws.Visible = xlSheetVisible

Next ws

End Sub
Protect all selected worksheets
What does it do?
Protects all the selected worksheets with a password determined by the user.
VBA code
Sub ProtectSelectedWorksheets()

Dim ws As Worksheet
Dim sheetArray As Variant
Dim myPassword As Variant

'Set the password
myPassword = Application.InputBox(prompt:="Enter password", _
    Title:="Password", Type:=2)

'The User clicked Cancel
If myPassword = False Then Exit Sub

'Capture the selected sheets
Set sheetArray = ActiveWindow.SelectedSheets

'Loop through each worksheet in the active workbook
For Each ws In sheetArray

    On Error Resume Next

    'Select the worksheet
    ws.Select

    'Protect each worksheet
    ws.Protect Password:=myPassword

    On Error GoTo 0

Next ws

sheetArray.Select

End Sub
Unprotect all worksheets
What does it do?
Unprotects all worksheets with a password determined by the user.
VBA code
Sub UnprotectAllWorksheets()

'Create a variable to hold worksheets
Dim ws As Worksheet

'Create a variable to hold the password
Dim myPassword As Variant

'Set the password
myPassword = Application.InputBox(prompt:="Enter password", _
    Title:="Password", Type:=2)

'The User clicked Cancel
If myPassword = False Then Exit Sub

'Loop through each worksheet in the active workbook
For Each ws In ActiveWindow.SelectedSheets

    'Protect each worksheet
    ws.Unprotect Password:=myPassword

Next ws

End Sub
Lock cells containing formulas
What does it do?
Password protects a single worksheet with cells containing formulas locked, all other cells are unlocked.
VBA code
Sub LockOnlyCellsWithFormulas()

'Create a variable to hold the password
Dim myPassword As Variant

'If more than one worksheet selected exit the macro
If ActiveWindow.SelectedSheets.Count > 1 Then

    'Display error message and exit macro
    MsgBox "Select one worksheet and try again"
    Exit Sub

End If

'Set the password
myPassword = Application.InputBox(prompt:="Enter password", _
    Title:="Password", Type:=2)

'The User clicked Cancel
If myPassword = False Then Exit Sub

'All the following to apply to active sheet
With ActiveSheet

    'Ignore errors caused by incorrect passwords
    On Error Resume Next

    'Unprotect the active sheet
    .Unprotect Password:=myPassword

    'If error occured then exit macro
    If Err.Number <> 0 Then

        'Display message then exit
        MsgBox "Incorrect password"
        Exit Sub

    End If

    'Turn error checking back on
    On Error GoTo 0

    'Remove lock setting from all cells
    .Cells.Locked = False

    'Add lock setting to all cells
    .Cells.SpecialCells(xlCellTypeFormulas).Locked = True

    'Protect the active sheet
    .Protect Password:=myPassword

    End With

End Sub
Hide formulas when protected
What does it do?
When the active sheet is protected, formulas will not be visible in the formula bar. Uses a predefined password of mypassword.
VBA code
Sub HideFormulasWhenProtected()

'Create a variable to hold the password
Dim myPassword As String

'Set the password
myPassword = "myPassword"

'All the following to apply to active sheet
With ActiveSheet

    'Unprotect the active sheet
    .Unprotect Password:=myPassword

    'Hide formulas in all cells
    .Cells.FormulaHidden = True

    'Protect the active sheet
    .Protect Password:=myPassword

End With

End Sub
Save time stamped backup file
What does it do?
Save a backup copy of the workbook with a time stamp.
VBA code
Sub SaveTimeStampedBackup()

'Create variable to hold the new file path
Dim saveAsName As String

'Set the file path
saveAsName = ActiveWorkbook.Path & "\" & _
Format(Now, "yymmdd-hhmmss") & " " & ActiveWorkbook.Name

'Save the workbook
ActiveWorkbook.SaveCopyAs Filename:=saveAsName

End Sub
Prepare workbook for saving
What does it do?
The macro will, for each worksheet:
- Close all group outlining
- Set the view to the normal view
- Remove gridlines
- Hide all row numbers and column numbers
- Select cell A1
The first sheet is selected.
After running the macro, every worksheet in the workbook will be in a tidy state for the next use.
VBA code
Sub PrepareWorkbookForSaving()

'Declare the worksheet variable
Dim ws As Worksheet

'Loop through each worksheet in the active workbook
For Each ws In ActiveWorkbook.Worksheets

    'Activate each sheet
    ws.Activate

    'Close all of groups
    ws.Outline.ShowLevels RowLevels:=1, ColumnLevels:=1

    'Set the view settings to normal
    ActiveWindow.View = xlNormalView

    'Remove the gridlines
    ActiveWindow.DisplayGridlines = False

    'Remove the headings on each of the worksheets
    ActiveWindow.DisplayHeadings = False

    'Get worksheet to display top left
    ws.Cells(1, 1).Select
Next ws

'Find the first visible worksheet and select it
For Each ws In Worksheets

    If ws.Visible = xlSheetVisible Then

        'Select the first visible worksheet
        ws.Select

        'Once the first visible worksheet is found exit the sub
        Exit For

    End If

Next ws

End Sub
Convert merged cells to center across
What does it do?
Changes all single row merged cells into center across formatting.
VBA code
Sub ConvertMergedCellsToCenterAcross()

Dim c As Range
Dim mergedRange As Range

'Loop through all cells in Used range
For Each c In ActiveSheet.UsedRange

    'If merged and single row
    If c.MergeCells = True And c.MergeArea.Rows.Count = 1 Then

        'Set variable for the merged range
        Set mergedRange = c.MergeArea

        'Unmerge the cell and apply Centre Across Selection
        mergedRange.UnMerge
        mergedRange.HorizontalAlignment = xlCenterAcrossSelection

    End If

Next

End Sub
Fit selection to screen
What does it do?
Zoom the screen on the selected cells.
VBA code
Sub FitSelectionToScreen()

'To zoom to a specific area, then select the cells
Range("A1:I15").Select

'Zoom to selection
ActiveWindow.Zoom = True

'Select first cell on worksheet
Range("A1").Select

End Sub
Flip number signage on selected cells
What does it do?
Flips the number signage of all numeric values in the selected cells
VBA code
Sub FlipNumberSignage()

'Create variable to hold cells in the worksheet
Dim c As Range

'Loop through each cell in selection
For Each c In Selection

    'Test if the cell contents is a number
    If IsNumeric(c) Then

        'Convert signage for each cell
        c.Value = -c.Value

    End If

Next c

End Sub
Clear all data cells
What does it do?
Clears all cells in the selection which are constants (i.e. not formulas).
VBA code
Sub ClearAllDataCellsInSelection()

'Clear all hardcoded values in the selected range
Selection.SpecialCells(xlCellTypeConstants).ClearContents

End Sub
Add prefix to each cell in selection
What does it do?
Adds a prefix to each cell in the selected cells (excludes formulas and blanks).
VBA code
Sub AddPrefix()

Dim c As Range
Dim prefixValue As Variant

'Display inputbox to collect prefix text
prefixValue = Application.InputBox(Prompt:="Enter prefix:", _
    Title:="Prefix", Type:=2)

'The User clicked Cancel
If prefixValue = False Then Exit Sub

For Each c In Selection

    'Add prefix where cell is not a formula or blank
    If Not c.HasFormula And c.Value <> "" Then

        c.Value = prefixValue & c.Value

    End If

Next

End Sub
Add suffix to each cell in selection
What does it do?
Adds a suffix to each value in the selected cells (excludes formulas and blanks).
VBA code
Sub AddSuffix()

Dim c As Range
Dim suffixValue As Variant

'Display inputbox to collect prefix text
suffixValue = Application.InputBox(Prompt:="Enter Suffix:", _
    Title:="Suffix", Type:=2)

'The User clicked Cancel
If suffixValue = False Then Exit Sub

    'Loop through each cellin selection
    For Each c In Selection

        'Add Suffix where cell is not a formula or blank
        If Not c.HasFormula And c.Value <> "" Then

            c.Value = c.Value & suffixValue

        End If

Next

End Sub
Reverse row order
What does it do?
Reverses the order of all rows of data in the selection.
VBA code
Sub ReverseRows()

'Create variables
Dim rng As Range
Dim rngArray As Variant
Dim tempRng As Variant
Dim i As Long
Dim j As Long
Dim k As Long

'Record the selected range and it's contents
Set rng = Selection
rngArray = rng.Formula

'Loop through all cells and create a temporary array
For j = 1 To UBound(rngArray, 2)
    k = UBound(rngArray, 1)
    For i = 1 To UBound(rngArray, 1) / 2
        tempRng = rngArray(i, j)
        rngArray(i, j) = rngArray(k, j)
        rngArray(k, j) = tempRng
        k = k - 1
    Next
Next

'Apply the array
rng.Formula = rngArray

End Sub
Reverse column order
What does it do?
Reverses the order of all column data in the selection.
VBA code
Sub ReverseColumns()

'Create variables
Dim rng As Range
Dim rngArray As Variant
Dim tempRng As Variant
Dim i As Long
Dim j As Long
Dim k As Long

'Record the selected range and it's contents
Set rng = Selection
rngArray = rng.Formula

'Loop through all cells and create a temporary array
For i = 1 To UBound(rngArray, 1)
    k = UBound(rngArray, 2)
    For j = 1 To UBound(rngArray, 2) / 2
        tempRng = rngArray(i, j)
        rngArray(i, j) = rngArray(i, k)
        rngArray(i, k) = tempRng
        k = k - 1
    Next
Next

'Apply the array
rng.Formula = rngArray

End Sub
Transpose selection
What does it do?
Transposes the selected cells with a single click.
VBA code
Sub TransposeSelection()

'Create variables
Dim rng As Range
Dim rngArray As Variant
Dim i As Long
Dim j As Long
Dim overflowRng As Range
Dim msgAns As Long

'Record the selected range and it's contents
Set rng = Selection
rngArray = rng.Formula

'Test the range and identify if any cells will be overwritten
If rng.Rows.Count > rng.Columns.Count Then

    Set overflowRng = rng.Cells(1, 1). _
        Offset(0, rng.Columns.Count). _
        Resize(rng.Columns.Count, _
        rng.Rows.Count - rng.Columns.Count)

ElseIf rng.Rows.Count < rng.Columns.Count Then

    Set overflowRng = rng.Cells(1, 1).Offset(rng.Rows.Count, 0). _
        Resize(rng.Columns.Count - rng.Rows.Count, rng.Rows.Count)

End If

If rng.Rows.Count <> rng.Columns.Count Then

    If Application.WorksheetFunction.CountA(overflowRng) > 0 Then

        msgAns = MsgBox("Worksheet data in " & overflowRng.Address & _
            " will be overwritten." & vbNewLine & _
            "Do you wish to continue?", vbYesNo)

    If msgAns = vbNo Then Exit Sub

    End If

End If

'Clear the rnage
rng.Clear

'Reapply the cells in transposted position
For i = 1 To UBound(rngArray, 1)

    For j = 1 To UBound(rngArray, 2)

        rng.Cells(1, 1).Offset(j - 1, i - 1) = rngArray(i, j)

    Next

Next

End Sub
Create red box around selected areas
What does it do?
Draws a rectangle shape to fit around the selected cells.
VBA code
Sub AddRedBox()

Dim redBox As Shape
Dim selectedAreas As Range
Dim i As Integer
Dim tempShape As Shape

'Loop through each selected area in active sheet
For Each selectedAreas In Selection.Areas

    'Create a rectangle
    Set redBox = ActiveSheet.Shapes.AddShape(msoShapeRectangle, _
        selectedAreas.Left, selectedAreas.Top, _
        selectedAreas.Width, selectedAreas.Height)

    'Change attributes of shape created
    redBox.Line.ForeColor.RGB = RGB(255, 0, 0)
    redBox.Line.Weight = 2
    redBox.Fill.Visible = msoFalse

    'Loop to find a unique shape name
    Do
        i = i + 1
        Set tempShape = Nothing

        On Error Resume Next
        Set tempShape = ActiveSheet.Shapes("RedBox_" & i)
        On Error GoTo 0

    Loop Until tempShape Is Nothing

    'Rename the shape
    redBox.Name = "RedBox_" & i

Next

End Sub
Delete all red boxes on active sheet
What does it do?
Having created the red boxes in the macro above. This code removes all the red boxes on the active sheet with a single click.
VBA code
Sub DeleteRedBox()

Dim shp As Shape

'Loop through each shape on active sheet
For Each shp In ActiveSheet.Shapes

    'Find shapes with a name starting with "RedBox_"
    If Left(shp.Name, 7) = "RedBox_" Then

        'Delete the shape
        shp.Delete

    End If

Next shp

End Sub
Save selected chart as an image
What does it do?
Saves the selected chart as a picture to the file location contained in the macro.
VBA code
Sub ExportSingleChartAsImage()

'Create a variable to hold the path and name of image
Dim imagePath As String
Dim cht As Chart

imagePath = "C:\Users\marks\Documents\myImage.png"
Set cht = ActiveChart

'Export the chart
cht.Export (imagePath)

End Sub
Resize all charts to same as active chart
What does it do?
Select the chart with the dimensions you wish to use, then run the macro. All the charts will resize to the same dimensions.
VBA code
Sub ResizeAllCharts()

'Create variables to hold chart dimensions
Dim chtHeight As Long
Dim chtWidth As Long

'Create variable to loop through chart objects
Dim chtObj As ChartObject

'Get the size of the first selected chart
chtHeight = ActiveChart.Parent.Height
chtWidth = ActiveChart.Parent.Width

For Each chtObj In ActiveSheet.ChartObjects

    chtObj.Height = chtHeight
    chtObj.Width = chtWidth

Next chtObj

End Sub
Refresh all Pivot Tables in workbook
What does it do?
Refresh all the Pivot Tables in the active workbook.
VBA code
Sub RefreshAllPivotTables()

'Refresh all pivot tables
ActiveWorkbook.RefreshAll

End Sub
Turn off auto fit columns on all Pivot Tables
What does it do?
By default, PivotTables resize columns to fit the contents. This macro changes the setting for every PivotTable in the active workbook, so that column widths set by the user are maintained.
VBA code
Sub TurnOffAutofitColumns()

'Create a variable to hold worksheets
Dim ws As Worksheet

'Create a variable to hold pivot tables
Dim pvt As PivotTable

'Loop through each sheet in the activeworkbook
For Each ws In ActiveWorkbook.Worksheets

    'Loop through each pivot table in the worksheet
    For Each pvt In ws.PivotTables

        'Turn off auto fit columns on PivotTable
        pvt.HasAutoFormat = False

    Next pvt

Next ws

End Sub
Get color code from cell fill color
What does it do?
Returns the RGB and Hex for the active cell’s fill color.
VBA code
Sub GetColorCodeFromCellFill()

'Create variables hold the color data
Dim fillColor As Long
Dim R As Integer
Dim G As Integer
Dim B As Integer
Dim Hex As String

'Get the fill color
fillColor = ActiveCell.Interior.Color

'Convert fill color to RGB
R = (fillColor Mod 256)
G = (fillColor \ 256) Mod 256
B = (fillColor \ 65536) Mod 256

'Convert fill color to Hex
Hex = "#" & Application.WorksheetFunction.Dec2Hex(fillColor)

'Display fill color codes
MsgBox "Color codes for active cell" & vbNewLine & _
    "R:" & R & ", G:" & G & ", B:" & B & vbNewLine & _
    "Hex: " & Hex, Title:="Color Codes"

End Sub
Create a table of contents
What does it do?
Creates or refreshes a hyperlinked table of contents on a worksheet called “TOC”, which is placed at the start of a workbook.
VBA code
Sub CreateTableOfContents()

Dim i As Long
Dim TOCName As String

'Name of the Table of contents
TOCName = "TOC"

'Delete the existing Table of Contents sheet if it exists
On Error Resume Next
Application.DisplayAlerts = False
ActiveWorkbook.Sheets(TOCName).Delete
Application.DisplayAlerts = True
On Error GoTo 0

'Create a new worksheet
ActiveWorkbook.Sheets.Add before:=ActiveWorkbook.Worksheets(1)
ActiveSheet.Name = TOCName

'Loop through the worksheets
For i = 1 To Sheets.Count

    'Create the table of contents
    ActiveSheet.Hyperlinks.Add _
        Anchor:=ActiveSheet.Cells(i, 1), _
        Address:="", _
        SubAddress:="'" & Sheets(i).Name & "'!A1", _
        ScreenTip:=Sheets(i).Name, _
        TextToDisplay:=Sheets(i).Name

Next i

End Sub
Excel to speak the cell contents
What does it do?
Excel speaks back the contents of the selected cells
VBA code
Sub SpeakCellContents()

'Speak the selected cells
Selection.Speak

End Sub
Fix the range of cells which can be scrolled
What does it do?
Fixes the scroll range to the selected cell range. It prevents a user from scrolling into other parts of the worksheet.
If a single cell is selected, the scroll range is reset.
VBA code
Sub FixScrollRange()

If Selection.Cells.Count = 1 Then

    'If one cell selected, then reset
    ActiveSheet.ScrollArea = ""

Else

    'Set the scroll area to the selected cells
    ActiveSheet.ScrollArea = Selection.Address

End If

End Sub
Invert the sheet selection
What does it do?
Select some worksheet tabs, then run the macro to reverse the selection.
VBA code
Sub InvertSheetSelection()

'Create variable to hold list of selected worksheet
Dim selectedList As String

'Create variable to hold worksheets
Dim ws As Worksheet

'Create variable to switch after the first sheet selected
Dim firstSheet As Boolean

'Convert selected sheest to a text string
For Each ws In ActiveWindow.SelectedSheets
    selectedList = selectedList & ws.Name & "[|]"
Next ws

'Set the toggle of first sheet
firstSheet = True

'Loop through each worksheet in the active workbook
For Each ws In ActiveWorkbook.Sheets

    'Check if the worksheet was not previously selected
    If InStr(selectedList, ws.Name & "[|]") = 0 Then

        'Check the worksheet is visible
        If ws.Visible = xlSheetVisible Then

            'Select the sheet
            ws.Select firstSheet

            'First worksheet has been found, toggle to false
            firstSheet = False

        End If

    End If

Next ws

End Sub
Assign a macro to a shortcut key
What does it do?
Assigns a macro to a shortcut key.
VBA code
Sub AssignMacroToShortcut()

'+ = Ctrl
'^ = Shift
'{T} = the shortcut letter

Application.OnKey "+^{T}", "nameOfMacro"

'Reset shortcut to default - repeat without the name of the macro
'Application.OnKey "+%{T}"

End Sub
Apply single accounting underline to selection
What does it do?
Single accounting underline is a formatting style which is not available in the ribbon. The macro below applies single accounting underline to the selected cells.
VBA code
Sub SingleAccountingUnderline()

'Apply single accounting underline to selected cells
Selection.Font.Underline = xlUnderlineStyleSingleAccounting

End Sub
Discover how you can automate your work with our Excel courses and tools.

Excel Academy
The complete program for saving time by automating Excel.

Excel Automation Secrets
Discover the 7-step framework for automating Excel.

Office Scripts: Automate Excel Everywhere
Start using Office Scripts and Power Automate to automate Excel in new ways.

I appreciate your efforts to create this exhaustive compilation of VBA macros. Thanks you for sharing this with us all.
Thank you – I’m glad you found it useful 🙂
Much appreciated, this was very helpful, and demonstrates your commitment to Excel in our world, thank you !!!
Nice, big and very clean job,
Thank you very much!
Thanks 🙂
Very useful! Thank you!
Wonderful job. I hope I can find even more.
Hi Amelia – my eBook of VBA Macros contains 100 examples that you can follow. You can check it out here:
https://exceloffthegrid.com/100-excel-vba-macros/
Hide all selected sheets (ALTERNATE CODE)
====================================================
Instead of looping the selected sheets in order to hide them one-at-a-time, you can hide all the selected sheets all at once using this single line of code. As for the case when all of the sheets are selected, I decided it might be better to tell the user that all of the sheets cannot be hidden instead of automatically assuming the last selected sheet should not be hidden.
Sub HideAllSelectedSheets()
On Error GoTo CannotDoThat
ActiveWindow.SelectedSheets.Visible = False
Exit Sub
CannotDoThat:
MsgBox “You cannot hide all of the sheets!!!!”, vbCritical
End Sub
Hi Rick – thank you. Yes I agree that is a nice solution.
Flip number signage on selected cells (ALTERNATE CODE)
====================================================
You can flip the sign of all numbers in the selection using just a single line of code…
Sub FlipNumberSignage()
Selection.Value = Evaluate(“-” & Selection.Address)
End Sub
Thanks Rick, nice use of Evaluate.
wonderful, great job
Thank Mazhar – I’m glad you found it useful 🙂