In this post, we look at how to browse for file path with VBA, and then insert the selected filepath into a cell.
This post is inspired by a question I received:
“If you would want to add a browse button right beside the cell that contains the file path so that you won’t need to manually copy and paste the file path in the cell, how would you do that?”
OK, let me show you the solution that I came up with.
Table of Contents
Download the example file: Join the free Insiders Program and gain access to the example file used for this post.
File name: 0052 Insert file path into cell with Browse button.zip
Watch the video
The solution
Before we look at how to build it, let’s look at the solution in action.
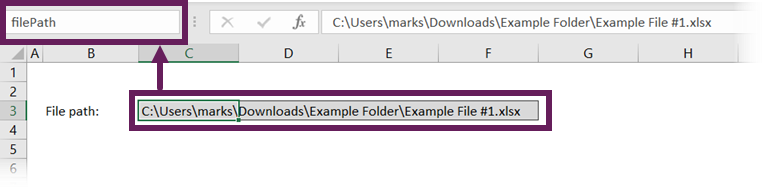
Cell C3 contains a file path, with a folder icon next to it.
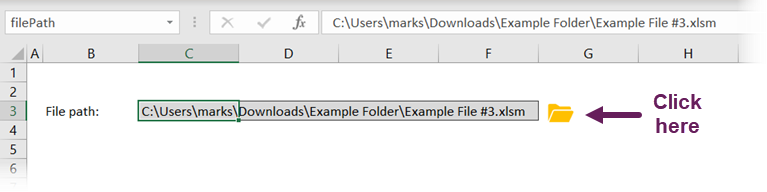
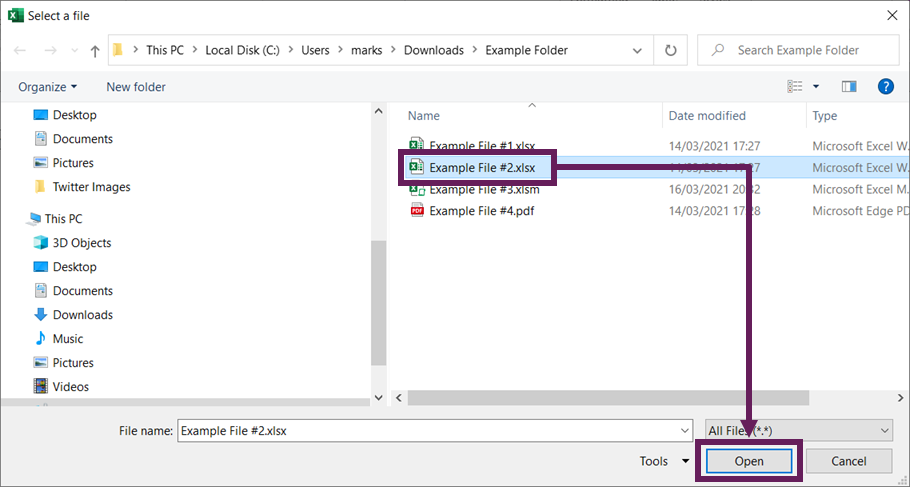
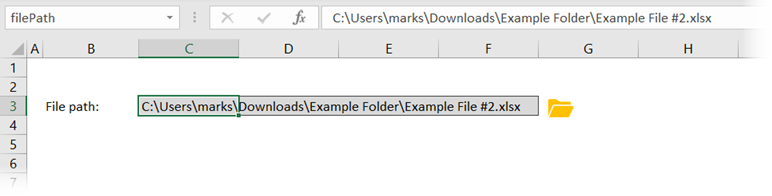
If we click on the folder icon, the file open dialog box opens. We can select a file and click Open.
The file path is now inserted into cell C3.
If you’re here to find out how to do this yourself, then you’re in the right place 😁
Building the solution
Now we know what it does; let’s build it.
Create a named range
First, we need to create a named range for the cell containing the file path.
While this step isn’t essential, it reduces the risk of error. If we wrote a macro that references cell C3, then inserted a new row or column, the code in the macro doesn’t change, so it then refers to the wrong cell. Therefore, named ranges help to remove this risk.
- Select the cell which contains the file path
- In the name box, type filePath and press Enter
First step. Done. ✅
The VBA macro
The main driving force for this solution is a VBA macro.
If you have the Developer ribbon visible, click Developer > Visual Basic. if not, press ALT + F11.

The Visual Basic Editor opens.
Right-click the file in the Project window, then click Insert > Module from the menu.
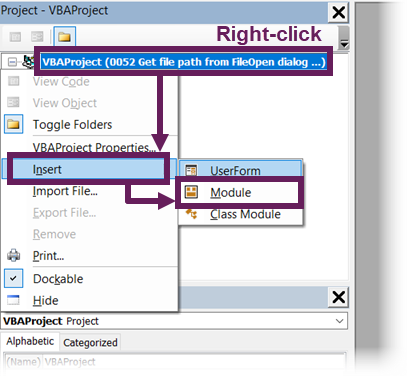
A new code module opens. Enter the following code into the code module
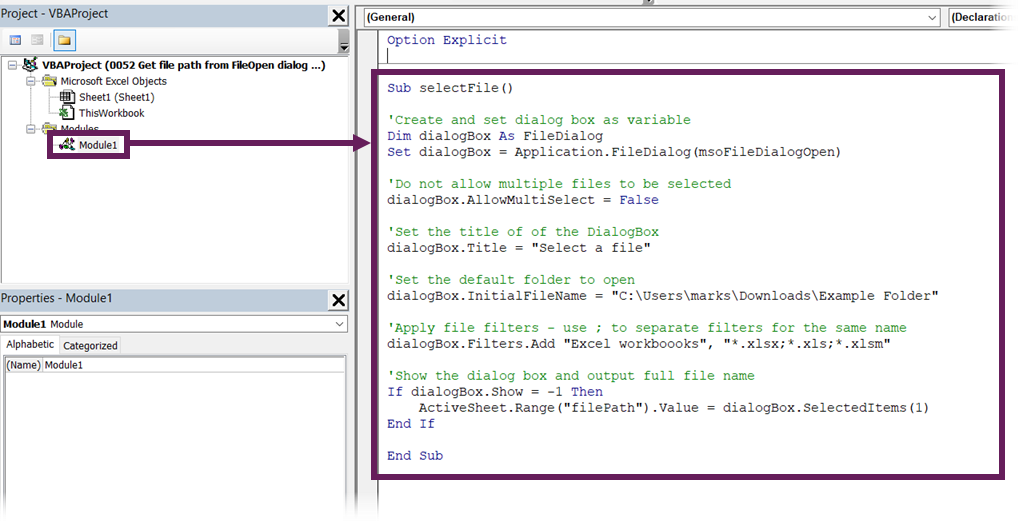
Sub selectFile()

'Create and set dialog box as variable
Dim dialogBox As FileDialog
Set dialogBox = Application.FileDialog(msoFileDialogOpen)

'Do not allow multiple files to be selected
dialogBox.AllowMultiSelect = False

'Set the title of the DialogBox
dialogBox.Title = "Select a file"

'Set the default folder to open
dialogBox.InitialFileName = "C:\Users\marks\Downloads\Example Folder"

'Clear the dialog box filters
dialogBox.Filters.Clear
'Apply file filters - use ; to separate filters for the same name
dialogBox.Filters.Add "Excel workbooks", "*.xlsx;*.xls;*.xlsm"

'Show the dialog box and output full file name
If dialogBox.Show = -1 Then
    ActiveSheet.Range("filePath").Value = dialogBox.SelectedItems(1)
End If

End Sub
The comments in the code describe the purpose of each section.
Please take careful note of the following, as you will need to change the code for your specific scenario.
ActiveSheet.Range(“filePath”).Value = dialogBox.SelectedItems(1)
Change the word filePath for the named range you created above.
dialogBox.InitialFileName = “C:\Users\marks\Downloads\Example Folder”
This contains the default folder path where the file picker opens each time. Change this to match your environment.
dialogBox.Filters.Clear
dialogBox.Filters.Add “Excel workbooks”, “*.xlsx;*.xls;*.xlsm”
This code restricts the types of files that are shown in the file picker. The asterisk ( * ) is a wildcard character; any files ending in .xlsx, .xlsx, and .xlsm will be displayed. To add new file types, PDFs for example, add “;*.pdf” into the text string. Or, to allow all file types, remove the dialogbox.Filters.Add… line completely.
Once the code has been entered and amended to your scenario, close the Visual Basic Editor by clicking on the [X] at the window’s top right.
Insert folder picture
Now we need something to act as the button. I am going to use an Icon. Depending on your version of Excel, you may not have the Icons feature. But you can insert any picture or shape you wish.
To insert an icon like me, click Insert > Icons.
Search for “Folder”, in the icons window. Select the preferred icon and click Insert.
The image will be inserted onto the face of the worksheet.
Move and resize the image to be in the right location. I have also formatted the folder icon to be an orange color (similar to how folders look in the normal Windows environment).
Assign macro to picture
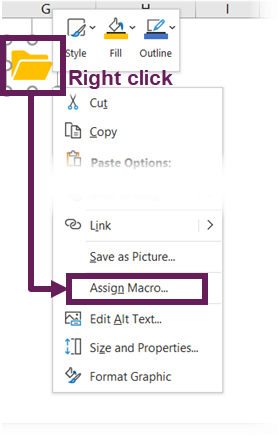
Finally, we assign the macro to the image. Right-click on the image and select Assign macro… from the menu.
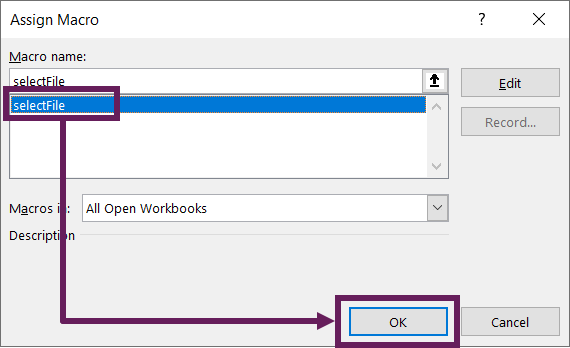
From the Assign Macro window, click the selectFile macro (this is the name of the macro we created earlier), then click OK.
Test it out
That’s it. We’re done. Now go and test it out.
Conclusion
In this post, we have seen how to create a user interface for selecting files. Users can browse for a file path, then insert that into a cell. This is a really useful technique if using cell parameters in Power Query.
Related posts:
- Change the Power Query source based on a cell value
- How to fix the Formula.Firewall error in Power Query (2 ways)
- VBA code to copy, move, delete and manage files
Discover how you can automate your work with our Excel courses and tools.
The Excel Academy

Make working late a thing of the past.
The Excel Academy is Excel training for professionals who want to save time.
Would you like a non VBA based method of doing the above?
Using MicroSoft 365 Excel, you have the option of using a formula to pull out the file name and path from.
I use the hyperlink function starting with the path that the current file is saved it.
That side steps security having issues with ‘rogue macro’ concerns.
Example:
=IF(ISNA(@CELL(“filename”,B1)),”After the file is saved this formula will display the path and name”,SUBSTITUTE(LEFT(@CELL(“filename”,B1),FIND(“]”,@CELL(“filename”,B1),1)-1),”[“,””,1))
Gives you the path for the entire file.
If you know you will be back to that file on a regular basis:
paste the formula into the file
F2 then press Enter to force recalc,
copy/paste values back in my home worksheet.
Trim to length for if I want to link to the folder or file desired.
Wrap it in a hyperlink formula.
Click save.
Here is an example that lets you click to open the folder a file is saved in.
=IF(ISNA(@CELL(“filename”,B2)),””,IF(ISERROR(FIND(“\”,@CELL(“filename”,A1),1)),HYPERLINK(LEFT(@CELL(“filename”,B2),FIND(“[“,@CELL(“filename”,B2),1)-1), “Saved in: “&MID(@CELL(“filename”,B2),FIND(“/[[“,SUBSTITUTE(@CELL(“filename”,B2),”/”,”/[[“,-1+SUMPRODUCT(LEN(CELL(“filename”,B2))-LEN(SUBSTITUTE(CELL(“filename”,B2),”/”,””)))),1)+1,(FIND(“/[“,@CELL(“filename”,B2))-2)-FIND(“/[[“,SUBSTITUTE(@CELL(“filename”,B2),”/”,”/[[“,-1+SUMPRODUCT(LEN(CELL(“filename”,B2))-LEN(SUBSTITUTE(CELL(“filename”,B2),”/”,””)))),1)+1)),HYPERLINK(LEFT(@CELL(“filename”,B2),FIND(“[“,@CELL(“filename”,B2),1)-1), “Saved in: “&MID(@CELL(“filename”,B2),FIND(“\[[“,SUBSTITUTE(@CELL(“filename”,B2),”\”,”\[[“,-1+SUMPRODUCT(LEN(CELL(“filename”,B2))-LEN(SUBSTITUTE(CELL(“filename”,B2),”\”,””)))),1)+1,(FIND(“\[“,@CELL(“filename”,B2))-2)-FIND(“\[[“,SUBSTITUTE(@CELL(“filename”,B2),”\”,”\[[“,-1+SUMPRODUCT(LEN(CELL(“filename”,B2))-LEN(SUBSTITUTE(CELL(“filename”,B2),”\”,””)))),1)+1))))
Anyhow, I was stopping by to say “Thanks for posting some interesting examples and pointers from a POV that works.”
Your writing style is a readable and effective at communicating.
Thank you for taking the time to post and make it effective.
Rgds,
Blair
Hello, May I know what do you mean by
ActiveSheet.Range(“filePath”).Value = dialogBox.SelectedItems(1)
Change the word “filePath” for the named range you created above.
In the Create Named Range step at the start, you created a named range. In the example, I used “filePath”. But if you used a different name, then you will need to change the code
Question please:
How would I change the below to just being a folder path rather than file path. Thanks. This will be very useful
Option Explicit
Sub selectFile()
‘Create and set dialog box as variable
Dim dialogBox As FileDialog
Set dialogBox = Application.FileDialog(msoFileDialogOpen)
‘Do not allow multiple files to be selected
dialogBox.AllowMultiSelect = False
‘Set the title of of the DialogBox
dialogBox.Title = “Select a file”
‘Set the default folder to open
dialogBox.InitialFileName = “C:\Users\marks\Downloads\Example Folder”
‘Clear the dialog box filters
dialogBox.Filters.Clear
‘Show the dialog box and output full file name
If dialogBox.Show = -1 Then
ActiveSheet.Range(“filePath”).Value = dialogBox.SelectedItems(1)
End If
End Sub
Change this:
ActiveSheet.Range("FilePath").Value = dialogBox.SelectedItems(1)To this:
ActiveSheet.Range("FilePath").Value = Left(dialogBox.SelectedItems(1), InStrRev(dialogBox.SelectedItems(1), "\"))Hi,
How do you make the button insert the path of the file/folder to different cells? For instance, you have a button for Cell A1, and another for Cell A2.
I know you can create 1 button for each cell but is there a way to make it easier?
You can program it to put the values into different cells. What you need first is the logic of how the button knows which cell to put the path into.
Hi there
If i wanted this to be for cells, would i need to create mutliple macro modules?
Many thanks
Sean
It depends what you want to do.
Yes, you could create multiple macros.
You could, use the active cell property to identify which cell is selected – that only requires one button.
You could also use the application.caller property identify which button called macro. See this post an example. https://exceloffthegrid.com/any-macro-one-button/