Do you ever find yourself typing out the same standard lists over and over again, such as lists of products, cost centers, projects or companies? I do. It is essential these lists don’t exclude any items and are presented in the same order each time. Lists of 4 or 5 things are easy to remember, but my brain starts to struggle when there are 6 or more. Plus, the time it takes to type those lists is a big waste of time. So, I decided to stop remembering and let Excel do the remembering for me.
AutoFill Lists
Excel loves to remember lists, it even has some built-in as standard; the months of the year and the days of the week. If you type ‘January’ into a cell, then drag that cell down/across Excel enters ‘February’ automatically, then ‘March’ and so on.


You could equally try the days of the week. ‘Monday’ will drag to become ‘Tuesday’, ‘Wednesday’ etc.
Excel doesn’t care where the list starts, type ‘Friday’ and it will populate the following days correctly. It also includes abbreviations, so ‘Jan’ for ‘January’ and ‘Mon’ for ‘Monday’. Try them, they will all populate correctly.
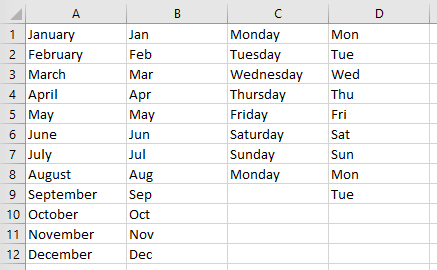
You can type the case of the first item as you need and the others will be the same. So, if you type it in upper case all the following items will be in uppercase.
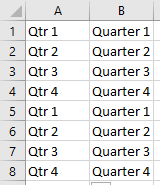
There are a few hidden lists too, such as the quarters of the year.
But you are not limited to the standard lists, Excel lets you can create your own.
Custom Lists
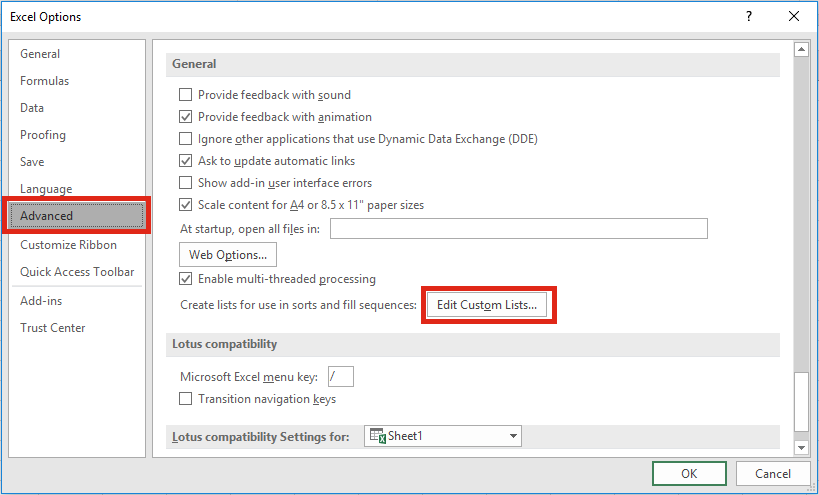
From the Ribbon, Click: File -> Options.
In the Excel Options window, scroll all the way down to the bottom, until you reach the General section. Click the Edit Custom Lists . . . button.
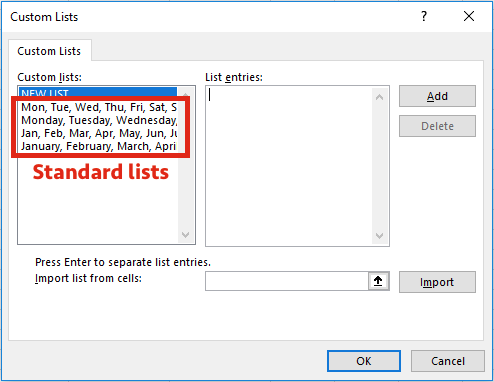
The Custom Lists window will open. You can now see where the lists for the months of the year or days of the week are stored.
To create your own lists, there are two methods of data entry:
Method 1 – Manual Entry
Click on NEW LIST in the Custom lists box [1].
Start typing the list in the List entries box [2].
Once complete click Add [3].
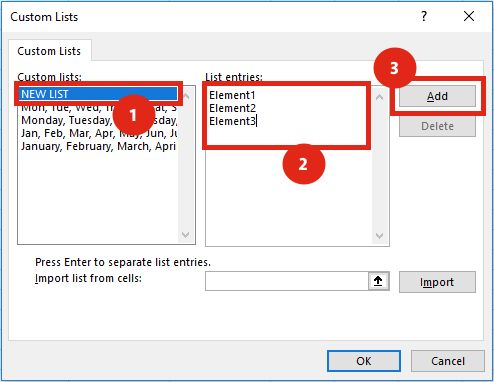
That’s it, your list is now ready to be used in a worksheet.
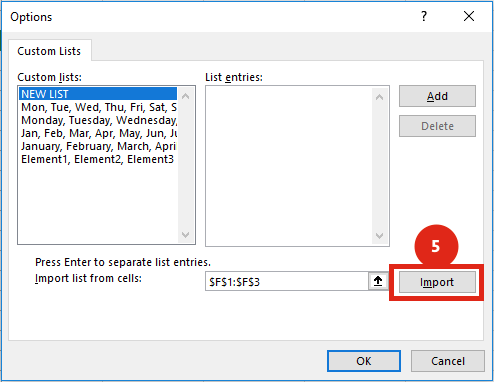
Method 2 – Import
Click on NEW LIST in the Custom lists box [1].
Click on the Range Input icon from the Import list from cells box [2].
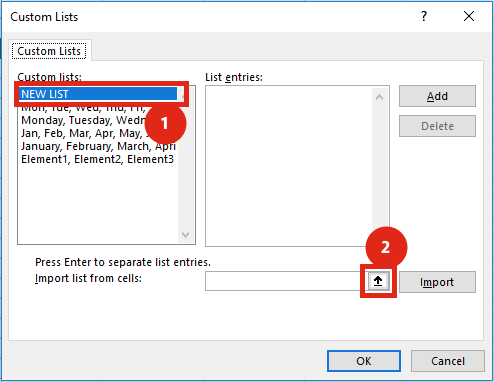
Select the location of the list [3], then click on the icon to return [4].

Back in the Custom Lists window, click Import [5].
That’s it, your list is now ready to be used in a worksheet.
Using your new Custom List
Click on a cell and type in the first item in your new Custom List, drag it down or along, just as you did for the months and days. The cells will populate with your new Custom List.
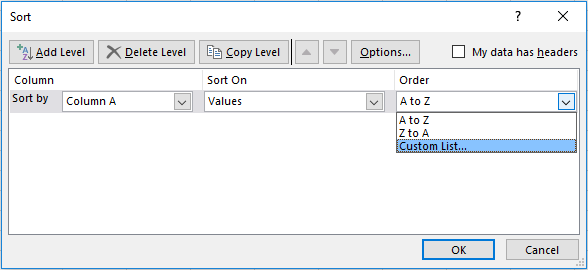
You can also sort by your Custom Lists too. In the Sort window select Custom List… from the Order drop-down box – simple.
The Custom List only exists on your computer, it will not be available for others to use unless they create the same Custom List on their own computer.
Editing a Custom List
To edit a list, click on it in the Custom Lists window and change it. Click Add to confirm the change.
Any Custom List which has been used on a worksheet is not linked in any way to the original list. i.e. If you change the elements in the Custom List it will not change any lists already existing on your worksheets.
Managing Custom Lists with VBA
If you wanted to manage Custom Lists (creating, deleting, checking for existence etc.) then check out my VBA Code Snippets.
Discover how you can automate your work with our Excel courses and tools.

Excel Academy
The complete program for saving time by automating Excel.

Excel Automation Secrets
Discover the 7-step framework for automating Excel.

Office Scripts: Automate Excel Everywhere
Start using Office Scripts and Power Automate to automate Excel in new ways.

