In 2020, I attended an online meetup where Danielle Stein Fairhurst shared a technique to automate Goal Seek in Excel with a VBA macro. I had never thought of this before; it had my mind buzzing with ideas of how I could use it. I have since implemented this technique on a few projects and it is a really useful time-saving approach. So, I wanted to share my approach with you.
While probably one of the best features in Excel, Goal Seek is quite clunky to use. It’s hidden away in the Data menu; so you need to know it’s there to find it. In this post, we automate Goal Seek to make it work with a single click directly on the worksheet. Then we take it a step further by removing the click, making it totally automated.
Table of Contents
Download the example file: Join the free Insiders Program and gain access to the example file used for this post.
File name: 0022 Automated Goal Seek.zip
Watch the video:

The Scenario
The Goal Seek feature determines the input required to achieve a specific outcome. The scenario we’re using is a simple business case. Based on the sales units, sales price, cost price, and fixed costs, we calculate the profit.
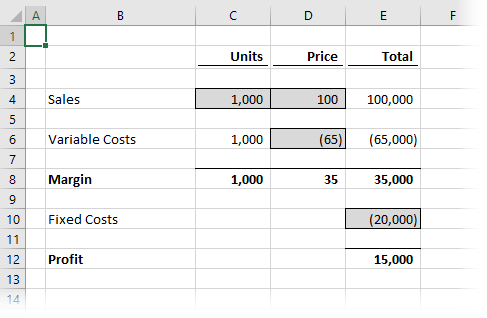
The grey cells are the variables, if any of the variables change, the final profit changes.
Manual Goal Seek
First, let’s understand what Goal Seeks does by performing the task manually.
Using the numbers above, let’s assume we want to find out how many units we would need to sell to break even (i.e., Profit equals zero).
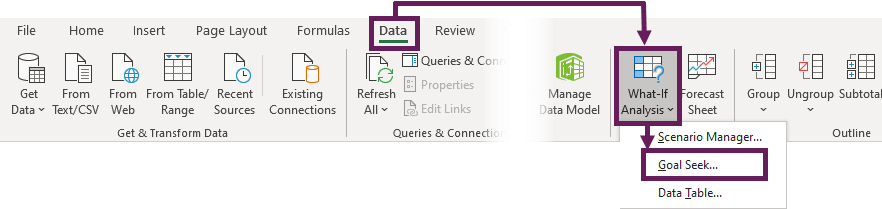
- Click Data > What If Analysis > Goal Seek… to open the Goal Seek tool
- In the Goal Seek dialog box, set the following parameters:
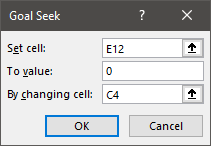
- Set cell: E12 (the Profit cell)
- To value: 0
- By changing cell: C4 (the Sales Units cell)
- Click OK to run the Goal Seek. Excel now tries to identify a possible solution and update cell E12 accordingly.

- Once a solution is found, click OK to close the Goal Seek dialog box.
If you’re following along with the example file, you will see that we need to sell 571 units to break even.
If one of the variables were to change (e.g., if the sales price increased to 110), then we would need to rerun the same Goal Seek process. It’s quite time-consuming. Also, if you are designing the spreadsheet for somebody else, then it’s not a great user experience.
Let’s move on to look at a more dynamic solution; how to automate goal seek in Excel with one click.
One-click Goal Seek
In this section, we create a one-click solution using a macro and attached to a button. Anytime the variables change, it just takes one click to re-run the Goal Seek.
Record the macro
In this scenario, the Macro Recorder is a solid starting point.
If the Developer Ribbon is not visible in your instance of Excel do the following:
- Right-click on an empty space in the Ribbon, and select Customize the Ribbon from the menu.
- The Excel Options dialog box opens. In the box on the right, check the Developer option.
- Click OK.
OK, we are now ready to start recording the macro.
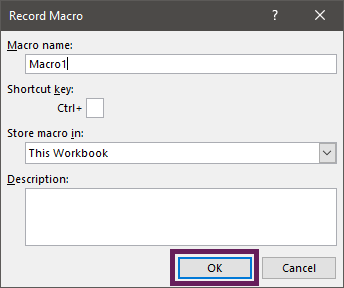
- Click Developer > Record Macro
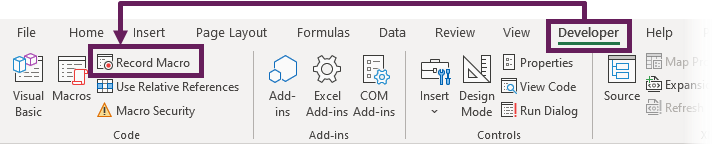
- In the Record Macro dialog, accept the default option by clicking OK.
- Undertake the same steps as the manual version we used above.
- When finished, click Developer > Stop Recording

Looking at the recorded code
Let’s take a brief look at the recorded code. Click Developer > Visual Basic, to open the Visual Basic Editor, then look at the code in Module 1.
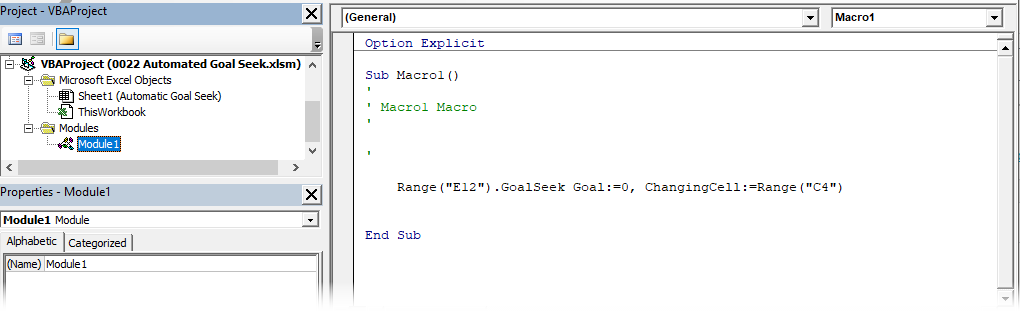
The recorded code should look like the following:
Sub Macro1()
'
' Macro1 Macro
'

'

    Range("E12").GoalSeek Goal:=0, ChangingCell:=Range("C4")
End Sub
The piece we need is just a single line of code. We can easily edit this to meet our needs. We will come back to the Visual Basic Editor in a few moments, but for now, it’s OK to close it.
Assign the macro to a button
The final step in this is to create a button to run the macro.
- Click Insert > Shapes > Rectangle Rounded Corners (or any other shape you like).
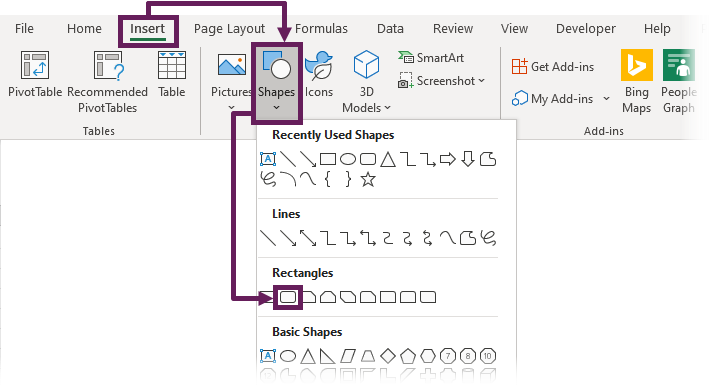
- Click on the worksheet to create the shape.
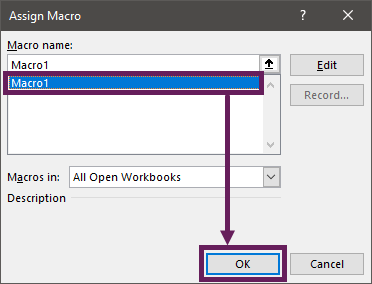
- Right-click the shape and select Assign Macro… from the menu.
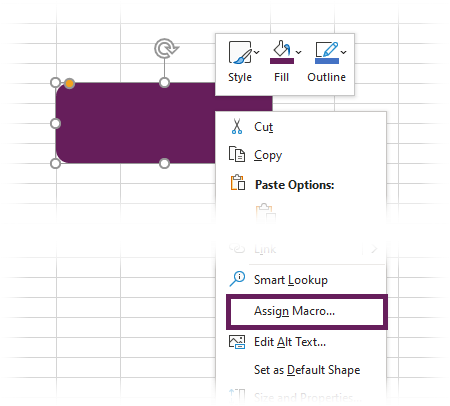
- In the Assign Macro dialog box, select the name of the macro recorded earlier, then click OK.
Clicking the shape will now runs the Goal Seek macro. Format the shape however you like.
Hopefully, you see that this is a much better user experience than using the default tool.
Using Named Ranges
It can be dangerous to just use cell references in a macro. If a user inserts a row or a column, the reference is then pointing to the wrong cell. To make this more robust, we should create some named ranges.
Select each grey cell (i.e. those containing variables), then type a name into the name box and press return.
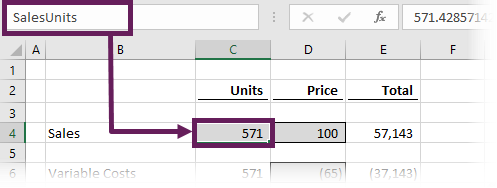
I’ve named the cells as follows:
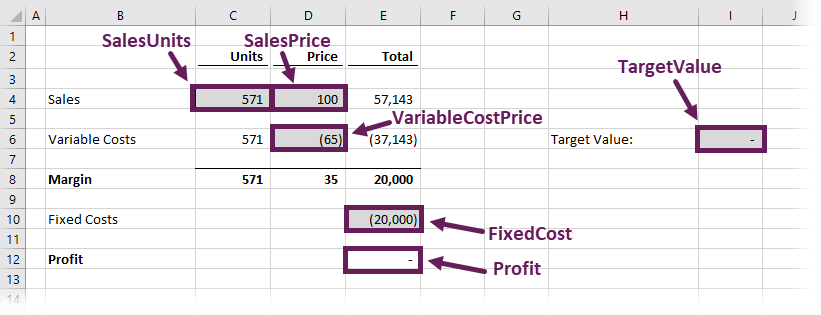
- C4: SalesUnits
- D4: SalesPrice
- D6: VariableCostPrice
- E10: FixedCost
- E12: Profit
- I6: Target Value
Let’s update our macro for the named ranges (I have also removed the unnecessary lines).
Sub Macro1()

Range("Profit").GoalSeek Goal:=Range("TargetValue"), _
    ChangingCell:=Range("SalesPrice")

End Sub
By adding the target value, we can now Goal Seek to any value we want. For example:
- To calculate the break-even point, we enter zero as the target value, then click the button to run the macro.
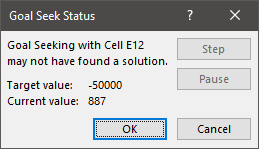
- To calculate the units required to make $50k profit, enter 50,000 as the target value, then run the macro.
Pretty good, eh?
Adding an error check
Normally, with a Goal Seek, we receive a message when a value cannot be found.
This does not happen with the macro, so we need to create our own error checks. There are lots of things we could do here, but for simplicity, I have just added the following in cell F12:
=IF(Profit<>TargetValue,"<< Automated Goal Seek - no result found","")It shows when the Profit does not equal the Target Value, which means Goal Seek did not find a matching value.

Depending on the accuracy you need, you may need to add rounding to the numbers.
Automate Goal Seek
Now, for the next-level stuff.
Add two more named ranges:
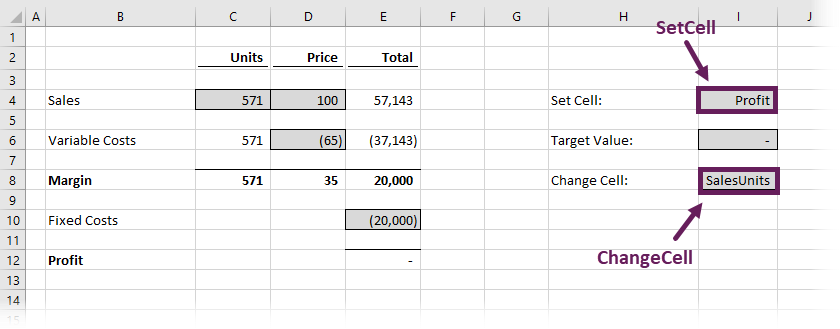
- I4: SetCell
- I8: ChangeCell
Enter the following values into those cells; you’ll soon see why.
- I4 = Profit
- I8 = SalesUnits
Next, add a new macro into the worksheet module, using the worksheet change event.
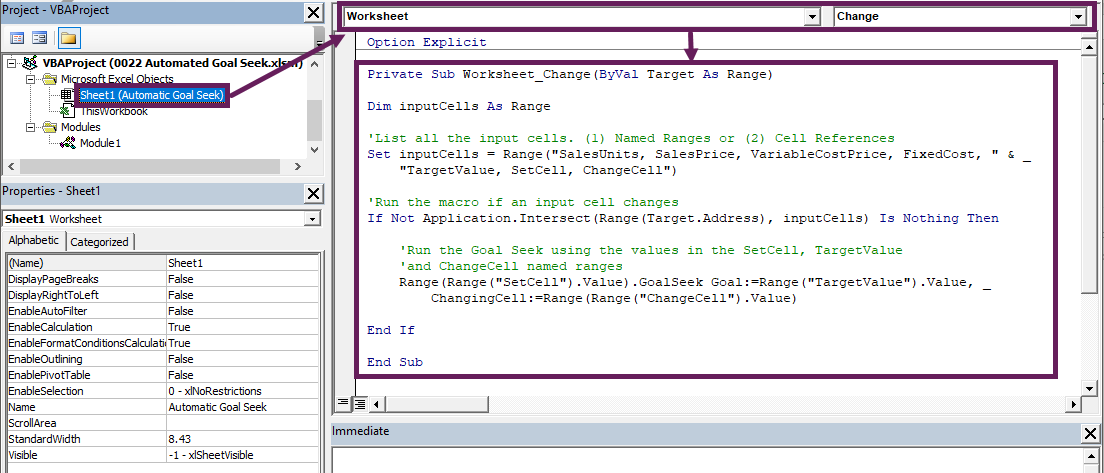
The comments provide information about each line of code. The macro is:
Private Sub Worksheet_Change(ByVal Target As Range)

Dim inputCells As Range

'List all the input cells.
Set inputCells = Range("SalesUnits, SalesPrice, VariableCostPrice, " & _
    "FixedCost, TargetValue, SetCell, ChangeCell")

'Run the macro if an input cell changes
If Not Application.Intersect(Range(Target.Address), _
    inputCells) Is Nothing Then

    'Run the Goal Seek using the values in the SetCell, TargetValue
    'and ChangeCell named ranges
    Range(Range("SetCell").Value).GoalSeek _
        Goal:=Range("TargetValue").Value, _
        ChangingCell:=Range(Range("ChangeCell").Value)

End If

End Sub
Now, every time we change an input cell, the Goal Seek fires automatically.

The Set Cell and Change Cell must both be the names of the named ranges we created earlier.
If we want the Goal Seek to change a different variable for calculating the profit, we adjust the Change Cell (Cell I8) to the named range for the variable.
Pretty cool, eh? Now we don’t even need to click a button 😁
Conclusion
In this post, we’ve learned how to automate Goal Seek in Excel with a VBA macro. Using the macro recorder we can create a simple one-click solution, or we can go go even further and automate every time the target changes.
There are lots of Excel features that can be operated by a few lines of code. Why not go and explore and see what else you can find.
Related Posts:
- Useful VBA codes for Excel (30 example macros + Free ebook)
- Named Ranges – VBA properties & methods
- Cell and Range VBA properties and methods
Discover how you can automate your work with our Excel courses and tools.
The Excel Academy

Make working late a thing of the past.
The Excel Academy is Excel training for professionals who want to save time.
First thanks a lot for the automated goal seeker-VBA code.
The code could be made shorter, the shorter the code, the better in my opinion.
1) ‘List all the input cells.
Set inputCells = Range(“SalesUnits, SalesPrice, VariableCostPrice, FixedCost, ” & _
“TargetValue”) (Leave out , SetCell, ChangeCell, not necessarily needed.)
============
2) ‘Run the Goal Seek using the values in the SetCell, TargetValue
‘and ChangeCell named ranges
Current code in the above explanation:
Range(Range(“SetCell”).Value).GoalSeek Goal:=Range(“TargetValue”).Value, _
ChangingCell:=Range(Range(“ChangeCell”).Value)
could be shorter in my opinion:
Range(“Profit”).GoalSeek Goal:=Range(“TargetValue”).Value, ChangingCell:=Range(“SalesUnits”)
This also avoid the indirect Range(Range(“xxx”).Value) code and reduces two variables (Set Cell and Change Cell)