This article explains how to achieve various advanced techniques with the Automation Toolkit.
How to…
- Create flow logic
- Create a loop
- Run an automation recipe from a shape or button
- Create a custom ribbon to run automation recipes
- Run an automation recipe from Power Automate Desktop
- Run automation recipe from a macro in another workbook
- Build your own action steps using macros
Create flow Logic
Within the Automation Toolkit, there are actions specifically designed to create logic and allow different flow paths depending on the result of a cell.
Logic actions
The actions used for logic are:
- Automation Go To – Jumps to the point named in the Automation Reference action
- Automation If Value Is Go To – This tests a cell value. Where the result of the test is TRUE, the automation jumps to the point named in the Automation Reference action.
- Automation Reference – This creates a reference point for the Automation If Value Is Go To and Automation Go To to jump to.
- Automation Stop – Stops the automation running.
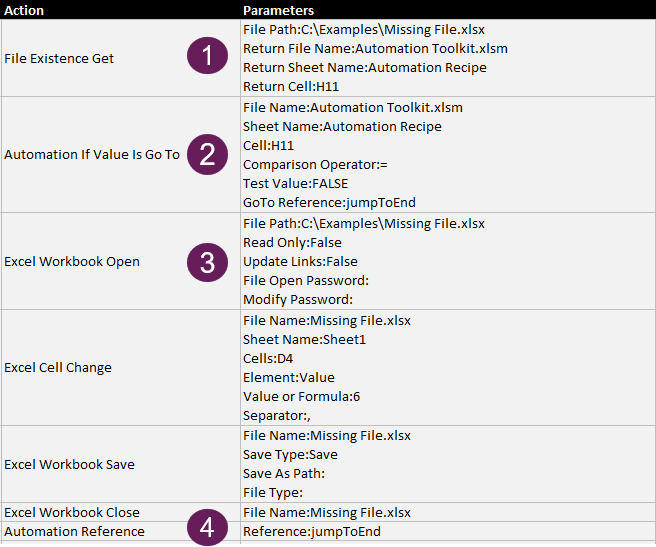
Basic logic example
In the Screenshot below:
- The File Existence Get action executes and checks for the existence of a file C:\Examples\Missing File.xlsx and returns TRUE or FALSE to cell H11 of the Automation Recipe sheet of the Automation Toolkit.xlsm workbook.
- The Automation If Value Is Go To action checks the value in cell H11. If H11 contains FALSE and the Test Value is FALSE then FALSE = FALSE, which is TRUE. Therefore, it jumps to the Automation Reference action where the reference is jumpToEnd (see 4). Otherwise the action continues to the next step (3).
- If the C:\Examples\Missing File.xlsx exists the recipe continues into the Excel Workbook Open, Excel Cell Change, Excel Workbook Save and Excel Workbook Close actions.
- The Automation Reference action creates a reference point with the name jumpToEnd. This is where the Automation If Value Is Go To (2) jumps to when the value is FALSE.
Create a loop
The Automation Toolkit does not have a looping method. However, by combining logic actions, we can create the same effect as a loop.
A loop is a list of actions that are executed repeatedly while, or until a condition is reached.
There are two looping methods possible with the Automation Toolkit
- Do until Loop – The loop starts and executes until a condition is no longer TRUE. The condition is checked at the end of the loop. Therefore the loop always happens at least once.
- Do while Loop – The loop starts only if the condition is TRUE, then continues to execute if it remains true. The condition is checked at the start of the loop. If the condition at the start is not met, the actions in the loop is not executed.
Care must be taken to ensure the condition is not ALWAYS true. This will create an infinite loop.
If an infinite loop is created in an automation recipe. Double-clicking in a cell, or pressing F2 will force an error and stop the loop running.
The two looping patterns are shown below:
Do until loop
The Do Until loop uses:
- Actions: Automation Reference, Excel Cell Change and Automation If Value Is GoTo
- Variables: Counter, Total Count, and Next Counter
The following screenshot provides the framework for the loop.
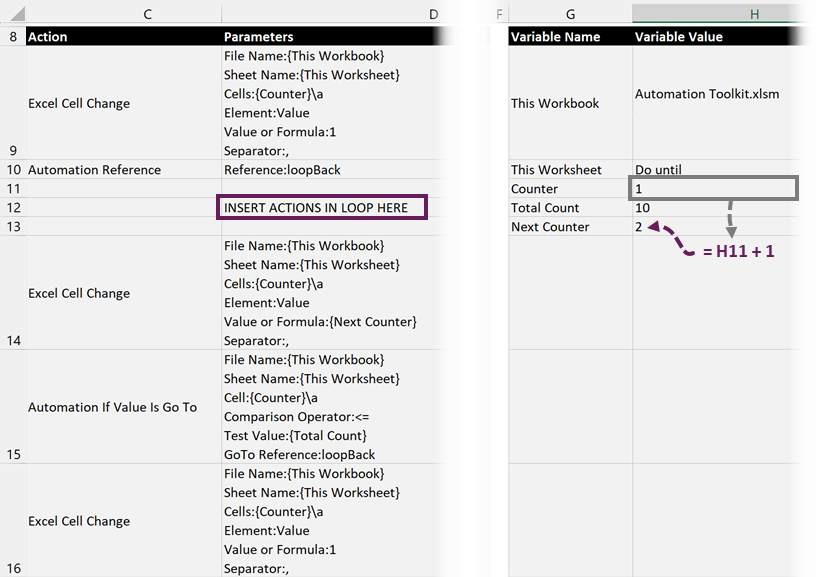
Initially, the Excel Cell Change sets the Counter variable to 1
The Next Counter is a variable that is equal to the Counter + 1.
With each loop, the Excel Cell Change action makes the Counter equal to the Next Counter. Therefore, the Counter increases by 1 for each loop.
The Automation If Value Is Go To action checks if Counter is less than or equal to Total Count. If this is true the recipe jumps to the Automation Reference step. If this is false the automation continues to the next actions.
The Excel Cell Change action at the end is not required as part of the loop but reduces the appearance of formula errors.
An example of a Do Until loop can be found in the Getting Started guide
Do while loop
The Do While loop uses the same logic steps.
The following screenshot provides the framework for the loop.
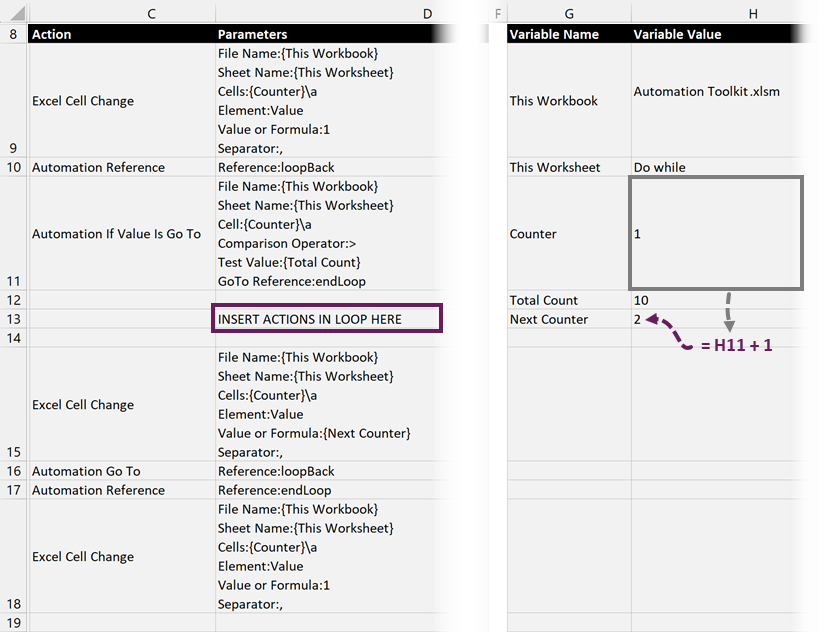
Initially, the Excel Cell Change sets the Counter variable to 1
The Next Counter is a variable that is equal to the Counter + 1.
Automation If Value Is Go To checks if Counter is greater than Total Count. If this is true the recipe jumps to the endLoop Automation Reference step. If this is false the automation continues to the next actions.
With each loop, the Excel Cell Change action makes the Counter equal to the Next Counter. Therefore, the Counter increases by 1 for each loop.
The Automation Go To action jumps the recipe back to the loopBack Automation Reference to create the looping effect.
Once Counter is greater than Total Count, the loop will stop.
The Excel Cell Change action at the end is not required as part of the loop but reduces the appearance of formula errors.
Total Count – Useful formulas
The Total Count variable determines the number of times a loop executes.
The Useful Formulas guide includes two useful formulas for calculating the Total Count based on a list:
- Count rows in a list of cells
- Count items in a delimited string
Returning the Nth item from a list – Useful formulas
Having calculated the total number of items to loop through, it is common to extract the nth item from that list as a variable to use in the automation.
Useful formulas for calculating the nth item from a list include:
- Get the nth item from a range
- Get the nth item from a delimited string
These formulas are available in the Useful Formulas guide.
Run an automation recipe from a shape or button
An automation recipe can run directly from a shape or button on a worksheet. Let’s take a look at two ways to achieve this.
Call named automation recipe
Create a shape on the worksheet.
Right-click on the shape and change the name in the name box as follows:
Sheet:Sheet Name- Sheet: Tells the Automation Toolkit that the following text is the name of the sheet containing the automation recipe
- Sheet Name: Replace this with the name of the sheet containing the automation recipe
In the example below, the recipe sheet is called Automation Recipe.
Right-click on the shape and select Assign Macro… from the menu.
In the Assign Macro dialog box, select the CallAutomationShape macro, then click OK.
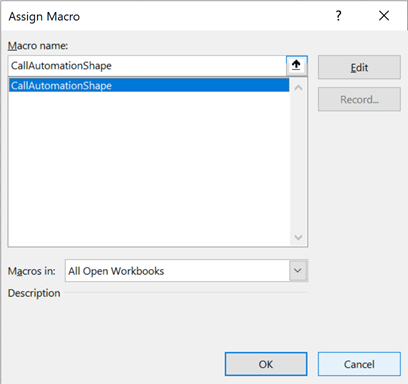
That’s it. Clicking the shape runs the named automation recipe.
Call automation recipe based on cell value
To add even more flexibility, the recipe sheet name may be based on a cell value.
Create the shape as per the previous section, but name the shape as follows:
Range:A1- Range: – tells the Automation Toolkit that the following text is the name of the range containing the automation recipe. The range must be on the same sheet as the button.
- A1 – replace this with the cell reference containing the name of the recipe sheet.
For example, look at the screenshot below. The shape is called Range:C2 and cell C2 contains the name of the recipe sheet.
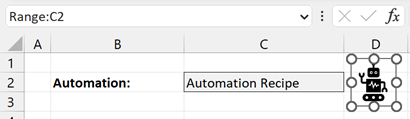
Assign the CallAutomationShape macro to the shapes as before.
Clicking the shape executes the automation recipe named in the cell.
Create a custom ribbon to run automation recipes
The Automation Toolkit includes a hidden worksheet called Ribbon. With this, we can create our own custom ribbon for running automation recipes.
The ribbon includes 150 buttons grouped into 10 sections.
Create a custom ribbon
Start by unhiding the Ribbon worksheet within the Automation Toolkit workbook.
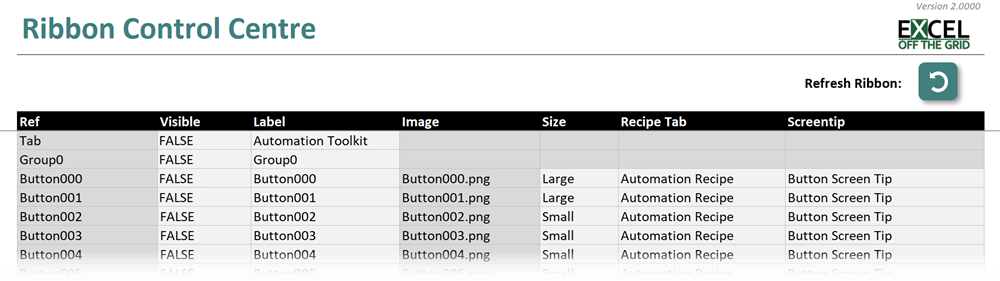
Edit the values in the column headings as follows:
- Ref: The unique name of the object on the ribbon. Do not change these values.
- Visible: To make the Tab, Group or Button visible enter TRUE against each object.
Note: To display a button, the relevant Group and Tab must be visible - Label: The name which appears in the ribbon
- Image: The name of the image which is used for the button. Do not change these values. We will customize the images in the next section.
- Size: Icons can be Small or Large. Small buttons can be stacked 3 per column.
- Recipe Tab: The name of the Automation Recipe tab to assign to the workbook.
- Screentip: The text which appears when hovering over the button.
Click the Refresh Ribbon button to update the ribbon. In most circumstances, the ribbon will update automatically. However, if certain automation step errors have occurred previously, it may be necessary to close and re-open the workbook.
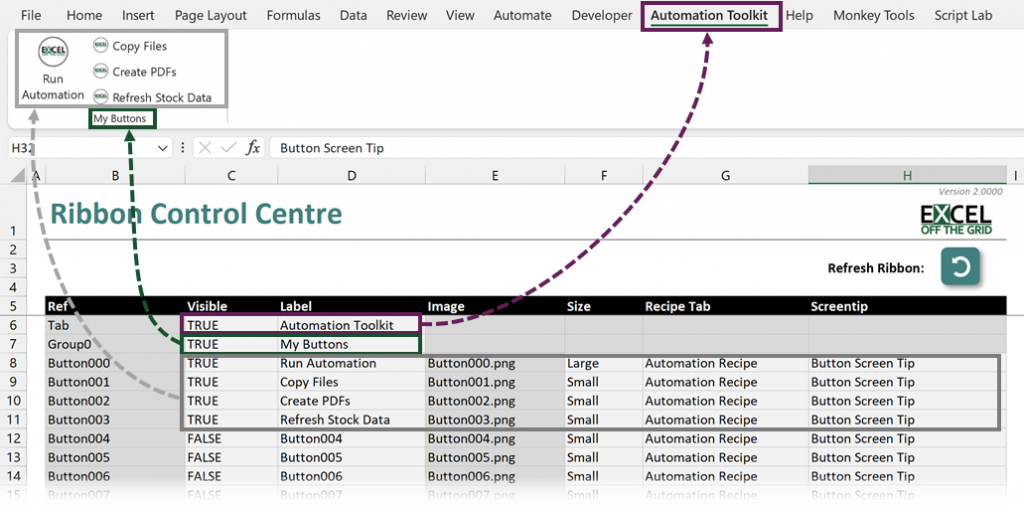
Note: as there are 150 buttons, there is a short delay for the ribbon to render when selecting the Tab the first time.
Once completed we can hide the Ribbon worksheet.
Create custom buttons
Open the Ribbon Icon Creator.xlsm workbook which came with the Automation Toolkit.
- Image: Create your button image inside the grey border
- Pixels: Enter the size to export the image. Images are scaled to different sizes depending on monitor resolution. Therefore you should experiment with different size images to obtain the optimal look.
- Folder Path: The location to save the generated image
- File Name: The name of the generated file. Note the file name should match the name used in the Image column of the Ribbon tab. (For example. Button000 must have a file name of Button000.png)
Click Save to create the image.
WARNING: Before undertaking the following steps ensure you have a backup of the Automation Toolkit workbook as any errors in the following process may corrupt the workbook and make it unusable.
To get add your custom image into the workbook:
- Close the Automation Toolkit workbook
- Rename the workbook by changing the extension from .xlsm or .xlam to .zip
- Double-click into the zip file to open it and find the customUI/Images folder
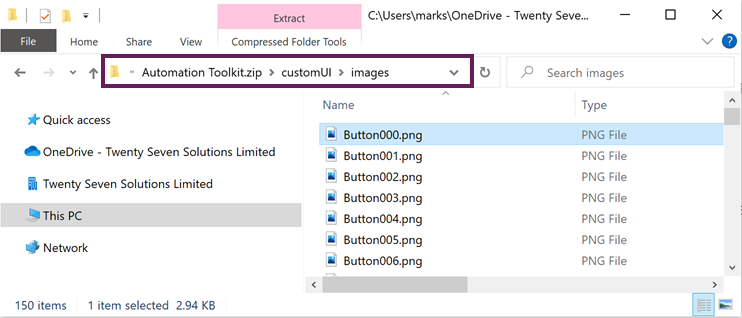
- Copy and paste your new image into the folder.
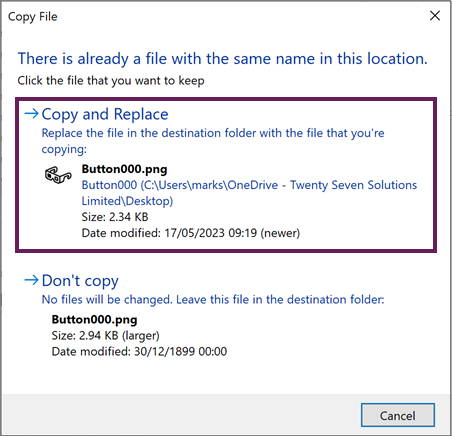
- In the Copy File dialog box click Copy and Replace
- Rename the file from .zip to .xlsm or .xlam (depending on the original file type).
- Open the workbook. The custom icon should be visible on the ribbon.
Turn the Automation Toolkit into an Excel Add-in
An Excel Add-in is a standard macro-enabled workbook (.xlsm) that has been saved as an .xlam file type. Any worksheets included in an add-in workbook still exist but are not visible to the end-user.
To create an Excel add-in from the Automation Toolkit:
- Open the Automation Toolkit workbook
- Click File > Save as or File > Save a copy (depending on option which is available)
- Select Excel Add-in (*xlam) from the file type drop-down.
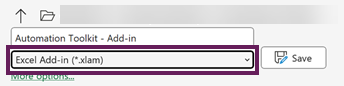 <
< - Click Save
When we next open the workbook, it will be an Excel Add-in.
To run the add-in automatically when opening Excel, follow these instructions: How to install or uninstall Excel Add-ins
Converting an add-in back to a standard macro-enabled workbook
An add-in’s worksheets are hidden. To make them visible again; have the add-in open, then run the following macro in a new workbook.
Sub ToggleAddIn()

Dim addInName As String

'Enter the name of the Add-in workbook here
addInName = "Automation Toolkit.xlam"

Workbooks(addInName).IsAddin = Not Workbooks(addInName).IsAddin

End Sub
In the code, change the addInName to refer to the file name of your add-in.
The add-in’s worksheets are now visible. We can now either:
- Save the file as a macro-enabled workbook – click File > Save As or File > Save as copy to save as a .xlsm.
- Convert back to an add-in by re-running the same macro as above.
Run an automation recipe from Power Automate Desktop
Power Automate Desktop is a powerful low code / no code tool available for download in Windows 10 and natively available for Windows 11.
To use the Automation Toolkit within Power Automate Desktop use the following actions.
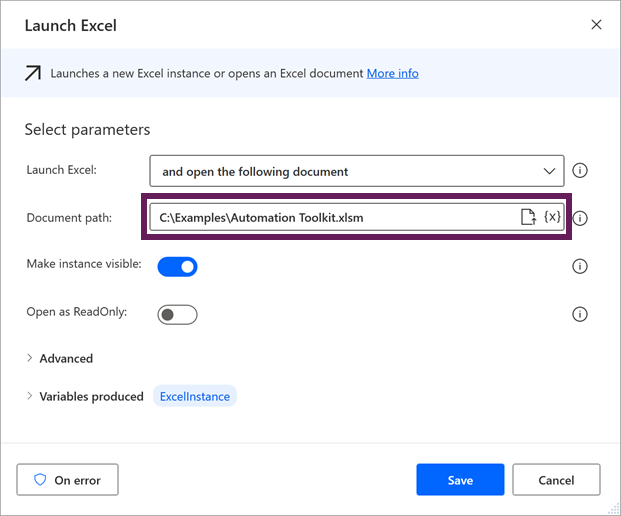
Launch Excel with the Automation Toolkit workbook.
Use the Run Excel Macro step.
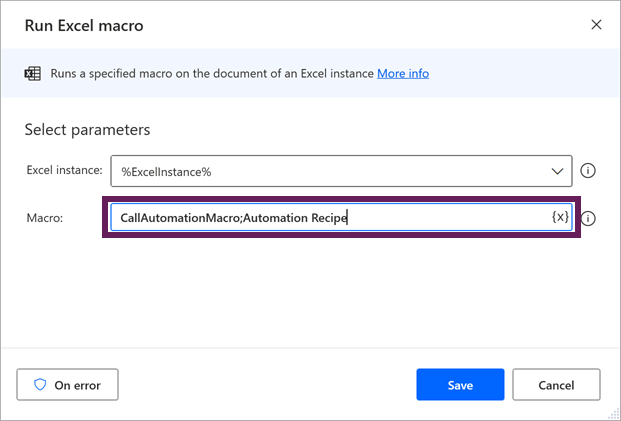
- Excel instance: %ExcelInstance% is created by the Launch Excel step
- Macro:
- CallAutomationMacro is the name of the macro in the Automation Toolkit
- ; (Semi-colon) is a separator
- Automation Recipe is the name of the worksheet containing the automation
Running the Power Automate Desktop flow will call the Automation Recipe.
Run automation recipes from a macro in another workbook
Automation Recipes can be run from another workbook.
The following macro runs the recipe on the WorksheetName tab of the WorkbookName.xlsm workbook.
Run "'WorkbookName.xlsm'!CallAutomationMacro", "WorksheetName"'Replace the following items to fit your scenario.
- WorkbookName.xlsm: Name of the workbook containing the automation recipe
- WorksheetName: Name of the worksheet containing the automation recipe
In the code example, pay close attention to the placement of the single and double quotes characters.
All the elements in the VBA above are text strings and can be replaced with cell values if required.
NOTE: The workbook containing the automation recipe must be open for the macro to execute.
Build your own action steps using macros
Using the Excel Macro Run action, you can run your own macros with up to 15 arguments form an automation recipe.
Example with no arguments
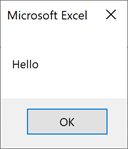
Let’s assume Workbook A.xlsm contains the following macro called myMacro.
Sub myMacro()

MsgBox "Hello"

End Sub
The macro above displays a message box containing the word Hello.
To call this macro from the Automation Toolkit we use the Excel Macro Run action.
FileName:Workbook A.xlsm
Macro Name:myMacro
Arguments:
Separator:,

Running the recipe executes myMacro from Workbook A.xlsm, and reveals the message.
NOTES: The workbook containing the macro must be open. If necessary, use the Excel Workbook Open action prior to the Excel Macro Run action.
Example with basic arguments
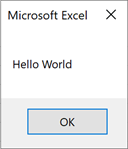
Now, let’s assume Workbook A.xlsm contains a macro called myTextMacro. It accepts two string arguments, text1 and text2.
NOTE: Macros with arguments do not appear the in the Macro list, but can be executed if the name and syntax is known.
Sub myTextMacro(text1 As String, text2 As String)

MsgBox text1 & " " & text2

End Sub
The parameters to call this macro would be as follows.
File Name:Workbook A.xlsm
Macro Name:myTextMacro
Arguments:Hello,World
Separator:,

The Separator argument declares the string used to separate each argument. In this example, the separator is a comma ( , ); therefore, the first argument is Hello, and the second argument is World. The separator character(s) must not be used within the arguments.
Example with complex arguments
All arguments are passed from the Automation Toolkit to the macro as text strings.
Where numeric or boolean values are required, the macro must convert the text to the correct data types.
VBA contains type functions (https://learn.microsoft.com/en-us/office/vba/language/concepts/getting-started/type-conversion-functions) to convert the text to other data types.
Common data conversion examples:
- CBool: Converts text to a boolean value
- CLng: Converts text to a long
- CDbl: Converts text to a decimal / floating point number
- CInt: Converts text to an integer
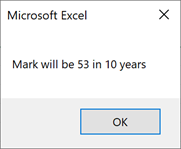
Now, let’s assume Workbook A.xlsm contains a macro called myComplexMacro (see below). It contains calculations using numbers. CInt converts the text to numbers prior to calculation.
'Note all arguments are passed as text strings
Sub myComplexMacro(name As String, age As String, years As String)

Dim futureAge As Integer

'Convert text values to integers
futureAge = CInt(age) + CInt(years)

'Output a message
MsgBox name & " will be " & futureAge & _
    " in " & years & " years"

End Sub
This macro can be executed with the following parameters
File Name:Workbook A.xlsm
Macro Name:myComplexMacro
Arguments:Mark,43,10
Separator:,

The result of running this recipe is:
Using line breaks within arguments
By default, the line break is a special character within the Automation Toolkit; it separates each parameter line.
Where a line break is required within an argument, the automation default settings must be modified. This is achieved with the Parameter Separator setting of the Automation Settings Change action.
Passing objects into a macro
The Automation Toolkit is built upon the Unix Philosophy, therefore all arguments are passed to macros as text values. Therefore, It is not possible to pass objects as arguments. However, the name of the object can be passed as text.
The following macro requires an object as a parameter. This will not work with the Automation Toolkit.
Sub passWorkbook(wb As Workbook)

MsgBox wb.Sheets.Count

End Sub
The following macro requires only text parameters and could be used as an alternative to passing objects:
Sub passWorkbookName(wbName As String)

MsgBox Workbooks(wbName).Sheets.Count

End Sub
Discover other articles: