This article guides you through a simple project, to help you get started with the Automation Toolkit.
The project includes an example file to download. By working along with each stage you will get to grips with the fundamentals of the tool faster.
Contents
- About the project
- Stage 1: Base automation
- Stage 2: Using variables
- Stage 3: User input
- Stage 4: Controlling flow
- Stage 5: Looping
- Stage 6: Run automation recipe from a button
- Next steps
About the project
In this project, we work through an example of saving multiple PDF files from an Excel report. This may not be a scenario you encounter, however, once you have grasped the fundamentals, you can apply them to your situation.
Download the example file here: Reporting Example.xlsx -> Download
The sections of the example report are as follows:
- Report: The report area which is printed within each PDF.
- Selection: The parameters to select the region and date for the report
- Data: Monthly data from 31 January 2023 to 31 December 2023 for 5 regions (North, South, East, West, Central) and 6 items (Alpha, Bravo, Charlie, Delta, Echo, Foxtrot)
- Calculations: The numerical calculations of the results, which are displayed in the Report. Calculates are based on the Data and Selection cells.
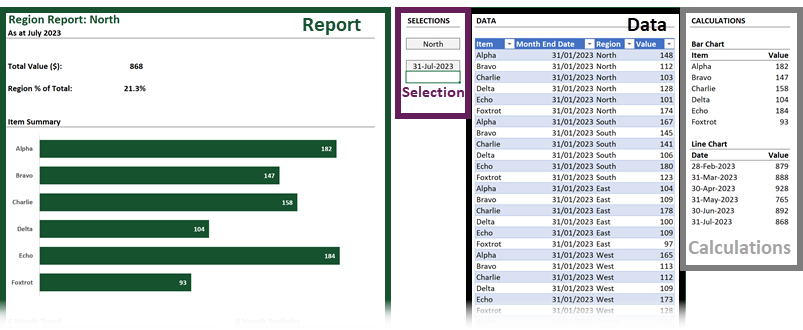
When the cells in the Selection area are changed, the report recalculates to include the data for the selected region and date.
NOTES:
- I am based in the UK, so all dates are in the dd/mm/yyyy format. Throughout this project please use your local date formats to ensure everything operates correctly in your version of Excel.
- All the stages in this project follow one after the other, it is not necessary to start a new file for each stage.
Stage 1: Base automation
Level: Beginner
Stage Overview
In this stage, we build an automation recipe to:
- Open an Excel Workbook
- Change two cell values in the Excel workbook for the region (cell J4) and the date (cell J6)
- Save the Print Area as a PDF file
- Save the workbook
- Close the workbook
Steps
As this may be your first view of the Automation Toolkit, we’ll go through the steps of this stage in detail.
- Take a copy of the Automation Toolkit template and save it as My Automation Project.xlsm
- Open the My Automation Project.xlsm workbook
- Let’s add our first action to the automation recipe. In the Search box, type Open.
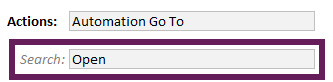
- The items in the Actions list now include only those containing the word Open.

- Select Excel Workbook Open from the Actions list, then click the Add Action button.

- The Excel Workbook Open action is added to the automation recipe.

- The first action in the project is to open the Reporting Example.xlsx workbook. The workbook does not have any passwords or links, and we do not want to open it as read-only. To achieve this, change the example text in the Parameters column to the following:
File Path:C:\Examples\Automation Toolkit\Reporting Example.xlsx
Read Only:False
Update Links:False
File Open Password:
Modify Password:
NOTES:
Do not delete the text before the first : (colon) character in each line.
Do not include any spaces after the first : (colon) character in each line
Do not include any special characters (e.g. double quotes) around values, unless they are required as part of the value
Do adjust the File Path parameter in the first line to the location where the Reporting Example.xlsx workbook is saved on your PC.
The action step should look similar to the following:
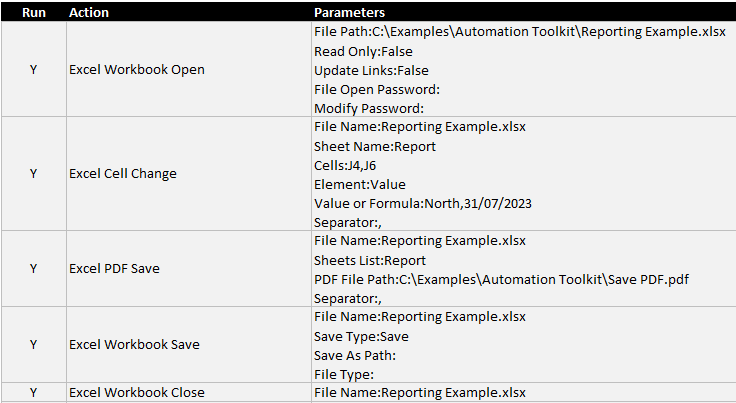
- Repeat the steps for all the actions listed in the screenshot below:
NOTES:
In the Excel Cell Change action, use the date format for your region (e.g. for the United States use 07/31/2023, for Canada use 2023-07-31).
In the Excel PDF Save action, ensure the PDF File Path parameter:- contains a folder path that already exists on your PC
- includes a file name that ends with .pdf
- includes the \ character between the folder path and the file name
Run the automation recipe
Ensure the Reporting Example.xlsx workbook is closed.
Click the Run button.

Did the automation recipe run successfully?
If you entered all the parameters correctly, the automation recipe runs:
- The Reporting Example.xlsx workbook opens. In the Report tab, cell J4 changes to North, and cell J6 changes to 31/07/2023 (or your region date equivalent)
- A PDF file is saved in your chosen file path
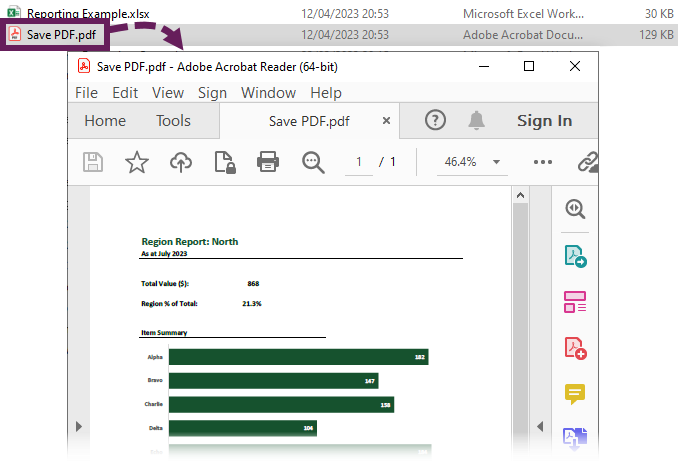
- The Reporting Example.xlsx workbook saves and closes.
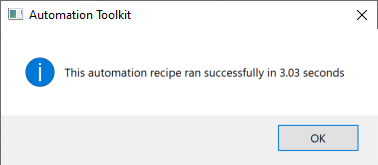
- A message box appears showing the run time
Congratulations! You have just created your first automation recipe! 👍
Did the automation recipe display an error message?
If you did not enter the parameters correctly, the automation recipe starts but does not complete.
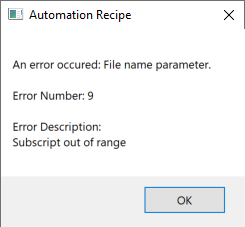
- A message box appears showing an error. This provides details about the error to help us troubleshoot the problem.
Click OK to close the message box. - The actions that have run successfully are highlighted in green. The action causing the error is highlighted in amber.
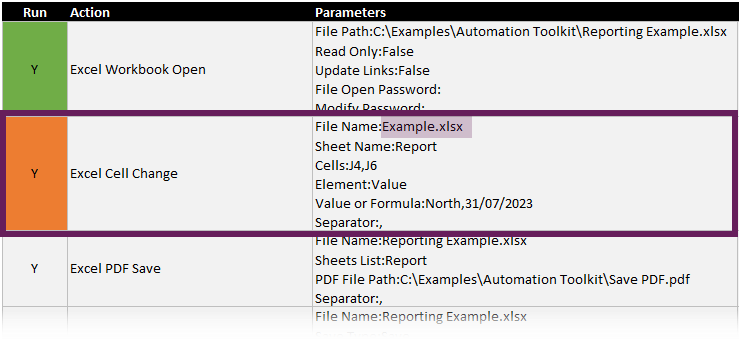
In the screenshot above, the error is caused by a typo; the workbook name has been entered as Example.xlsx, instead of Reporting Example.xlsx)
Once the errors are corrected, close the Reporting Example .xlsx workbook, and click the Run button again.
If you are struggling to find the error, the following is a list of common error messages for these actions:
- Error Number: 1004 – Sorry, we couldn’t find [workbook file path]. Is it possible it was moved, renamed or deleted?
- The File Path parameter is referencing a workbook that cannot be found
- Error Number: 1004 – Method ‘Range’ of object ‘_Worksheet’ failed
- A cell reference or named range is invalid or does not exist
- Error Number: 1004 – Application-defined or object-defined error
- The file path for the PDF does not contain a valid folder path
- Error Number: 1004 – Document not saved. The document may be open, or an error may have been encountered when saving.
- The file path for the PDF does not contain a valid folder path
- Error Number: 13 – Type mismatch
- A parameter requiring a True/False value does not contain True or False
- Error Number: 9 – Subscript out of range
- A file name or sheet name refers to an item that does not exist, cannot be found, or is not open (check for typos, and remove any extra spaces)
- Error Number: -2147021773 – Automation error. The filename, directory name, or value label syntax is incorrect
- The file path for the PDF does not contain a valid folder path
- Error Number: -2147024773 – Document not saved
- The file path for the PDF does not contain a valid folder path
- A PDF file with that name is already open
- Error Number: EOTG – Lists are different lengths.
- In the Excel Cell Change action, there are different number of items included in the Cells parameter than the Value or Formula parameter
A full list of errors can be found in the Errors Reference Guide.
Continue fixing any errors until the process runs correctly.
Stage 2: Using variables
Level: Beginner
Stage Overview
In this stage, we build on Stage 1:
- Change the hardcoded values in the File Path, File Name, PDF File Path and Cell Value parameters to variables.
Steps #1
Let’s create variables to use within the action parameters.
- Enter the following into cells G11 to H15:
- G11:
Full File Path - H11:
C:\Examples\Automation Toolkit\Reporting Example.xlsxREMEMBER: Amend to match the location of the workbook on your PC. - G12:
File Name - H12:
Reporting Example.xlsx - G13:
Region - H13:
North - G14:
Date - H14:
31/07/2023REMEMBER: Use your local date format - G15:
PDF Save Path - H15:
C:\Examples\Automation Toolkit\Save PDF.pdfREMEMBER: Change to match with the file path on your PC.
The variables section will look like this.
The values in Column G are the Variable Names. the values in Column H are the Variable Values.
Do not change the values in cells G9 to H10; these are pre-populated variables that we use in the following stages.
- G11:
- To use the variables within the parameters we use {VariableName} within the parameters text.
For example, The Excel Workbook Open parameter text changes to:File Path:{Full File Path}
Read Only:False
Update Links:False
File Open Password:
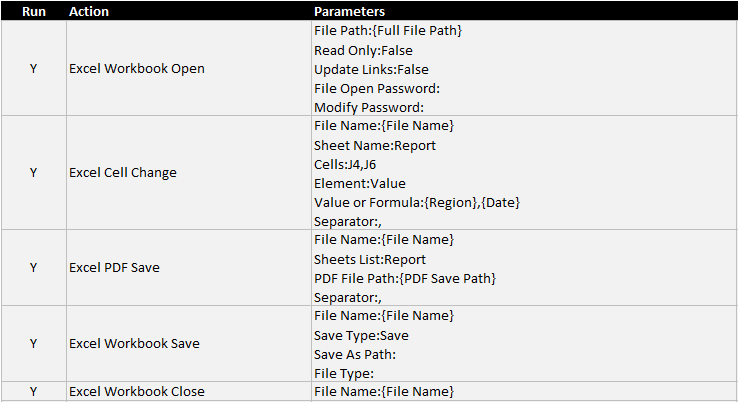
Modify Password: - Update the actions in the recipe to incorporate the variables. The full recipe should look as follows:
Run the automation recipe
Ensure the Reporting Example.xlsx workbook and Saved PDF.pdf file are closed.
Click the Run button.
As in Stage 1, if the automation recipe runs correctly, the run time appears and a PDF file is saved (or overwritten if it already exists). If there are any errors, correct them. Ensure the Reporting Example.xlsx workbook is closed, then run the automation again.
If you have an error and are unable to find it, click the Info icon. This shows the text which is used in the recipe after the variables have been included.
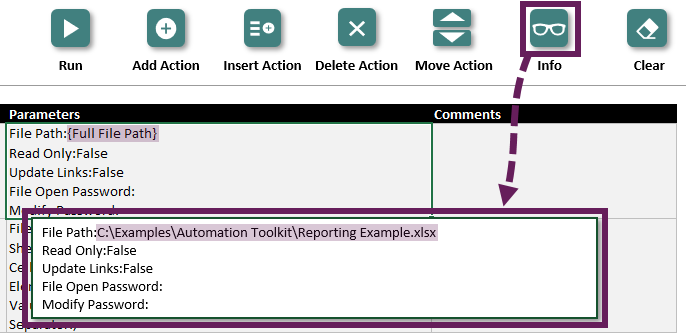
As shown in the Screenshot above, the {Full File Path} variable is converted into the corresponding file path.
If variable names are still visible in the Info box, it means the variable does not exist, or the wrong brackets have been used.
- Variable names are case-sensitive.
- Opening and closing curly brackets are required around all variables.
Updating the variables
Now, let’s change the variable values and re-run the recipe
- Change the cell values in the automation recipe as follows:
- H13:
South - H14:
31/08/2023REMEMBER: Use your local date format
- H13:
- Click the Run button
The automation recipe runs again. If everything has worked correctly. The saved PDF file is now for the South region on 31 August 2023.
The variables provide an easy way to run the automation for each region and month – we only need to change cells H13 and H14, then click Run.
Steps #2
Variables can be formulas based on other cells. Let’s change the PDF file name to include the region name and date.
- Change the formula in cell H15 as follows:
NOTE: This is presented on 2 lines below, but should be entered into a single line in Excel.="C:\Examples\Automation Toolkit\Save PDF - "
&$H$13&" "&TEXT($H$14,"YYYYMMDD")&".pdf" - Click the Run button.
The automation recipe now saves a version of the PDF file called Save PDF – South 20230831.pdf.
Stage 3: User input
Level: Beginner
Stage Overview
In this stage, we build on Stage 2:
- Add steps allowing users to select the Excel workbook to run the automation on
Steps #1
Firstly, let’s give users the power to select the file to run the automation on.
- In the Actions list, find the File Selection Get action.
- Select the first action in the automation recipe, then click the Insert Action button. File Selection Get should be added as the first action.
- Change the parameter text for the File Selection Get as follows:
Title:Select a file
Button Text:Select
Filter Description:Excel Workbooks
Filter Extensions:*.xlsx;*.xlsm
Default Folder:C:\Examples\Automation Toolkit\
File Name Element:Full
Return File Name:{This Workbook}
Return Sheet Name:{This Worksheet}
Return Cell:$H$11
Ensure the Default Folder is a valid folder on your PC.
In this stage we are using the pre-populated variables in H9, {This Workbook}; and H10, {This Worksheet}.
The File Selection Get action asks the user to select a file. Once they clicked Select, the Full file path is returned to cell H11 of the current recipe sheet {This Worksheet} in the workbook {This Worksheet}.
The Return Cell parameter requires a cell reference, so we have entered $H$11. Any absolute or mixed references are permitted, therefore H11, $H11, H$11, and $H$11 are all treated the same.
$H$11 is the cell for the Full File Path variable. There is an alternative method that uses variable names. Change, $H$11, to {Full File Path}\a to get the cell address of that variable (NOTE: \a is a switch to represent the address of the variable).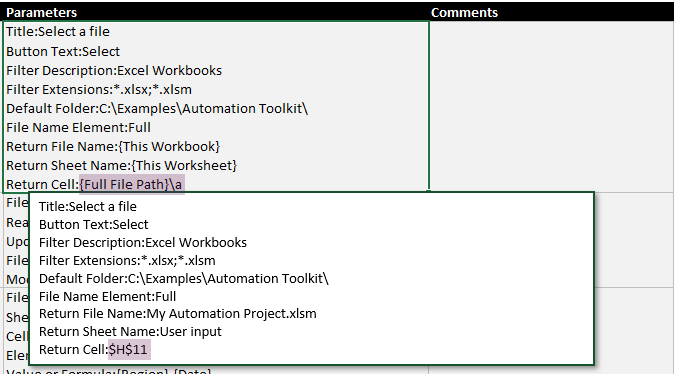
As shown above, {Full File Path}\a evaluates to the cell $H$11 - As the user can select any file, the File Name variable can no longer be a fixed value. This needs to be calculated based on the Full File Path variable. Enter the following formula in cell H12.
=MID(H11,FIND("*",SUBSTITUTE(H11,"\","*",LEN(H11)-LEN(SUBSTITUTE(H11,"\",""))))+1,LEN(H11))
This and other formulas for working with Automation Toolkit are available on the Useful Formulas reference page.
This formula works on all versions of Excel. For Excel 365 users, there are easier versions of this formula available.
Run the automation recipe
Ensure the Reporting Example.xlsx workbook PDF files are closed.
Click the Run button.
The file selector window opens.
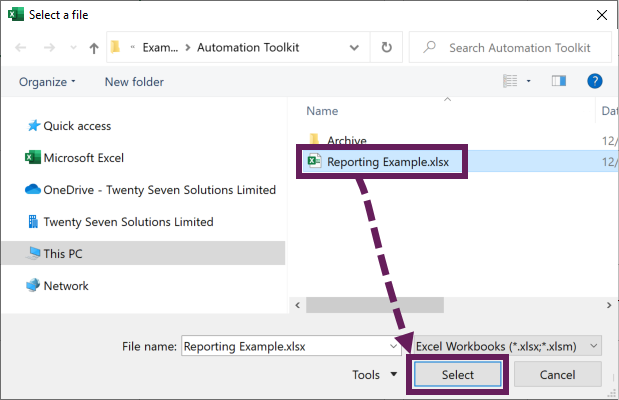
Navigate to the Reporting Example.xlsx workbook, then click the Select button.
The automation runs as before and saves the PDF for the selected file.
If the user clicks Cancel in the file selector, the automation starts, but returns FALSE to cell H11. This subsequently causes errors in the recipe. Let’s correct this in the next stage.
Stage 4: Controlling flow
Level: Beginner
Stage Overview
In this stage, we build on Stage 3:
- Add a check to stop the automation if a user clicks Cancel when selecting a file.
Steps
- Add an Automation Reference step to the end of the recipe. Set the parameter as follows:
Reference:jumpToEnd
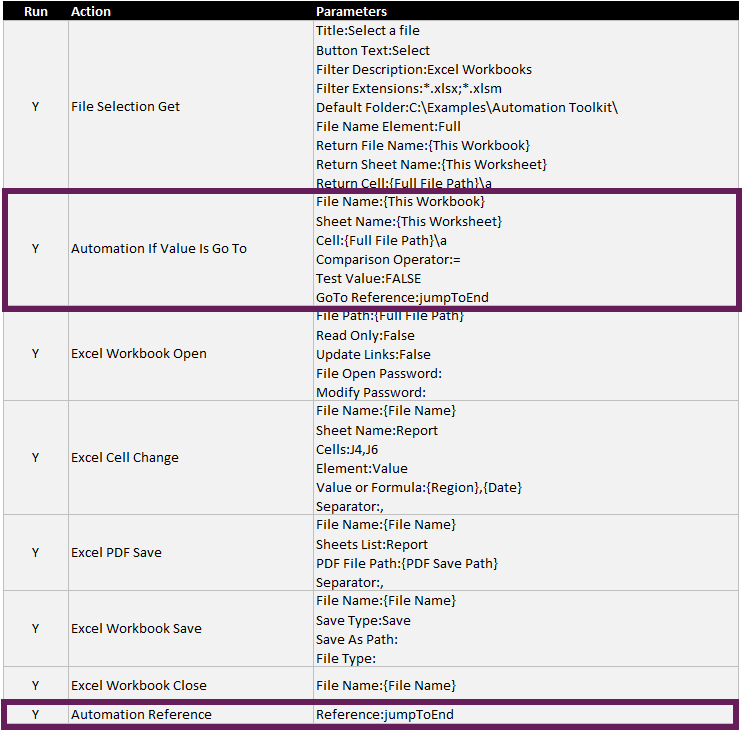
The purpose of this action will become clear after the next step. - Add an Automation If Value Is Go To step between the File Selection Get and Excel Workbook Open actions. Set the parameter formula as follows:
File Name:{This Workbook}
Sheet Name:{This Worksheet}
Cell:{Full File Path}\a
Comparison Operator:=
Test Value:FALSE
GoTo Reference:jumpToEnd
If a user clicks cancel on the file selection dialog box, FALSE is returned to cell Full File Path variable. Therefore, this action checks if the Full File Path is FALSE. If so, the automation jumps to the Automation Reference action with the reference of jumpToEnd. Otherwise, the automation recipe continues to the next step. - The entire recipe looks like this:
Run the automation recipe
Ensure the Reporting Example.xlsx workbook and PDF files are closed.
Click the Run button. Now, if a user clicks Cancel, the automation jumps to the end of the recipe and no action is taken.
Notes:
- The reference name used in Automation Reference and Automation If Value Is GoTo must be the same.
Stage 5: Looping
Level: Intermediate
Stage Overview
In this stage, we build on Stage 4:
- Add steps to allow the automation to loop through a list of all regions and prepare a PDF report for each.
Steps
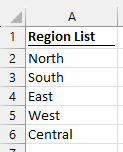
- Add a new worksheet to the My Automation Project.xlsm workbook called Lists.
- On the Lists worksheet, enter the following values into cells A1:A6:
- In the automation recipe, enter the following into the variables section:
G16:Total Count
H16:=ROWS(Lists!$A$2:$A$6)– this counts the number of regions (excluding the header row)
G17:Counter
H17:1
G18:Next Counter
H18:=$H$17+1 - We want the Region variable in Cell H13 to be based on the List tab and the Counter variable. Therefore, in cell H13 enter the following formula:
=INDEX(Lists!$A$2:$A$6,$H$17)
If Counter (cell H17) is 1, the first item from the region list is displayed, if Counter is 2, the second item is displayed, etc. - Between the Excel Workbook Open and Excel Cell Change actions, add an Automation Reference action with the following parameter formula:
Reference:loopBack - Between the Excel PDF Save and Excel Workbook Save actions, add an Automation If Value Is Go To action with the following:
File Name:{This Workbook}
Sheet Name:{This Worksheet}
Cell:{Counter}\a
Comparison Operator:<=
Test Value:{Total Counter}
GoTo Reference:loopBack
This action checks if the value in Counter is less than or equal to (<=) the Total Counter. If it is, the automation jumps back to the loopBack reference. If it is not, the automation continues to the next steps. - Currently, we have an infinite loop, because the Counter in cell H17 never changes. To fix that, we add an Excel Cell Change action between Excel PDF Save and the second Automation If Value Is Go To. The parameter text to use is:
File Name:{This Workbook}
Sheet Name:{This Worksheet}
Cells:{Counter}\a
Element:Value
Value or Formula:{Next Counter}
Separator:,
This action makes the Counter equal to Next Counter.
The recipe keeps jumping back to loopBack until Counter equals 6. At that point, Counter is greater than Total Counter, and the recipe continues to the next step. - We need to ensure Counter is set to 1 before the automation runs. To do this, insert an Excel Cell Change action at the top of the recipe with the following parameters:
File Name:{This Workbook}
Sheet Name:{This Worksheet}
Cells:{Counter}\a
Element:Value
Value or Formula:1
Separator:, - When the Counter equals 6 the loop ceases. However, this leaves a #REF! error in the Region variable and any dependent cells. This is not a problem for the recipe, but it can cause concern to some users. Therefore, to avoid this, duplicate the Excel Cell Change action created in step 8 above at the end of the recipe.
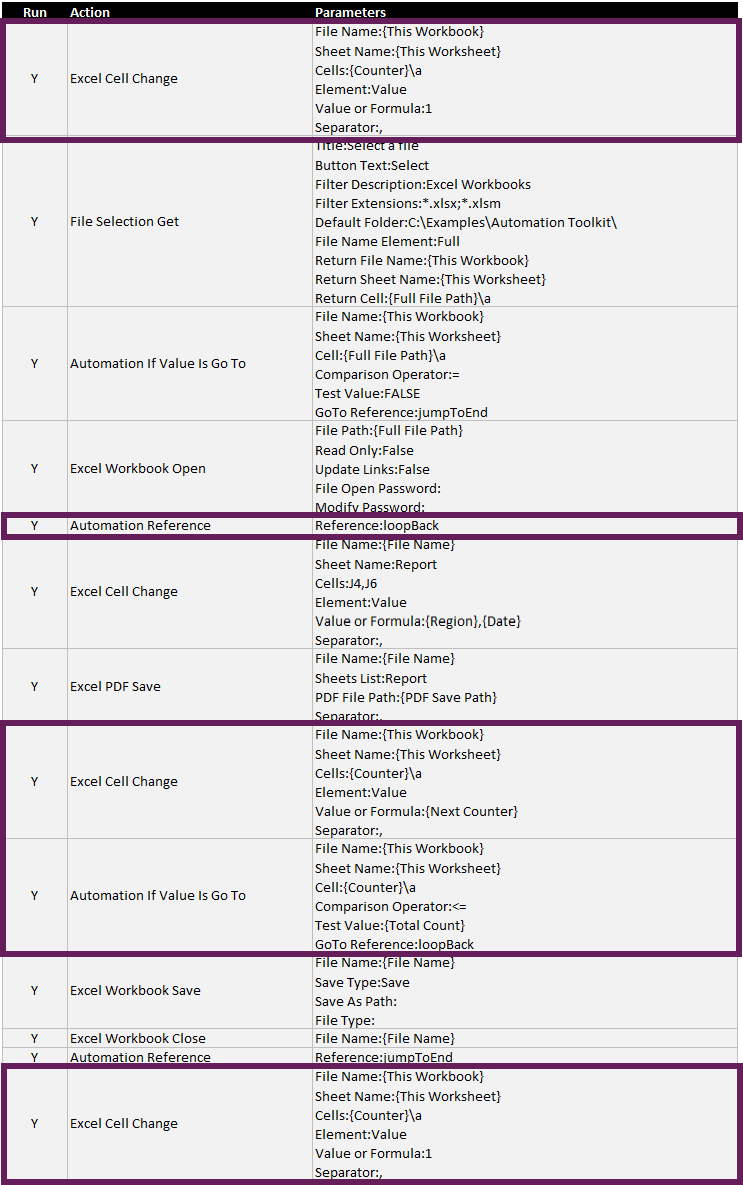
- The full automation recipe should look as follows:
Run the automation recipe
Ensure the Reporting Example.xlsx workbook and PDF files are closed.
Click the Run button.
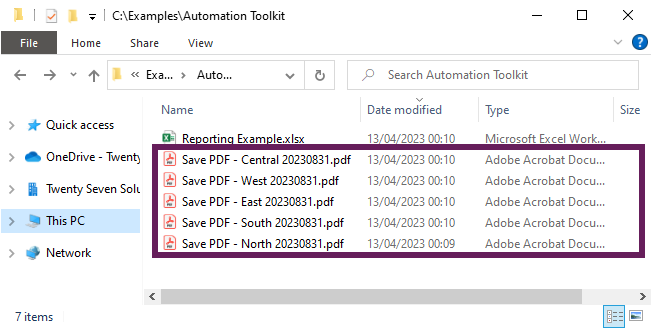
If everything is working correctly, one PDF is created for each region.
Stage 6: Run automation recipe from a button
Level: Advanced
Stage Overview
In this stage, we build on Stage 5:
- Execute the automation from a button on a worksheet, so we can hide the automation recipe worksheet.
Steps
- Add a new worksheet to the My Automation Project.xlsm workbook called Control
- Enter the following into the Control worksheet (REMEMBER: use your local date format)
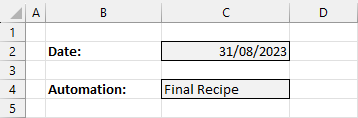
For this example, Final Recipe is the name of the worksheet which contains the automation recipe. - In the automation recipe, change the Date variable in cell H14 so it is:
=Control!$C$2
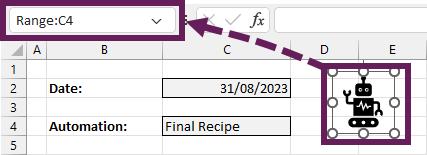
The date for the recipe is now set per the Control worksheet - Insert a shape or icon onto the face of the Control worksheet. I’ve selected a picture of a robot.
- In the Name Box, change the name of the shape to Range:C4, press Enter to commit the name. C4 is the cell that contains the name of the recipe sheet.
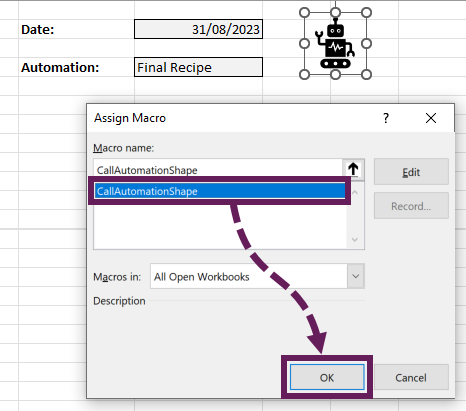
- Right-click on the shape, select Assign Macro… from the menu
- In the Assign Macro dialog box, select CallAutomationShape, then click OK.
- Finally, hide the recipe sheet
Run the automation recipe
Ensure the Reporting Example.xlsx workbook and PDF files are closed.
Click the shape to run the automation.
Now change the date in Cell C2 to 30 September 2023 (REMEMBER: use your local date format). Click the button again. This saves PDFs for all regions for the selected date.
NOTE:
- Running an automation recipe in this way does not trigger the run time message on completion. If you want a completion message, use the Input Message Display action at the end of your recipe.
TIP:
- If you have multiple automation recipes in one workbook, why not create a Data Validation list to select between them, then one button can run all the automations.
Next steps
This project was an introduction to get you started with the Automation Toolkit.
The toolkit contains many other actions for working with Files, Folders, Power Query, PivotTables, Slicers, PowerPoint etc. So, now it’s time to create some automation recipes for yourself.
Discover other articles: