The Automation Toolkit is a Low Code / No Code tool to help you automate the tasks you don’t want to do.
This article provides details of the main features and techniques to operate the tool.
Contents
- How to use the Automation Toolkit
- Working with objects
- Using dynamic values
- Other user interface features
- Running automation recipes from other triggers
- Known limitations
- Tips and tricks
How to use the Automation Toolkit
The Automation Toolkit is filled with pre-set actions that you can choose from and customize to your needs. Actions are placed one after another to build entire processes, known as an automation recipe.
Finding and adding actions
Automation recipes contain the list of individual actions necessary for automating a process.
To add an action to a recipe
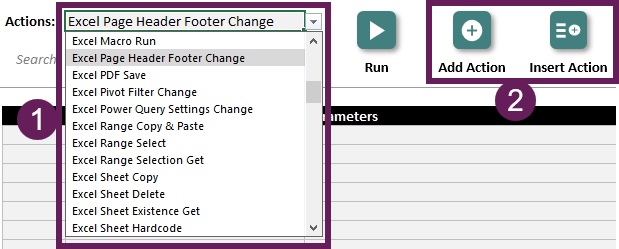
- Select an action from the Actions drop-down list.
- Click Add Action to add the action to the end of the existing recipe, or Insert Action to insert the action into the selected row of the recipe.
Understanding action parameters
You customize each action to your scenario by changing the action parameters.
Initially, parameters are pre-populated with example values relevant to that action. For example, as shown in the screenshot below, the Excel Workbook Close action has a single parameter called File Name, the example value is File Name.xlsx

If the workbook you want to close is called Reporting.xlsx, you only need to replace the example value of File Name.xlsx with Reporting.xlsx (see the Screenshot below).

The parameter name of File Name and the colon ( : ) must remain.
Do not include any spaces after the colon, unless the parameter you are entering specifically requires spaces.
Parameters with limited values
Some parameters have an almost infinite number of possible values (e.g. file names).
However, other parameters are restricted to a list of known items. For these parameters, the list of acceptable values is shown, with the pipe ( | ) symbol separating each option. For example, in the Excel Workbook Open action, the Read Only and Update Link parameters can only be True or False. Providing any other values results in an error. Therefore the example text for the parameter is True|False. You must change the text to include one of the valid options.

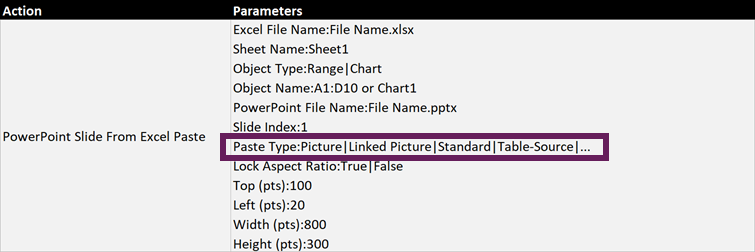
Where the list of acceptable parameters is long, three dots ( … ) are displayed in the example text. This indicates that a full list of acceptable values is available in the Actions Reference guide for that step.
For example, the PowerPoint Ojbect From Excel Paste action displays 4 acceptable values, followed by 3 dots. There are 8 possible values for this parameter. Look at the Action Reference guide to see all 8 options.
Optional parameters
Some actions do not require values for every parameter. In these situations, the text on that line, after the colon ( : ) can be removed. But the parameter name and colon must remain.
As an example, the Excel Workbook Save action only requires the Save As Path parameter when the Save Type is set as Save As or Save Copy. The Save action by default retains the existing file path and file type, therefore the Save As Path and File Type are not required and can be left blank.
Full details of the required parameters for each action are available in the Action Reference guide.
Building automation recipes
By creating a list of actions, you build automation recipes.
The following is a simple automation recipe.
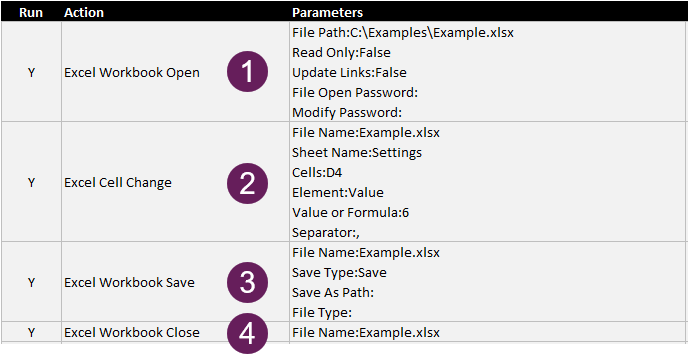
- The workbook in the C:\Examples\Example.xlsx file path opens. Read Only and Update Links are both set to False. There is no passwords for opening or modifying the workbook.
- The Value in cell D4 in the Settings tab of the Example.xlsx workbook changes to 6. Any existing values or formulas in cell D4 are overwritten.
- The Example.xlsx workbook saves the file in the existing location. There Save As Path and File Type are not required.
- The Example.xlsx workbook closes.
Running automation recipes
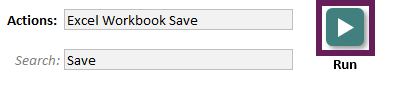
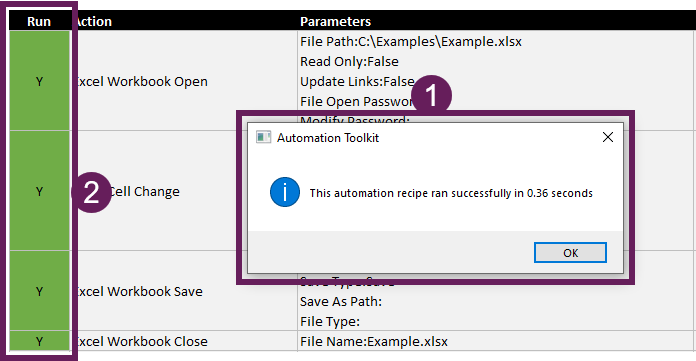
To execute the steps in the automation recipe, click the Run button.
After the successful completion of a recipe:
- The run time is displayed. NOTE: This can be turned off using the Automation Settings Change action.
- The Run column displays green for each successful action completed.
Action errors
When running an action, there are many errors that may occur due to invalid parameters.
In the screenshot below, the Excel Cell Change action has used a file name of My Workbook.xlsx. However, there is no open workbook with that name. Therefore an error occurs.
- An error message provides detail about the specific error.
- The Run column displays amber for the action causing the error. All subsequent actions in the recipe are not executed.

The Errors Reference guide provides details of error messages and how to resolve them.
Editing automation recipes
Existing automation recipes can be edited by:
- Adding, deleting, and moving actions
- Changing action parameters
- Toggling the Run status
- Adding comments
Adding, deleting, and moving actions
The buttons in the user interface provide the ability to add, delete and move actions within a recipe.
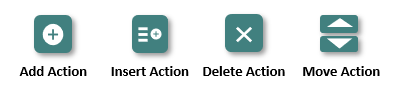
- Add action: Adds the action as the last action in the recipe
- Insert action: Inserts the action into the selected row. Any actions below the selection are moved down.
- Delete action: Removes the selected actions from the recipe
- Move up/down: Moves the selected actions earlier or later in the recipe
Changing action parameters
Automation parameters are created using text within cells. To edit any existing action step, you only need to change the parameter values for that step.
Parameter values are the text after the first colon ( : ) on each line. So to edit a step change the text after a colon, do not change the text before the colon.
Toggling the Run status
Each action step contains a toggle switch to turn specific actions on or off. Only actions where the Run column contains Y are executed.
NOTE: Turning an action off may cause errors or unwanted results in subsequent actions; this must be applied with care.
Comments
The Comments field provides space to add comments and descriptions for each action step.
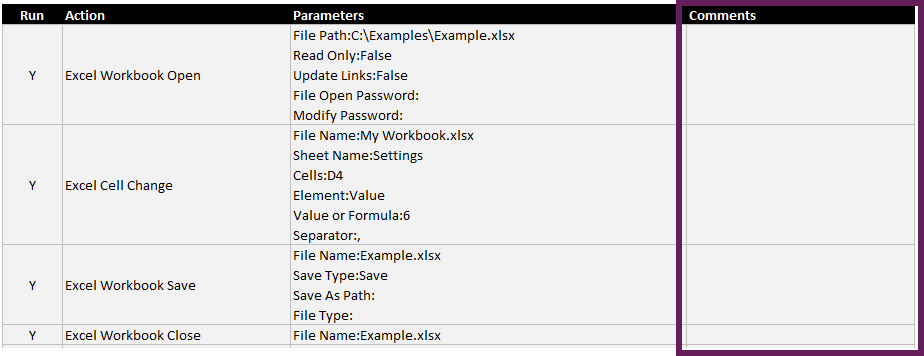
As automation recipes can become complex, comments provide a way to help you and others understand what is happening within the recipe.
Saving and sharing
Automation recipes are created inside Excel workbooks; therefore, they can be saved, copied, and shared like other Excel workbooks.
Working with objects
The Automation Toolkit is designed to work with objects. Knowing the names of those objects is essential for many actions. The names of objects are available in the following locations:
- Sheets: Sheet names are visible as tabs at the bottom. Names of hidden tabs are visible in the VBA editor.
- Named Ranges: Named ranges are visible in the Name Manager (Formulas > Name Manager), or by pressing F3 to display the Paste Names dialog box.
- PivotTables: Select a cell in the PivotTable, then click PivotTable Analyze > PivotTable Name
- Slicers: Select the slicer, then click Slicer > Slicer Settings. In the Slicer Settings dialog box find the section entitled Name to use in formulas
- Queries: Query names shown in Excel interface and the names used in the background differ slightly. The background names have Query – as a prefix. For example, a Sales Data query would be named Query – Sales Data. The Automation Tookit uses the background names. Therefore ensure queries names have the Query – prefix.
- PowerPoint Shapes: In PowerPoint, select the object. Then, click Shape Format > Selection Pane to display the names of the shapes on the slide.
Using dynamic values
This section covers the use of variables and formulas to make parameters easier to manage.
Essential parameter elements
Various elements of the parameter text are required for the Automation Toolkit to operate correctly. These include:
- Line breaks: Used to identify the end of each parameter. For advanced users, this can be modified using the Automation Settings Change action.
- First colon in each parameter: Used to separate the parameter name from the value. The first colon ( : ) is essential for the recipe to know where a value begins.
- Parameter order: The order of parameters for each action must remain as provided. Changing parameter order, or removing parameters will prevent actions from running.
Using variables within parameters
The interface includes an area designed specifically for holding variables. Using these variables inside the parameter text provides more flexibility when building recipes.
To create variables, you need to enter the name in the Variable Name column, then the value in the Variable Value column. In the screenshot below a variable called My File Path has been created with the value C:\Examples\Automation Toolkit\Reporting Example.xlsx.
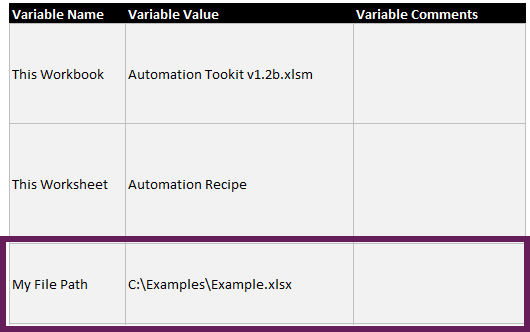
Use variables within parameters by entering the Variable Name surrounded by curly brackets. As shown below, the My File Path variable becomes {My File Path} when used inside the parameter.
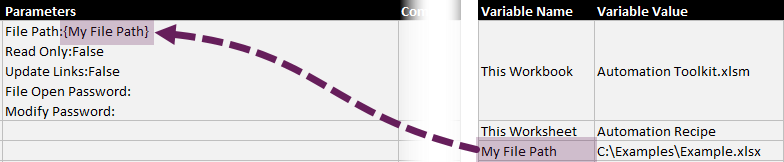
When the automation recipe runs, the variable name in the parameter is replaced with the variable value.
Using cell references as variables
Many actions include parameters that require cell references. In the example below, we are referencing cell H11 of the recipe.
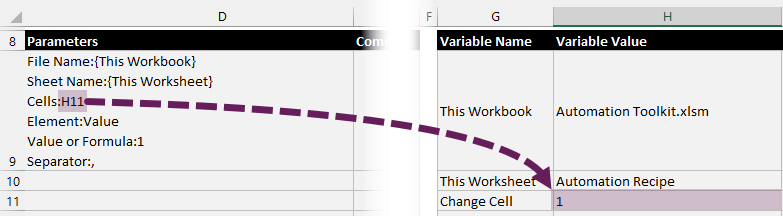
Any absolute or mixed references are permitted in these parameters; i.e., H11, $H$11, $H11, and H$11 are all valid cell references.
Alternatively, if the parameter requires a cell reference, we can use the variable name, followed by \a as way of providing the cell reference. In the example below {Cell Value}\a is equivalent to entering H11.
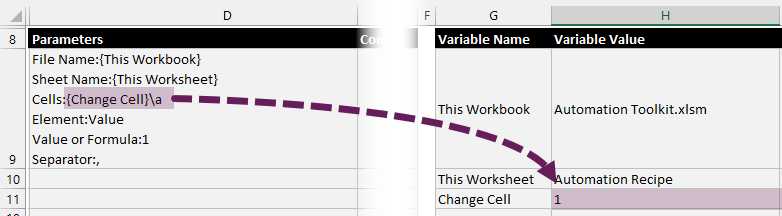
The \a syntax only works with cell references.
- {VariabeName} reads the value from a variable
- {VariableName}\a reads the cell address of the variable
Pre-populated variables
Two variables exist in the default template: This Workbook (cell H9) and This Worksheet cell H10). These are not essential for the tool to operate but are provided as useful variables. They can be edited or removed if required.
This Workbook: Provides the name of the workbook containing the current recipe. This is calculated using the following formula:
=MID(CELL("filename",A1),FIND("[",CELL("filename",A1))+1,FIND("]", CELL("filename",A1))-FIND("[",CELL("filename",A1))-1)This Worksheet: Provides the name of the worksheet containing the current recipe. The is calculated using on the following formula
=RIGHT(CELL("filename",A1),LEN(CELL("filename",A1))-FIND("]",CELL("filename",A1)))NOTE: These parameters display as #VALUE! if the workbook has not yet been saved.
Using formulas/functions within parameters or variables
The parameters and variables are standard cell values. Therefore, we can use Excel formulas and functions within those cell values. Using formulas in this way creates dynamic action parameters and dynamic variables.
See Getting Started guide stage 5 for an example of using a formula inside a variable.
Other user interface features
The following describes the other features of the Automation Toolkit interface.
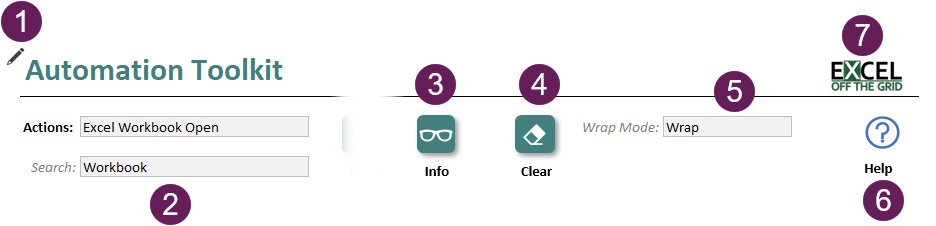
Pencil icon / renaming the automation [1]
Click the pencil icon to edit the heading in Cell B1
Search [2]
There are a lot of actions contained within the Automation Toolkit. Use the search box to find actions faster.
The actions list displays only the actions containing the text in the search box. You do not need to enter whole words, any partial text strings are also matched.
Info [3]
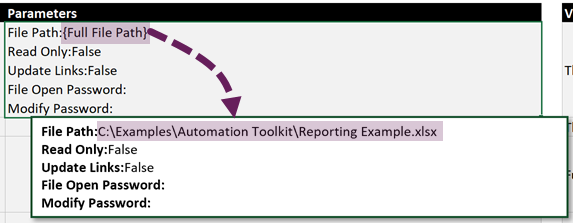
When using variables within parameter text, click the Info button to display the evaluated full text with the variable value.
Use this to help troubleshoot recipes or to confirm parameters are displaying the correct result before running the automation.
The following is an example where the {Full File Path} variable has been evaluated to a full file path.
Clear [4]
Clears the automation recipe and variables sections; reinstating the pre-populated formulas in H9 and H10.
Wrap mode [5]
Control how actions are displayed with three wrap modes:
- Wrap: The automation recipe and variables are always wrapped
- Responsive: Only the action step and variable for the selected rows are wrapped
- None: No text wrapping occurs
NOTE: Text wrapping is a visual format. When not wrapped, the line break character is still the default parameter separator, but this may not be visible in the cell.
Help button [6]
The Help button provides a link to the Automation Toolkit help pages (https://exceloffthegrid.com/automation-toolkit-help/)
Excel Off The Grid website [7]
Click the Excel Off The Grid logo to visit the website and discover the latest blog posts and information (https://exceloffthegrid.com)
Running automation recipes from other triggers
Along with the Run button, automation recipes can be started from other triggers:
- Assigning a macro to shape on another worksheet
- Creating a custom ribbon built using the Ribbon worksheet in the Automation Toolkit workbook
- Running a macro from a separate workbook
- Using the Run Macro action within Power Automate Desktop
Examples of these methods are included in the How To… guide
Known limitations
Excel is a vast tool, with many features not compatible with the Automation Toolkit. Sufficient testing should always be undertaken to ensure recipes work as expected.
The following are known limitations.
Excel AutoComplete
By default, Excel tries to complete text entries if the first letters match an existing value in the column. Therefore, take care to ensure this does not change the cell parameters to unexpected values.
SharePoint/OneDrive syncing
The Automation Toolkit works well with files saved locally and on network drives. Files saved on SharePoint or OneDrive may cause issues. The Automation Toolkit may execute faster than file syncing to OneDrive or SharePoint. For example, when a file name changes, the previous file name may persist for seconds or minutes until the file is synced with the SharePoint/OneDrive server.
SharePoint/OneDrive AutoSave
Files synced with OneDrive and SharePoint are likely to have the AutoSave feature enabled. This may cause changes to be saved inadvertently. To prevent changes impacting existing workbooks, either:
- Open Workbooks as read-only if changes are not expected to be saved
- Use the File Copy action to create a copy of a file before working on the copied version.
Tips and tricks
The following tips and tricks will help you to get the most out of the Automation Toolkit and avoid errors.
- Build recipes assuming the required workbooks are closed, and ensure workbooks are closed prior to running an automation recipe. This reduces errors and ensures recipes are executed against the correct workbook.
- There is no action for creating workbooks, presentations or documents. Instead, have a blank version saved, then use the File Copy action to copy the blank file.
- Create multiple recipes in one workbook by copying an existing recipe worksheet.
- Use the Info button to help troubleshoot recipe errors and confirm the parameters are displaying the correct result before running the automation.
- Toggle actions on and off to ensure the actions up to the stop point are working as expected.
- Use variable names that are clear and easy to remember.
- Use the comment fields to provide reminders and descriptions about each step or variable.
Discover other articles: