Most Excel users love keyboard shortcuts; they help us perform tasks faster. Constantly switching between the mouse and keyboard adds a few minutes to our work day. So, if we want to make the most of this, wouldn’t it be great to create our own keyboard shortcuts for common tasks we perform? Well… we can.
This post looks at 5 methods for creating your own keyboard shortcuts in Excel.
Table of Contents
Watch the video
QAT
The Quick Access Toolbar (QAT) is a small section of the screen that holds easy to access commands.
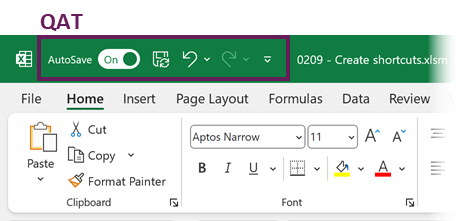
By default, the QAT starts with AutoSave, Save, Undo, and Redo. But we are not restricted to these; we can add our own icons too.
To change the commands in the QAT, click the down arrow to the right of the icons.
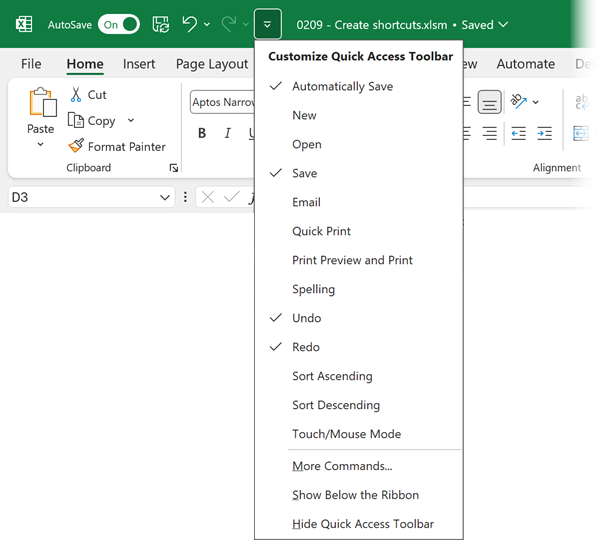
A menu appears, showing some common commands (e.g. New, Open, Email, etc.). Clicking any of these will add them to the QAT.
This short list of commands is just the beginning. Click More Commands… to open the Excel Options dialog box.
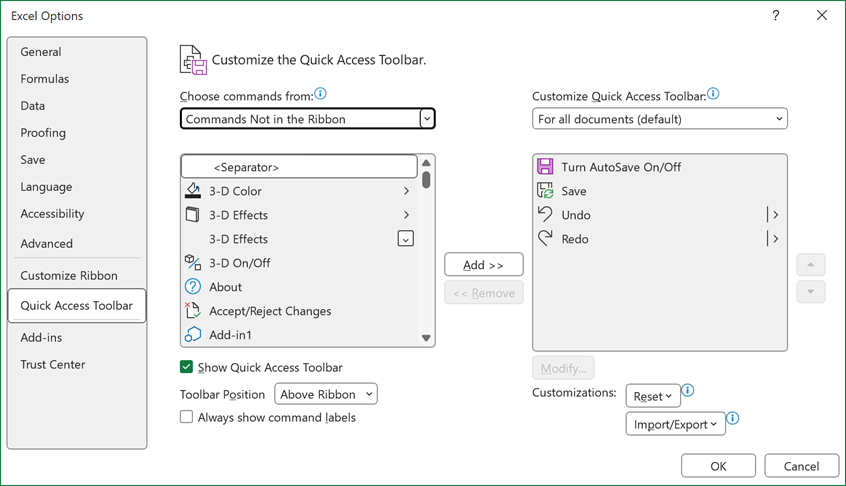
The current QAT icons are in the box on the right. The list of available commands are in the box on the left.
Click the choose commands from dropdown to change the list of available items. Some useful lists are:
- All commands – contains every possible command
- Commands Not in the Ribbon – the buttons not already available in the ribbon
- Macros – the Macros currently available in open workbooks (including Personal Macro Workbook)
When you find the item you wish to add to the QAT, select it, then click Add >>
Add all the icons you want..
At the top of the commands list is the <Separator>; add this to insert a line between icons. This helps to group similar icons together.
To remove any commands, select the icon in the right box, then click << Remove.
Once finished, click OK to close the Excel Options dialog box.
PRO TIP #1:
Above the right box there is a dropdown list. The default option is for all documents (default). This creates a QAT for your Excel application; it is available to all workbooks.
However, clicking the dropdown reveals a list of open workbooks. This allows us to create a QAT specific to a workbook.
PRO TIP #2:
To send your QAT to a colleague, click the Import/Export button, then Export all customizations.
Save the .exportedUI file and send it to your colleague.
They can use the Import/Export button to import customizations file.
The icons appear in the QAT. We can click them as icons. However, Excel also provides each QAT icon with its own shortcut.
Press the ALT key, the next shortcut key is revealed

These shortcuts are based on position:
- ALT, 1 is the shortcut for the first button,
- ALT, 2 is the shortcut for the second button,
- etc.
Therefore, if you change your QAT, the keyboard shortcuts will change.
Ribbon
In the previous section, we added icons to the QAT. We can do the same to the Ribbon.
Click File > Options > Customize Ribbon to open the ribbon settings in the Excel Options dialog box.
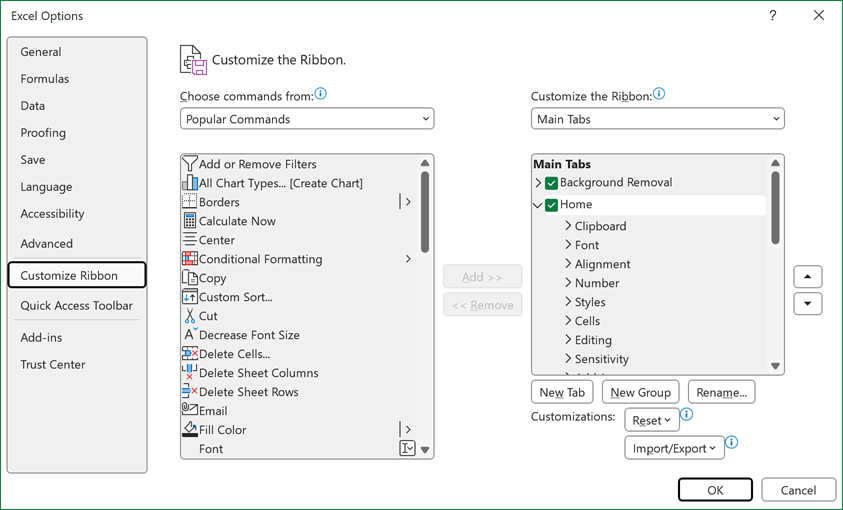
The right box displays the current ribbon structure. In here, we can click into any tab and add our own icons.
Clicking New Tab creates a new Tab on the Ribbon. The default name will be New Tab. To rename the tab, select the tab name and click Rename…, then provide a meaningful name.
Within a tab, we add groups by clicking the New Group button. Again, we can use Rename… to provide a name.
Once we have a group, we can select a command from the left box, then click Add >> to add it to the ribbon.
In the screenshot below, it shows I have new tab called My Ribbon, with a group called Favourites and it contains a single button.
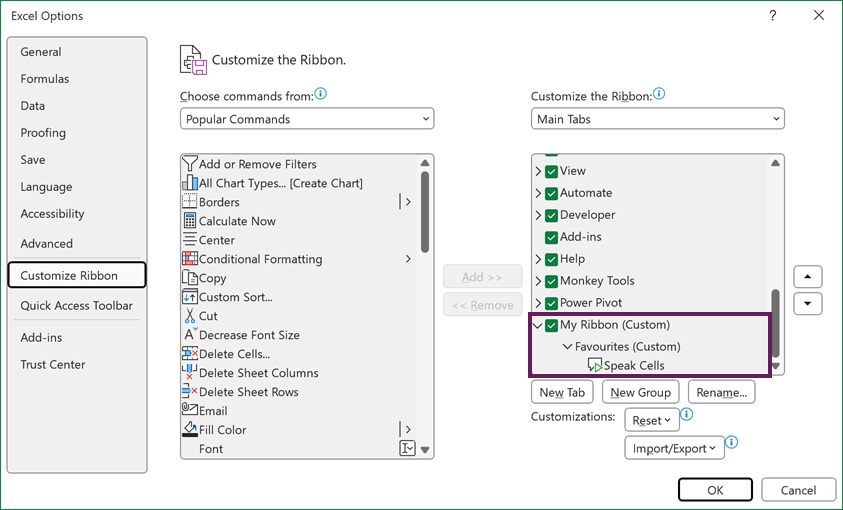
Once complete, click OK to close the Excel Options dialog box.
Pressing ALT reveals the shortcut to navigate through the menu.

For example, to use the Speak Cells button we created above, the shortcut would be Alt, Y4, P.
Record VBA Macro
Another option for creating keyboard shortcuts in Excel is to use a macro.
Click View > Macros (dropdown) > Record Macro…
The Record Macros dialog box appears.
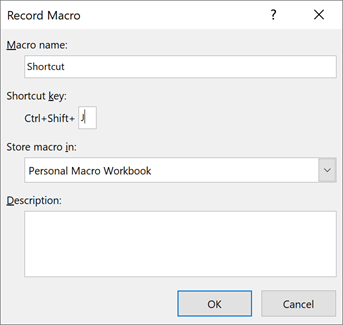
Give the macro a name and provide the shortcut keys you wish to use (In the screenshot above, I used Ctrl + Shift + J).
All shortcuts created using this method must start with Ctrl. We can also hold the Shift key to create Ctrl + Shift shortcuts.
The store macro in dropdown list is important.
- This Workbook or New Workbook – shortcut travels with the workbook.
- Personal Macro Workbook – shortcut is created in a workbook on your PC and only works for you.
NOTE: The Personal Macro Workbook always opens when we open the Excel application. Therefore, it will always be available to you.
Click OK when ready.
Now, record the actions you wish the shortcut to perform.
Once complete click View > Macros (dropdown) > Stop Recording.
Pressing the shortcut (Ctrl + Shift + J in our example) re-performs the actions.
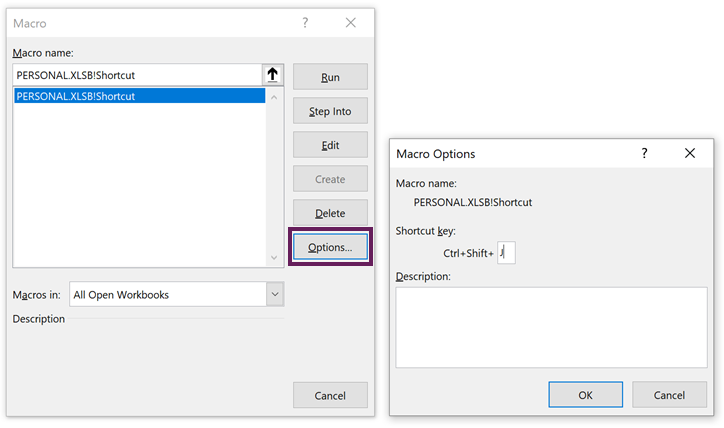
To edit the macro, click View > Macros (dropdown) > View Macros…
In the Macro dialog box, the most useful buttons for our purpose are:
- Edit – Allows us to edit the recorded code
- Delete – Removes the shortcut key
- Options – Allows us to re-assign the action to a different shortcut or assign a shortcut to an existing macro.
WARNING
The shortcut we create supersedes any existing shortcuts. So, take care when deciding which key combination to use.
Application.OnKey
In the example above, we recorded a macro and assigned a keyboard shortcut.
However, we have greater flexibility when we write the VBA code ourselves.
Press ALT + F11 to open the Visual Basic Editor.
Double-click the ThisWorkbook object for the workbook in which we want to create the keyboard shortcut.
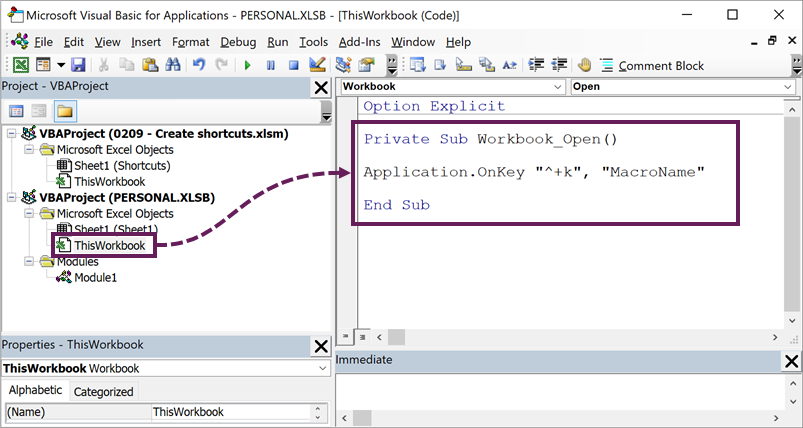
Note: PERSONAL.XLSB is our Personal Macro Workbook, the shortcuts created in here are always available to us.
To assign the shortcut to an existing macro, enter the following VBA code into the ThisWorkbook module.
Private Sub Workbook_Open()

Application.OnKey "^+k", "MacroName"

End Sub
When the workbook opens, the macro runs and creates a shortcut key for Ctrl + Shift +K, which runs a macro called MacroName.
In the example above, ^ and + may seem odd. However, these represent Ctrl and Shift. Each special key has a specific format. Find out all the options here: https://learn.microsoft.com/en-us/office/vba/api/excel.application.onkey
This method provides the most flexibility as we can create shortcuts with Alt, Ctrl, Shift, and any special keys, such as F2 or Page Down.
We can add as many keyboard shortcuts in the workbook_open event as we need.
AutoCorrect
The final method applies to text we enter into cells.
Let’s suggest we are always entering our company name into a cell. Instead of typing the full name, we can allocate a shortcut which inserts the text.
This makes use of the Office AutoCorrect feature. As a result, this also applies in Word, PowerPoint, Outlook, etc.
Click File > Options > Proofing > AutoCorrect Options…
The AutoCorrect dialog box appears.
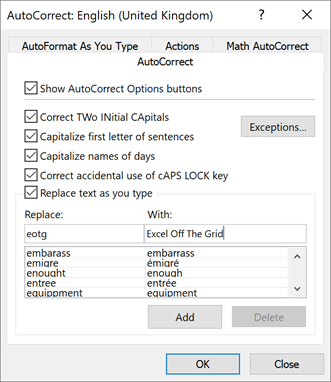
In the Replace box enter the text we will use as the shortcut. In the With box, enter the text we wish to display. In the example above, eotg is replaced with Excel Off The Grid.
Click Add to include the word in the AutoCorrect dictionary. Click OK to close the dialog box.
Any time we enter the text eotg it will change to Excel Off The Grid.
While this is not a full shortcut method, it is very useful to enter common pieces of text very quickly.
Conclusion
In this post, we have seen 5 ways to create shortcut keys in Excel. They can be individual commands that already exist in Excel, our own custom macros, or even text AutoCorrect.
Using these methods, we can customize Excel to work how we want, meaning we work faster and more efficiently.
Related Posts
- 8 quick ways to open a new instance of Excel (+1 hard way)
- Useful VBA codes for Excel (30 example macros + Free ebook)
- Using Custom Lists in Excel
Discover how you can automate your work with our Excel courses and tools.

Excel Academy
The complete program for saving time by automating Excel.

Excel Automation Secrets
Discover the 7-step framework for automating Excel.
Office Scripts: Automate Excel Everywhere
Start using Office Scripts and Power Automate to automate Excel in new ways.